

Why This Homemade Mac and Cheese Works
The first time I tried to make homemade mac and cheese from scratch, I cried. Seriously. It was a lumpy, greasy cheese mess that looked nothing like the creamy bowl I’d dreamed about. I’d used pre-shredded cheese, cranked the heat too high, and ended up with something that belonged in the trash.
But here’s the thing I was determined to figure it out. And after a lot of trial and error (and a few more sad bowls), I finally nailed it. This homemade mac and cheese recipe is the result of all those lessons. It’s creamy, it’s cheesy, and it’s surprisingly simple once you know a few tricks.
What makes it work? A few key things. First, you shred your own cheese block cheese melts so much smoother than the bagged stuff. Second, you build a proper roux, which gives the sauce that velvety texture. And third, you layer the cheese into the sauce gently so it stays silky. No graininess, no clumps, just pure comfort food perfection.
This mac and cheese recipe works for busy weeknights when you need something fast, but it’s also fancy enough for holiday dinners or summer BBQs. And honestly? It reheats like a dream, which is a total win for leftovers.
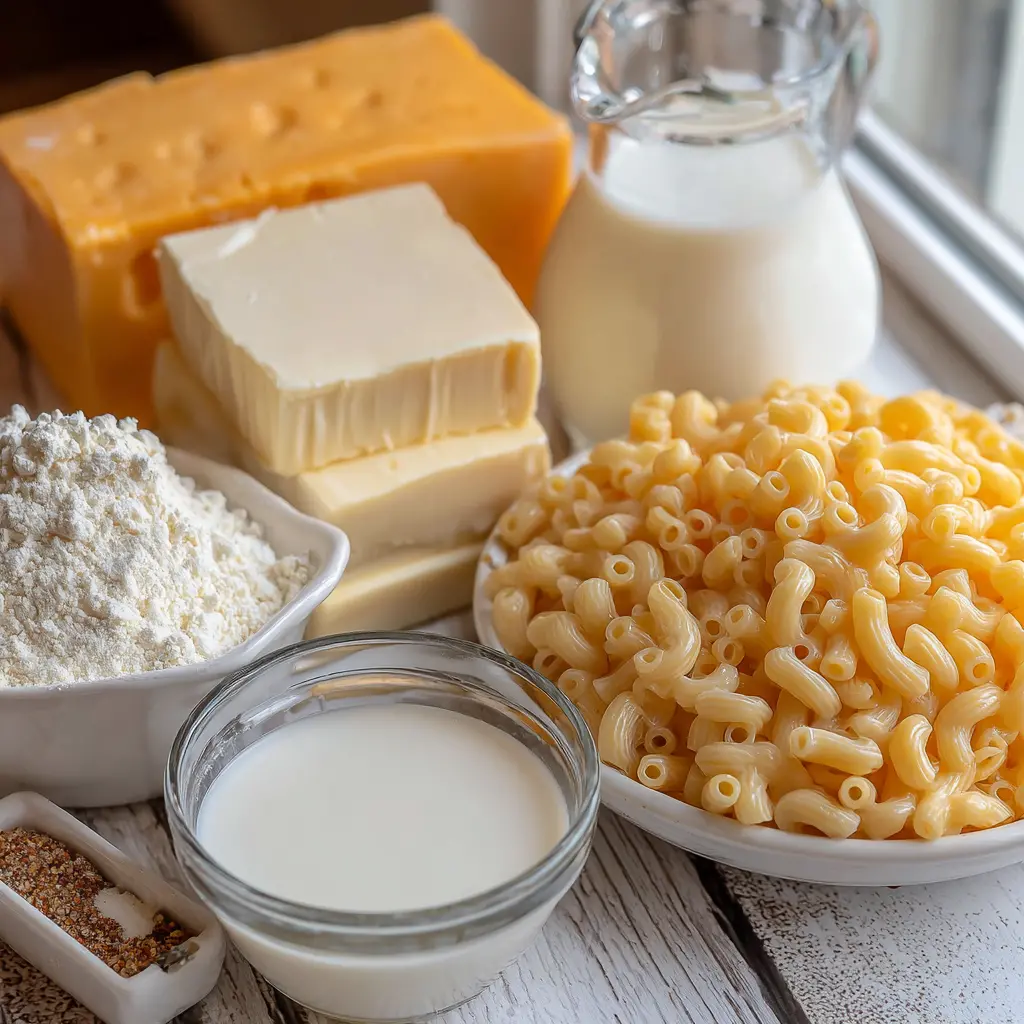
Ingredients You’ll Need
You probably have most of these in your kitchen already. That’s the beauty of this no exotic ingredients, just real food.
- Short pasta Elbow macaroni is classic, but cavatappi or shells work great too. The little curves catch all that cheese sauce.
- Sharp cheddar cheese Two kinds here. Yellow sharp cheddar for that familiar orange color and tangy flavor. Sharp white cheddar for extra depth and creaminess.
- Unsalted butter The base of your roux. Don’t substitute margarine; butter gives the best flavor and texture.
- All-purpose flour Thickens the sauce. Simple pantry staple.
- Whole milk Full fat is key here. It makes the sauce rich and luxurious. You can use 2% in a pinch, but whole milk is worth it.
- Salt, black pepper, paprika, garlic powder Simple seasonings that punch up the flavor without overwhelming the cheese.
That’s it. No cream cheese, no Velveeta, no weird processed stuff. Just real ingredients that come together into something magical.
Best Cheese for Mac and Cheese
Let’s talk cheese for a second, because this is where most homemade mac and cheese goes wrong. The best cheese for mac and cheese needs to melt well AND have good flavor.
Sharp cheddar is my go-to. It has that classic cheddar tang that cuts through the richness. But I like to mix it with sharp white cheddar for a more complex flavor. The white cheddar is slightly nuttier and adds a creaminess that yellow cheddar alone doesn’t quite hit.
Here’s the big rule: always shred your own cheese from a block. Pre-shredded cheese has anti-caking agents like potato starch and cellulose that stop it from melting smoothly. You’ll end up with a grainy, clumpy sauce. I learned this the hard way, trust me.
If you want to get fancy, you can swap half the cheddar for Gruyère or Monterey Jack. Gruyère adds a nutty, slightly sweet flavor that’s incredible. Jack cheese makes things extra creamy. But honestly? The two-cheddar combo is perfect for everyday.
Cheese Tip
Pro tip: Let your shredded cheese come to room temperature before adding it to the sauce. Cold cheese can shock the sauce and cause graininess. Just leave it on the counter while you prep everything else.
Step-by-Step Instructions
Alright, let’s get cooking. This homemade mac and cheese comes together in about 40 minutes, and most of that is hands-off baking time.
Stage 1: Prep and Pasta
Butter a 9×13-inch baking dish and preheat your oven to 375°F. Bring a large pot of salted water to a boil it should taste like the sea. Cook your pasta until al dente, which is about 1 minute less than the package directions. It’ll finish cooking in the oven, so you don’t want it mushy. Drain well and return it to the pot.

Stage 2: Make the Roux
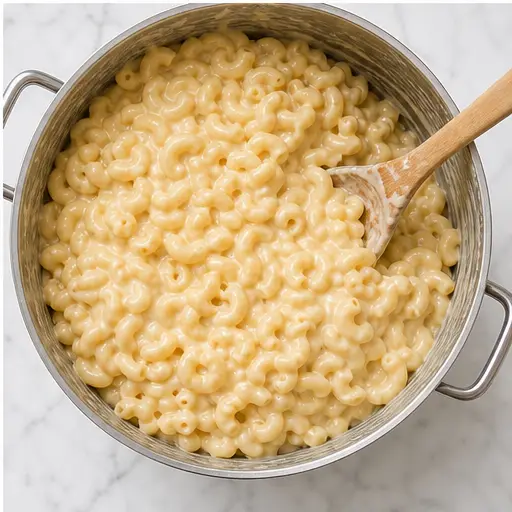
While the pasta cooks, melt the butter in a medium saucepan over medium heat. Whisk in the flour and cook for 1 to 2 minutes, stirring constantly. You’re looking for a light golden color this is your roux. It should smell a little toasty, like pie crust. Slowly whisk in the milk, a little at a time, and keep stirring. The sauce will thicken in about 5 minutes. Don’t walk away; you want to whisk continuously.

Stage 3: Build the Cheese Sauce
Remove the saucepan from the heat. Whisk in the salt, pepper, paprika, and garlic powder. Now, gradually stir in half of your shredded cheese mixture about 2 cups total. Stir gently until it’s melted and smooth. The sauce should be thick and glossy. If it looks a little thin, don’t panic; it will thicken as it bakes. Pour this cheese sauce over the cooked pasta and stir until every piece is coated.

Stage 4: Layer and Bake
Spoon half the pasta mixture into the prepared dish. Sprinkle with about one-third of the remaining cheese. Top with the rest of the pasta, then scatter the remaining cheese evenly over the top. Bake uncovered for 15 to 20 minutes, until hot, bubbly, and the cheese on top is melted and lightly golden. For an extra crispy top, broil for the last 1 to 2 minutes but watch it closely so it doesn’t burn.
How to Avoid Grainy Cheese Sauce
Grainy sauce is the number one complaint I hear about homemade mac and cheese. And it’s almost always caused by one of these mistakes.
- Using pre-shredded cheese We covered this. Shred your own. It’s non-negotiable for a smooth sauce.
- Overheating the sauce Once you add the cheese, remove the pan from the heat. High heat makes the proteins seize up and turn grainy.
- Adding cheese too quickly Add it gradually, stirring constantly. Dumping it all in at once can cause clumping.
- Using cold cheese Room temperature cheese melts more evenly. Cold cheese can shock the warm sauce.
- Over-stirring after cheese melts Once the cheese is incorporated, stop stirring. Overworking the sauce can make it separate.
If your sauce does get a little grainy, don’t throw it out. Sometimes whisking in a splash of cold milk can help smooth it out. It won’t be perfect, but it’ll still taste great.

Variations and Add-Ins
Once you’ve mastered the basic mac and cheese recipe, you can play around with it. Here are some of my favorite ways to change things up.
- Stovetop version Skip the baking. Cook the pasta to al dente, use a bit more cheese (about 3 to 3.5 cups total), and skip the layering. Stir everything together and serve immediately. Perfect for hot summer days when you don’t want the oven on.
- Crunchy topping Mix panko breadcrumbs with melted butter and sprinkle over the top before baking. Or use crushed Ritz crackers for a buttery, salty crunch.
- Add vegetables Stir in steamed broccoli florets, peas, or sautéed mushrooms before baking. It adds color and makes it a one-dish meal.
- Spice it up Add a pinch of cayenne pepper or a few dashes of hot sauce to the cheese sauce. A little heat pairs beautifully with the creamy cheddar.
- Different cheeses Swap half the cheddar for smoked Gouda, Gruyère, or even a little Brie (rind removed). Each one brings a unique flavor.
- Protein boost Stir in cooked, shredded chicken or leftover holiday turkey. For a seafood twist, fold in cooked lobster meat lobster mac and cheese is a showstopper.
These are just starting points. The beauty of this recipe is that it’s a blank canvas. Use what you have on hand and make it your own.
Storage and Reheating Tips
This homemade mac and cheese makes great leftovers if you have any left, that is. Here’s how to store and reheat it so it stays creamy.
Storing leftovers: Transfer to an airtight container and refrigerate for up to 4 days. The sauce will thicken as it sits, but that’s normal.
Reheating: The key to reviving leftover mac and cheese is adding a splash of milk. Stir in 1 to 2 tablespoons of milk before reheating to restore that creamy texture. You can reheat in the microwave in 30-second bursts, stirring between each, or in the oven at 350°F for about 15 minutes, covered with foil.
Freezing: Yes, you can freeze it! For best results, assemble the dish but don’t bake it. Cool it completely, wrap tightly in plastic wrap and foil, and freeze for up to 3 months. To bake from frozen, remove the wrapping and bake at 350°F for 70 to 80 minutes, until hot and bubbly. If thawed first (in the fridge overnight), cover with foil and bake at 325°F for about 20 minutes.
One tip: if the sauce seems too thick after reheating, just stir in a little more milk. It’ll loosen right up.
Frequently Asked Questions
I hope this homemade mac and cheese becomes a staple in your kitchen like it is in mine. It’s one of those recipes that feels both nostalgic and special at the same time. Whether you’re making it for a quick weeknight dinner or bringing it to a summer potluck, it always gets rave reviews.
If you try it, I’d love to hear how it turned out! Drop a comment below or tag me in your photos. And if you’re looking for more comfort food inspiration, check out my Pinterest board for more creamy, cheesy recipes.

Ultimate Creamy Homemade Mac and Cheese
Ingredients
Method
- Butter a 9x13-inch baking dish or spray with cooking spray. Preheat your oven to 375°F.
- Bring a large pot of salted water to a boil and cook the pasta until al dente according to package directions. Drain well and return to the pot.
- While the pasta cooks, mix the shredded cheddar and white cheddar together in a bowl.
- In a medium saucepan over medium heat, melt the butter. Whisk in the flour and cook, stirring constantly, until lightly golden, about 1 to 2 minutes. Slowly whisk in the milk and continue cooking, stirring often, until the sauce thickens, about 5 minutes. Remove from heat.
- Whisk in the salt, pepper, paprika, and garlic powder. Then gradually stir in half of the cheese mixture until melted and smooth. Pour this cheese sauce over the cooked pasta and stir until well combined.
- Spoon half of the pasta mixture into the prepared baking dish. Sprinkle with about one-third of the remaining cheese. Top with the rest of the pasta, then scatter the remaining cheese evenly over the top.
- Bake uncovered for 15 to 20 minutes, until hot, bubbly, and the cheese on top is melted and lightly golden.
Nutrition
Notes
Tried this recipe?
Let us know how it was!Source: Health & Nutrition Research


