
Rich Vanilla Caramel Layer Cake
Ingredients
Method
- Preheat oven to 350°F (175°C). Grease and flour two 8-inch round cake pans, then line the bottoms with parchment paper. Set aside. In a medium mixing bowl, cream butter and sugar until light and fluffy. Beat in eggs one at a time, then continue mixing on high speed for about 3 minutes until the mixture becomes pale and airy. Stir in vanilla extract or paste. In a separate bowl, whisk together flour, baking powder, and salt. Add dry ingredients to the creamed mixture in three additions, alternating with milk and beginning and ending with the dry mixture. Mix until just combined, being careful not to overbeat. Evenly divide batter between the prepared pans and smooth the tops with a spoon or spatula. Bake for 30 to 40 minutes, or until a toothpick inserted into the center comes out clean. Let cakes cool in pans for 5–10 minutes, then turn them out onto a wire rack to cool completely.
- For the frosting, beat softened butter until smooth and fluffy. Gradually add powdered sugar, one cup at a time, and mix until fully incorporated. Add ⅓ cup of cooled caramel sauce and beat again until light and fluffy. If the frosting appears too thick, add 1 to 2 tablespoons of cream or milk to adjust consistency.
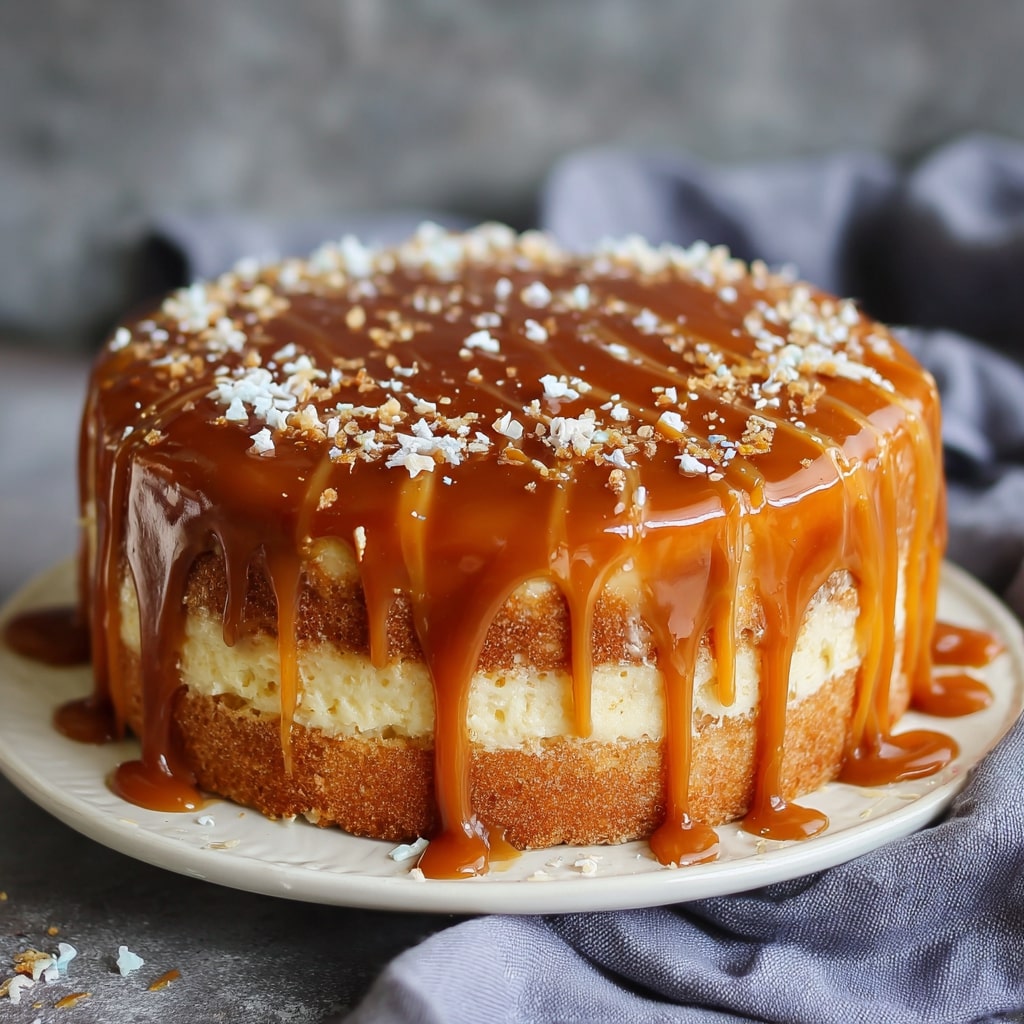
- To assemble the cake, place one cake layer on a serving plate or cake stand. Use a fork to gently poke holes across the cake's surface. Carefully pour about ⅓ cup of caramel sauce over the top, allowing it to seep into the holes. Spread a thick layer of frosting over the caramel-soaked layer. Add the second cake layer on top, with the flattest side facing up. Repeat the process: poke holes, drizzle with remaining caramel sauce, and spread on frosting. For an extra touch, sprinkle flaky sea salt over the top if desired.
Nutrition
Notes
Tried this recipe?
Let us know how it was!Why You’ll Love This Vanilla Caramel Cream Cake
You know when you see a gorgeous layered cake and think, “That’s way above my pay grade”? I thought that too until I cracked the code. This Vanilla Caramel Cream Cake looks like it belongs in a Beverly Hills bakery window, but honestly, it’s one of the most forgiving cakes I’ve ever made. It’s got that soft, tender crumb, a rich vanilla flavor that hits you right away, and a caramel that’s silky and not too sweet. The cream filling is stable enough to stack high without sliding all over the place. I’ve had plenty of cake disasters, so I built this recipe to avoid every single one of them. If you’ve ever had a cake layer crumble or caramel turn to rock, you’re not alone. This is for you.
I’m not gonna lie, the first time I tried a caramel layer cake, the frosting was so thick it pulled chunks out of the sponge. Devastating. So I went back to the drawing board. The trick is a soft caramel sauce that you make from scratch, plus a cream filling that’s stable but light. It’s the kind of cake that makes people say “Where did you buy this?” and you get to smile and say “I made it.” And the best part? You can split the work across two days if you want. The cake layers freeze beautifully, and the caramel sauce keeps in the fridge for a week. So you can totally pull this off even on a busy weekend.
This spring, with strawberry season just around the corner, I love serving this cake with a handful of fresh berries on the side. The tartness cuts through the sweetness in the best way. It’s also a killer Mother’s Day cake. Trust me on this.
Ingredients You’ll Need
Let’s talk about what goes into this Vanilla Caramel Cream Cake. The list is short, which I love. You’ve got your standard baking staples: granulated white sugar, unsalted butter (softened, not melted), large eggs, vanilla extract, all-purpose flour, baking powder, salt, and whole milk. For the caramel, you’ll need more sugar, heavy cream or milk, and a little patience. The full list is in the recipe card below, so don’t worry about writing it down.
One thing I always tell people: use room temperature ingredients. It’s not being fussy, it’s the difference between a cake that rises evenly and one that domes like a muffin. If your eggs are cold, just drop them in a bowl of warm water for five minutes. The butter should be soft enough that your finger leaves a dent without sinking in. I’ve skipped this step when I was in a hurry, and the cake was still good, but not great. So yeah, worth the extra few minutes.
For the caramel, you can use store-bought if you’re really short on time. No judgment. But homemade caramel is so much better, and it’s honestly not hard. You just need to watch it like a hawk. More on that in a second.
Step-by-Step Instructions
Step 1 – Prepare the Cake Batter
This is where the reverse creaming method comes in. I know it sounds fancy, but it’s actually easier than the traditional way. You combine your dry ingredients (flour, sugar, baking powder, salt) in a bowl, then beat in the softened butter until the mixture looks like coarse sand. It should feel like damp sand between your fingers. Then you add the wet ingredients: milk, eggs, and vanilla. The result is a batter that’s thick, smooth, and less likely to overmix. Overmixing is what makes cake tough, so this method is a lifesaver.
Pour the batter into three 8-inch cake pans that you’ve greased and floured. Or you can use two 9-inch pans, just add about 10 minutes to the baking time. Bake at 350°F for 25 to 30 minutes, or until a toothpick comes out with a few moist crumbs. If the cake jiggles when you shake the pan, it’s not ready. Testing too early can make it fall, so wait until it looks set. The kitchen will smell like a vanilla cloud at this point, and it’s amazing.
Step 2 – Make the Caramel Sauce
Here’s where people get nervous, but don’t be. You’ll cook sugar in a saucepan over medium heat, stirring occasionally, until it melts into a deep amber color. Think the color of a penny, not a traffic cone. Then you whisk in heavy cream (be careful, it will bubble up) and a pinch of salt. Let it simmer until it thickens slightly, about 2 to 3 minutes. If you have a candy thermometer, aim for 235°F. That’s the sweet spot where it stays pourable but sets up nicely.
If your caramel seizes up and turns into a hard lump, don’t panic. Just add a splash of warm cream and stir over low heat. It will come back together. I’ve done this more times than I’d like to admit. The sauce should be smooth and glossy, like liquid gold. Let it cool to room temperature before you use it. If you add warm caramel to the cream filling, it will melt everything. Ask me how I know.
Step 3 – Prepare the Cream Filling
This is the heart of the Vanilla Caramel Cream Cake. You’ll whip heavy cream with a little powdered sugar and vanilla until it holds stiff peaks. The key is to chill your bowl and beaters first. I pop them in the freezer for 10 minutes before I start. It makes a huge difference, especially in warm weather. If your kitchen is hot (and let’s be real, LA kitchens can get warm), you can even set the bowl over a bowl of ice water.
If the cream seems too thin after whipping, chill it for 10 minutes and whip again. If it’s too thick and looks like butter, you went too far. But that’s rare. You want it to be soft but stable enough to hold its shape when you pipe it. It should feel like a fluffy cloud.
Step 4 – Assemble the Cake Layers
First, level your cake layers. Use a serrated knife to slice off the domed tops. Don’t worry if they’re a little uneven, you can fix it with a crumb coat. Place the first layer on your cake stand or plate. Spread a thick layer of cream filling on top, then drizzle some caramel sauce. Repeat with the second and third layers. Don’t go too heavy on the caramel between layers, or the cake might slide. I learned this the hard way when my cake did a slow-motion collapse. Not cute.
Once all layers are stacked, apply a thin crumb coat of cream around the entire cake. This seals in the crumbs and gives you a clean surface for decorating. Chill the cake for 30 minutes to set the crumb coat. This is a great time to clean up your kitchen and take a breath.
Step 5 – Decorate the Cake
Now the fun part. Spread the remaining cream over the top and sides of the cake. You can make it smooth or rustic, whatever you prefer. I like to leave a little texture because it looks more homemade. Then drizzle the caramel sauce over the top, letting it drip down the sides. Use a spoon or a squeeze bottle for more control. Sprinkle a little flaky sea salt on top if you want. It balances the sweetness perfectly.
For a spring look, I sometimes add a few edible flowers or fresh berries on top. It makes the cake look like a garden party. But even without them, this cake is a showstopper. The glossy caramel against the pale cream is just beautiful.
Tips for the Best Vanilla Caramel Cream Cake
I’ve made this cake more times than I can count, and I’ve picked up a few tricks along the way. First, sifting the flour mixture is optional but it does add lightness. If you skip it, the cake will still be good, but not as fluffy. Second, if your powdered sugar is clumpy, sift it before mixing into the cream. Nobody wants lumps in their filling. Third, the cake is tasty warm, but it looks prettier when cooled because the frosting sets properly. Patience is a virtue here.
If your caramel frosting is too thin and dripping, beat it longer or let it cool further. If it’s too thick, heat it slightly or mix in more cream. If it’s gummy or chewy when set, you overheated it. Cook it only until thickened, not until it’s hard. And always ensure your caramel sauce is at room temperature before adding it to the cream filling. Warm sauce will melt the cream and make a mess. If you accidentally add warm sauce, refrigerate the bowl for 30 minutes to re-chill the fats, then re-mix. It works, I promise.
Another thing: use a kitchen scale if you have one. Weighing your flour is more accurate than scooping, and it prevents dry cake. If you don’t have a scale, spoon the flour into the measuring cup and level it off. Don’t scoop directly from the bag, that packs the flour and gives you too much.
Variations to Try
This Vanilla Caramel Cream Cake is pretty perfect as is, but you can switch it up. If you’re not feeling three thinner layers, divide the batter between two 9-inch pans and increase the baking time by 10 minutes. You’ll get taller layers that are just as tender. You can also add a cream cheese frosting alternative by swapping half the cream for softened cream cheese. It adds a tangy note that pairs beautifully with the caramel.
For a chocolate version, replace 1/4 cup of the flour with cocoa powder. It’s not in the base recipe, but it’s a fun twist. Or add a handful of toasted pecans or walnuts between the layers for crunch. If you want a dairy-free version, use a plant-based milk and butter substitute. I’ve tested it with oat milk and it works, though the texture is slightly denser. Still delicious.
You can also garnish with mini stroopwafel cookies for a fun surprise. Or serve it with fresh blueberries and raspberries, which is my favorite spring combination. The tart berries cut through the sweetness and make each bite feel lighter.
Common Mistakes to Avoid
Mistakes & Fixes
Mistake: The cake layers are dry.
Solution: You probably overbaked them or used too much flour. Check your oven temperature with an oven thermometer. And weigh your flour if you can. The cake should be moist and tender, not crumbly.
Mistake: The caramel is too thin and runs off the cake.
Solution: Let it cool further or simmer it a bit longer. It should coat the back of a spoon. If it’s still thin, you can add a little more cream and cook it down again.
Mistake: The cream filling is too runny.
Solution: Your cream was too warm or you didn’t whip it long enough. Chill the bowl and beaters first, and whip until stiff peaks form. If it’s still runny, add a tablespoon of powdered sugar and whip again.
Mistake: The cake slides apart when you cut it.
Solution: You used too much caramel between the layers or didn’t chill it long enough. Use a thin layer of caramel, and chill the assembled cake for at least an hour before slicing.
Mistake: The caramel is gummy and chewy when set.
Solution: You overheated it. Cook it only until it reaches 235°F. If it’s already gummy, you can reheat it with a splash of cream and try again, but it won’t be as smooth.
How to Store Leftovers
If you have any leftovers, which is rare with this cake, store it in an airtight container at room temperature for up to two days. After that, refrigerate it for up to a week. The cream filling will firm up in the fridge, but let the cake sit at room temperature for 30 minutes before serving to soften it up again. You can also freeze the cake layers (unfrosted) for up to three months. Wrap them tightly in plastic wrap and then foil. Thaw overnight in the fridge before assembling.
For the caramel sauce, store it in a jar in the fridge for up to a week. It will thicken when cold, so reheat it gently in the microwave or on the stovetop before drizzling. Don’t microwave it too long, or it will burn. Just 10-second bursts, stirring in between.
Frequently Asked Questions
Conclusion
When you present this Vanilla Caramel Cream Cake at your Mother’s Day brunch or spring dinner party, expect gasps. It’s the kind of dessert that makes people stop and stare. But more than that, it’s the kind of cake that makes you feel proud. You made this. With your own two hands. And it’s amazing.
I’d love to see your creation. Share it with #VanillaCaramelCake and tag me so I can cheer you on. And if you’re looking for more ideas, check out my Pinterest boards for tons of variations and inspiration. You’ve got this. Go make something beautiful.
Source: Nutritional Information


