
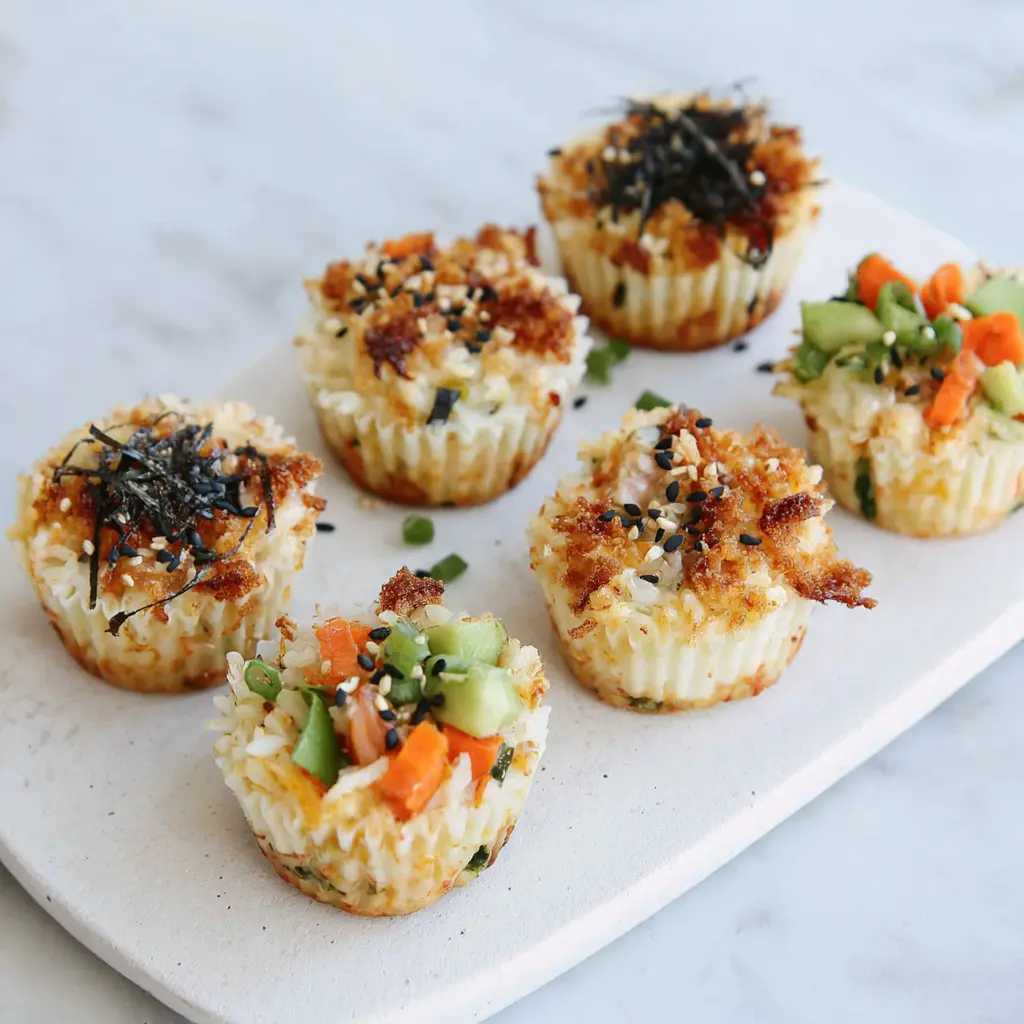

California Sushi Bake Cups
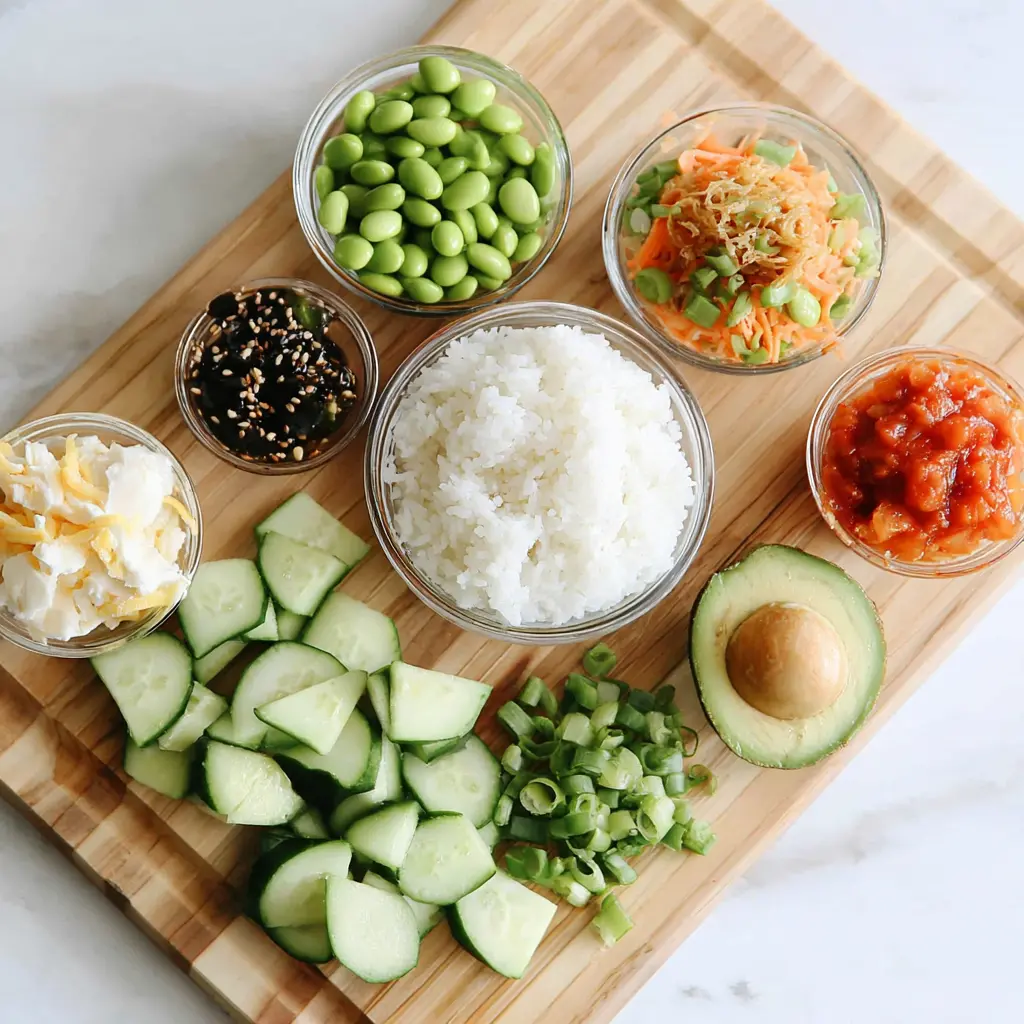
Ingredients
Method
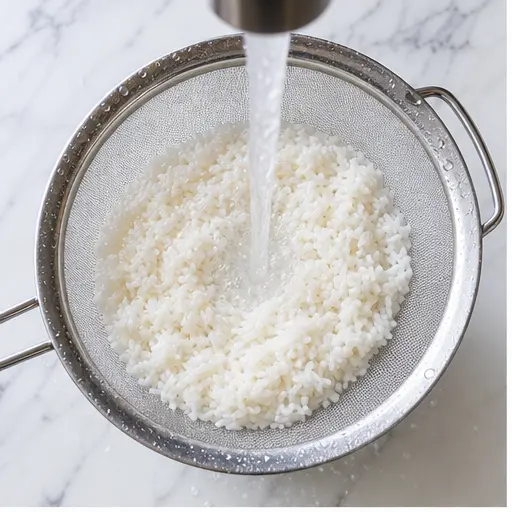
- Rinse the sushi rice under cold water until the water runs clear. In a medium pot, combine the rinsed rice and water. Bring to a boil over high heat, then reduce heat to low, cover, and simmer for 20 minutes, or until the rice is tender and the liquid is absorbed. Remove from heat and let it cool slightly.
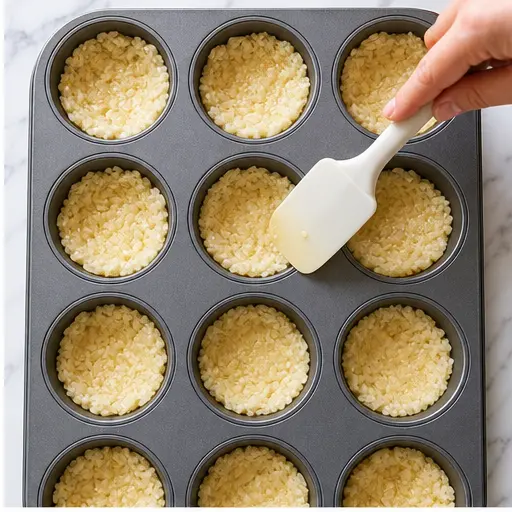
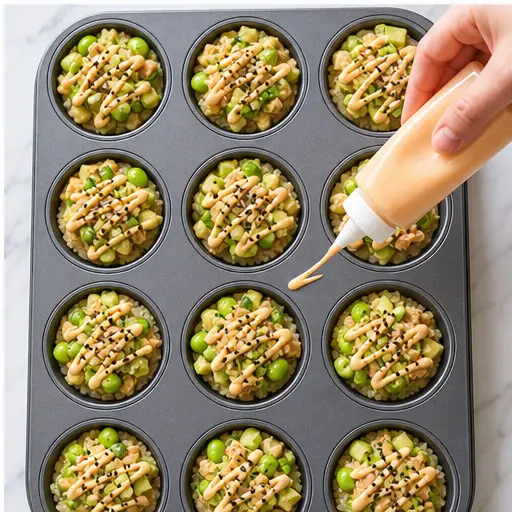
- Press about 2 heaping tablespoons of the cooked rice into each cup of a standard 12-cup muffin tin. Firmly compact the rice to form a solid base. Place the muffin tin in the refrigerator and chill for 20 minutes to set the rice cups.
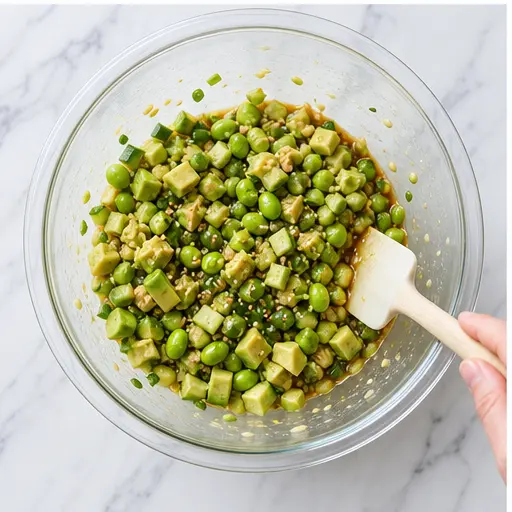
- In a mixing bowl, combine the chopped veggies, steamed edamame, diced avocado, and soy sauce. Toss gently to coat and blend the flavors.
- In a separate small bowl, whisk together the mayonnaise, Sriracha, soy sauce, honey, and sesame oil until smooth. Adjust the Sriracha to your preferred level of heat.
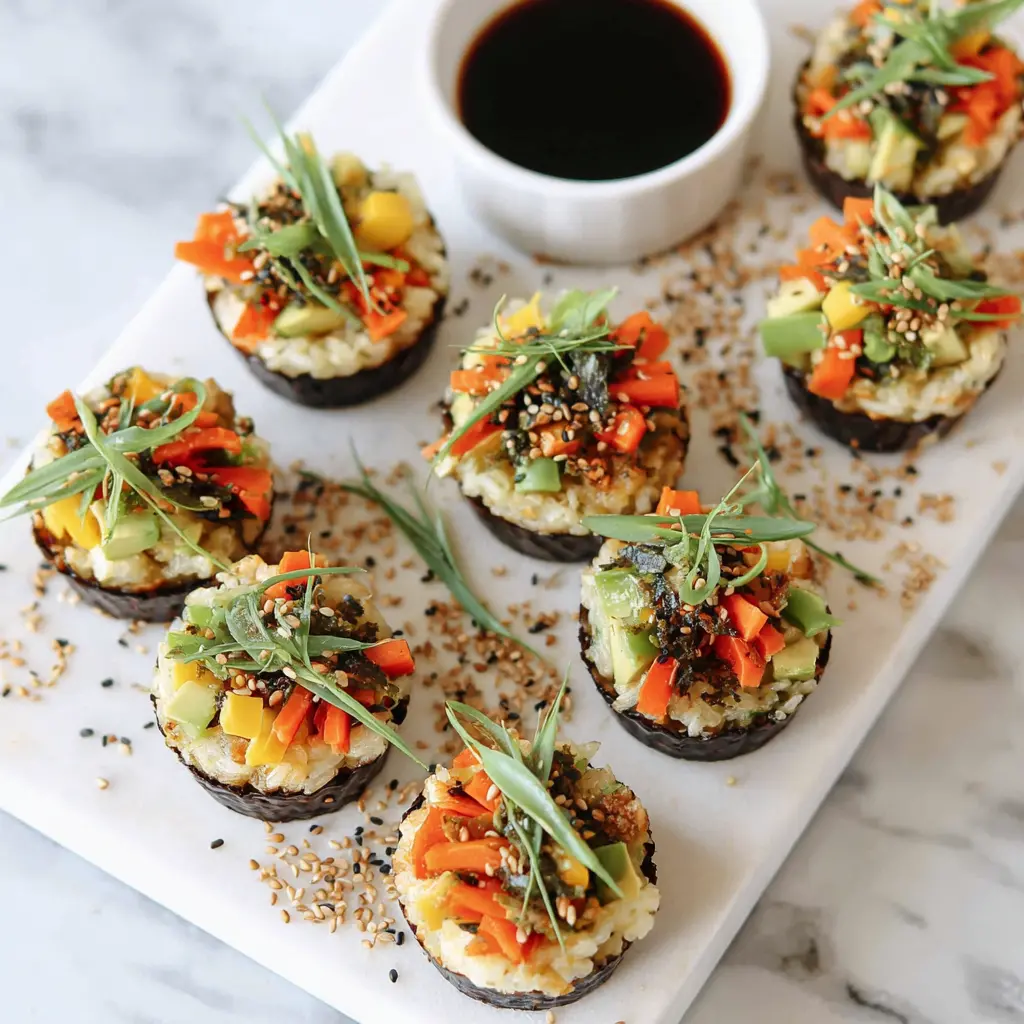
- Remove the rice cups from the refrigerator. Spoon a heaping tablespoon of the veggie filling over each rice cup, dividing evenly. Drizzle the spicy mayo over the top and garnish with black sesame seeds. Serve immediately.
Nutrition
Notes
Tried this recipe?
Let us know how it was!Why You’ll Love These California Sushi Bake Cups
Okay, I have a confession. I love sushi. Like, really love it. But rolling those little maki rolls? Total disaster zone for me. Rice everywhere, nori ripping, filling spilling out. It was a mess. So when I first saw the sushi bake cups trend taking over TikTok, I was skeptical. But then I tried it. And honestly? It changed everything.
These Sushi Bake Cups are my go-to party trick now. They’re basically deconstructed sushi in a cute, portable cup. No rolling, no bamboo mat, no stress. Just creamy, crunchy, savory goodness in every bite. And the best part? They look like you spent hours in the kitchen. But between you and me? It’s like 40 minutes, tops.
I promise you’re going to love this. Trust me on this one. I’ve made these for game nights, potlucks, and even a fancy dinner party, and they disappear every single time. People go crazy for them. Plus, they’re totally customizable. You can swap in whatever veggies you have, use different proteins, make them spicy or mild. It’s the kind of recipe that makes you look like a genius with almost zero effort.
Let me walk you through it. I’ll share all my little tricks so you nail it on the first try. Because I’ve definitely made my share of mistakes along the way. Like the time I underbaked the rice cups and they fell apart into a sad pile of grains. Set that timer, people. We’ll get to all that.
Ingredients You’ll Need
The beauty of this recipe is that the ingredient list is short and sweet. You probably already have most of these in your pantry. Let me break it down for you.
First up, sushi rice. This is non-negotiable for the best texture. Sushi rice is short-grain and super sticky, which is exactly what you need for those little cups to hold their shape. You’ll also need water to cook it, obviously.
For the filling, you want a mix of fresh and crunchy stuff. I love using finely chopped veggies like cucumber, bell pepper, or carrot. Whatever you have in the crisper drawer works. Then add some steamed edamame for protein and that pop of green. And of course, diced Hass avocado. California-grown is my favorite. It adds that creamy, buttery element that makes sushi so good.
You’ll also need soy sauce or coconut aminos for seasoning. If you’re gluten-free, go with the coconut aminos. It’s a little sweeter but works beautifully.
Now for the spicy mayo. This is where the magic happens. You’ll need mayonnaise, Sriracha sauce, a little more soy sauce or coconut aminos, honey, and sesame oil. Whisk it all together, and you’ve got a sauce that’s creamy, spicy, sweet, and nutty all at once. Top it off with black sesame seeds for garnish. They look gorgeous and add a little crunch.
That’s it. Simple stuff. Nothing weird or hard to find.
Substitutions & Variations
I get it. You might not have everything on hand, or maybe you want to switch things up. This recipe is super forgiving. Here are some swaps I’ve tried and loved.
Protein swaps: The recipe uses edamame for a veggie version, but you can easily add cooked crab, shrimp, or even rotisserie chicken. Just chop it up fine and mix it in. I’ve made these with canned tuna before, and they were fantastic. Just drain it well first.
Veggie swaps: Cucumber, bell pepper, carrot, even some finely chopped zucchini. Whatever you have. Just make sure it’s chopped small so it fits nicely in the cups.
Spicy level: Not a fan of heat? Just use regular mayo and skip the Sriracha. Or use half a teaspoon for a tiny kick. The honey and sesame oil still give it tons of flavor.
Gluten-free: Use coconut aminos instead of soy sauce, and you’re golden. The nori sheets are naturally gluten-free, so no worries there.
Rice swaps: If you don’t have sushi rice, you can use jasmine rice or even instant rice in a pinch. Just know the texture will be a little different. The cups might not hold together as well, but they’ll still taste great.
Make it a meal: Instead of mini cups, press the rice into a greased baking dish, add the filling, drizzle the sauce, and bake it like a casserole. Then scoop it out with nori squares. It’s a whole different vibe but equally delicious.
How to Make Sushi Bake Cups
Alright, let’s get cooking. I’ll walk you through the four main stages. Don’t worry, it’s way easier than it sounds.
Stage 1: Cook and chill the rice. Rinse your sushi rice under cold water until the water runs clear. This gets rid of excess starch and keeps the rice from getting gummy. Then cook it with water in a pot. Bring to a boil, cover, and simmer for 20 minutes. Let it cool slightly. Then press about 2 heaping tablespoons into each cup of a standard 12-cup muffin tin. Press firmly. I use the back of a spoon or a small glass to really compact it. Then pop the whole tin in the fridge for 20 minutes. This helps the rice cups set and hold their shape.
Stage 2: Make the filling and sauce. While the rice chills, get your filling ready. In a bowl, toss together your chopped veggies, edamame, avocado, and soy sauce. In a separate small bowl, whisk together the mayo, Sriracha, soy sauce, honey, and sesame oil. Taste it. Adjust the heat if you want. I like mine with a good kick.
Stage 3: Assemble the cups. Take the muffin tin out of the fridge. Spoon a heaping tablespoon of the veggie filling over each rice cup. Don’t overfill, or they’ll be hard to eat. Then drizzle the spicy mayo over the top. A little goes a long way, but I’m generous with it.
Stage 4: Garnish and serve. Sprinkle black sesame seeds over each cup. That’s it. You’re done. Serve them right away, or let them sit at room temperature for a bit. They’re great warm or cold.
Pro Tips for Perfect Cups
I’ve made these a bunch of times, and I’ve learned a few things the hard way. Here are my best tips so you don’t make the same mistakes.
- Wet your hands: When pressing the rice into the muffin tin, wet your fingers with a little water. The rice won’t stick to you, and you can press it down firmly without a mess.
- Compact the rice well: This is key. If the rice is loose, the cups will fall apart. Press it down with the back of a spoon or a small glass until it’s solid.
- Don’t skip the chill time: The 20 minutes in the fridge is crucial. It firms up the rice so the cups hold their shape when you add the filling.
- Chop veggies small: Big chunks of cucumber or bell pepper will make the cups hard to eat. Aim for tiny dice, like the size of a pea.
- Add avocado last: Toss it in right before serving so it doesn’t get brown and mushy.
- Use a standard muffin tin: Mini muffin tins work too, but you’ll get more cups and they’ll be smaller. Adjust the filling amount accordingly.
- Don’t overfill: A heaping tablespoon is perfect. Too much filling and the cups get top-heavy and fall apart.
Storage & Make-Ahead Tips
Here’s the thing about these Sushi Bake Cups. They’re best eaten fresh, but you can absolutely prep ahead. Here’s how I do it.
Make the rice cups ahead: Cook the rice, press it into the muffin tin, and chill it. Then cover the whole tin with plastic wrap and keep it in the fridge for up to 2 days. When you’re ready to serve, just add the filling and sauce.
Prep the filling: You can chop the veggies and make the spicy mayo a day ahead. Store them separately in airtight containers in the fridge. Add the avocado right before serving.
Store leftovers: If you have leftover assembled cups, store them in an airtight container in the fridge for up to 2 days. The rice might get a little firm, but they’re still tasty.
Reheat: To reheat, pop them in the microwave for about 1 minute. Or if you want the rice to get a little crispy again, bake them at 350°F for 5 minutes. Just watch them so they don’t dry out.
Can you freeze them? I haven’t tried freezing the assembled cups, but you can freeze the plain rice cups. After pressing them into the muffin tin and chilling, pop them out and store them in a freezer bag for up to a month. Thaw in the fridge before using.
Common Questions
More Fun Sushi-Inspired Bites
If you’re loving this whole no-roll sushi thing, I’ve got a few more ideas for you. These are all super easy and perfect for parties.
- Sushi Rice Balls (Onigiri): Shape leftover sushi rice into triangles, stuff with a little filling, and wrap with nori. So simple.
- Deconstructed Sushi Bowl: Layer sushi rice, veggies, protein, and spicy mayo in a bowl. Top with sesame seeds and enjoy with a spoon.
- Baked Sushi Casserole: Press sushi rice into a baking dish, top with your favorite fillings and spicy mayo, and bake until bubbly. Scoop and eat.
- Cucumber Sushi Bites: Slice cucumber into thick rounds, top with a dollop of filling and a drizzle of sauce. Low-carb and refreshing.
These are all crowd-tested and idiot-proof, I promise.
You’re about to be the hero of the party. These Sushi Bake Cups are that dish everyone asks for the recipe. And when they do, you can smile and say, “Oh, it’s nothing. Just a little something I threw together.” Because now you know the secret. It’s easier than it looks, and it tastes amazing.
Go ahead, give them a try. And let me know how they turn out. I’d love to hear about your own twists and variations. Happy cooking!
Source: Nutritional Information


