

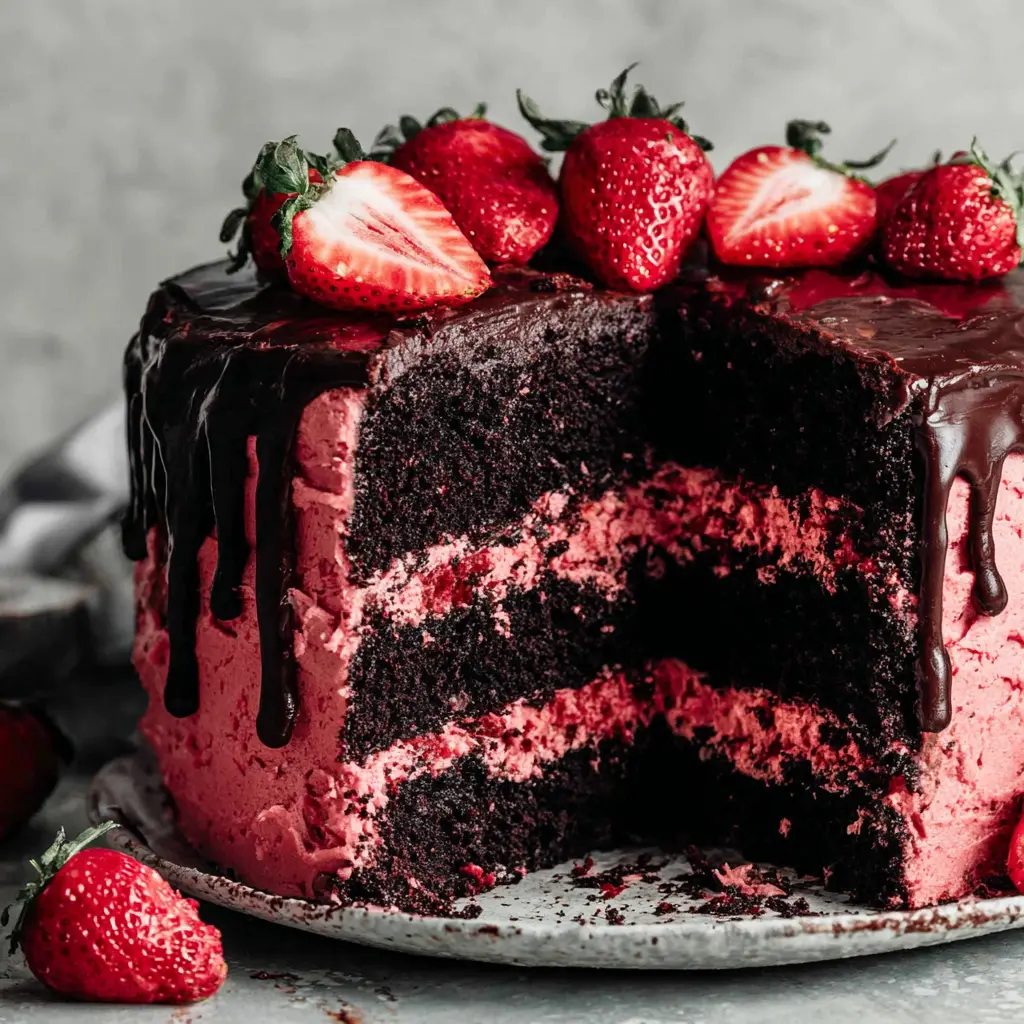
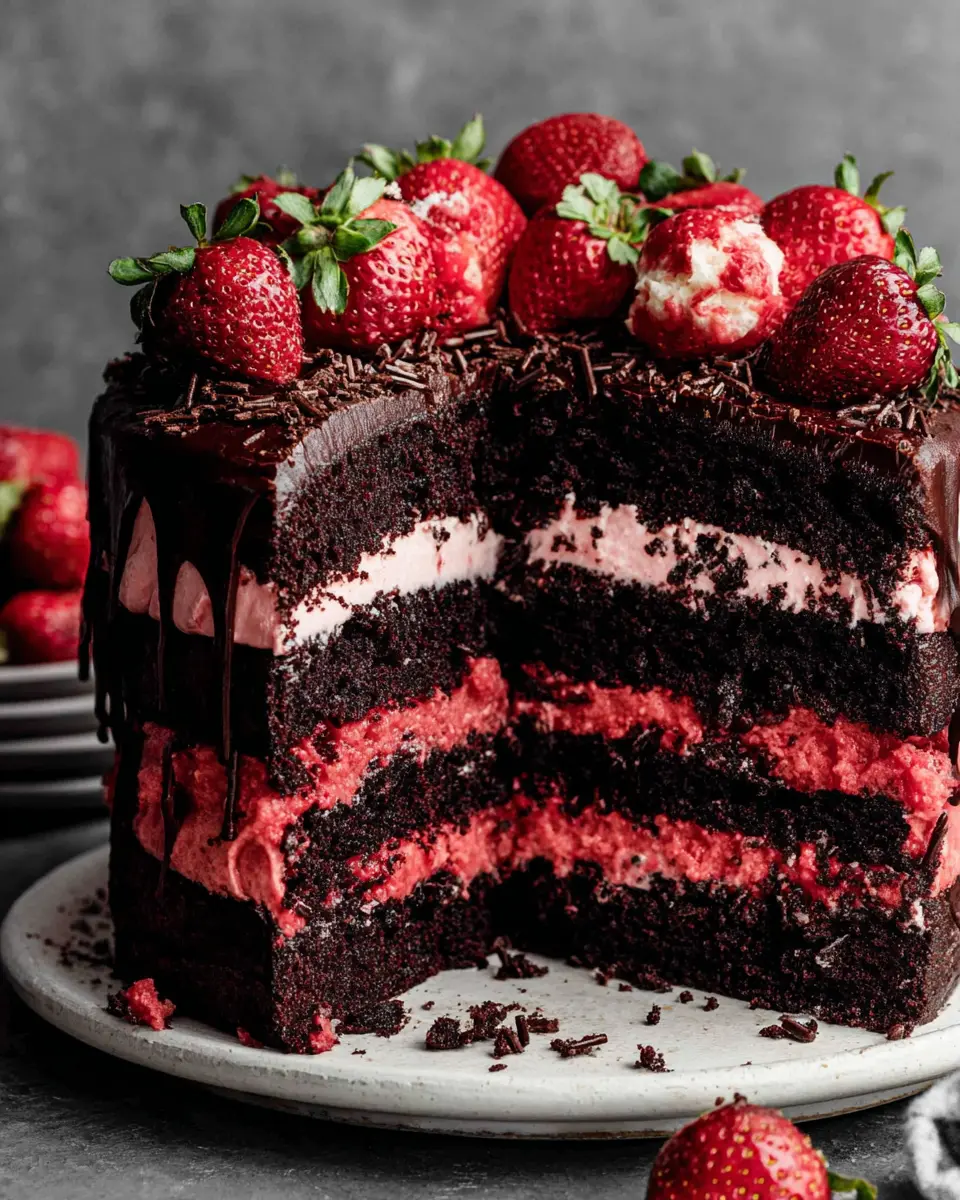
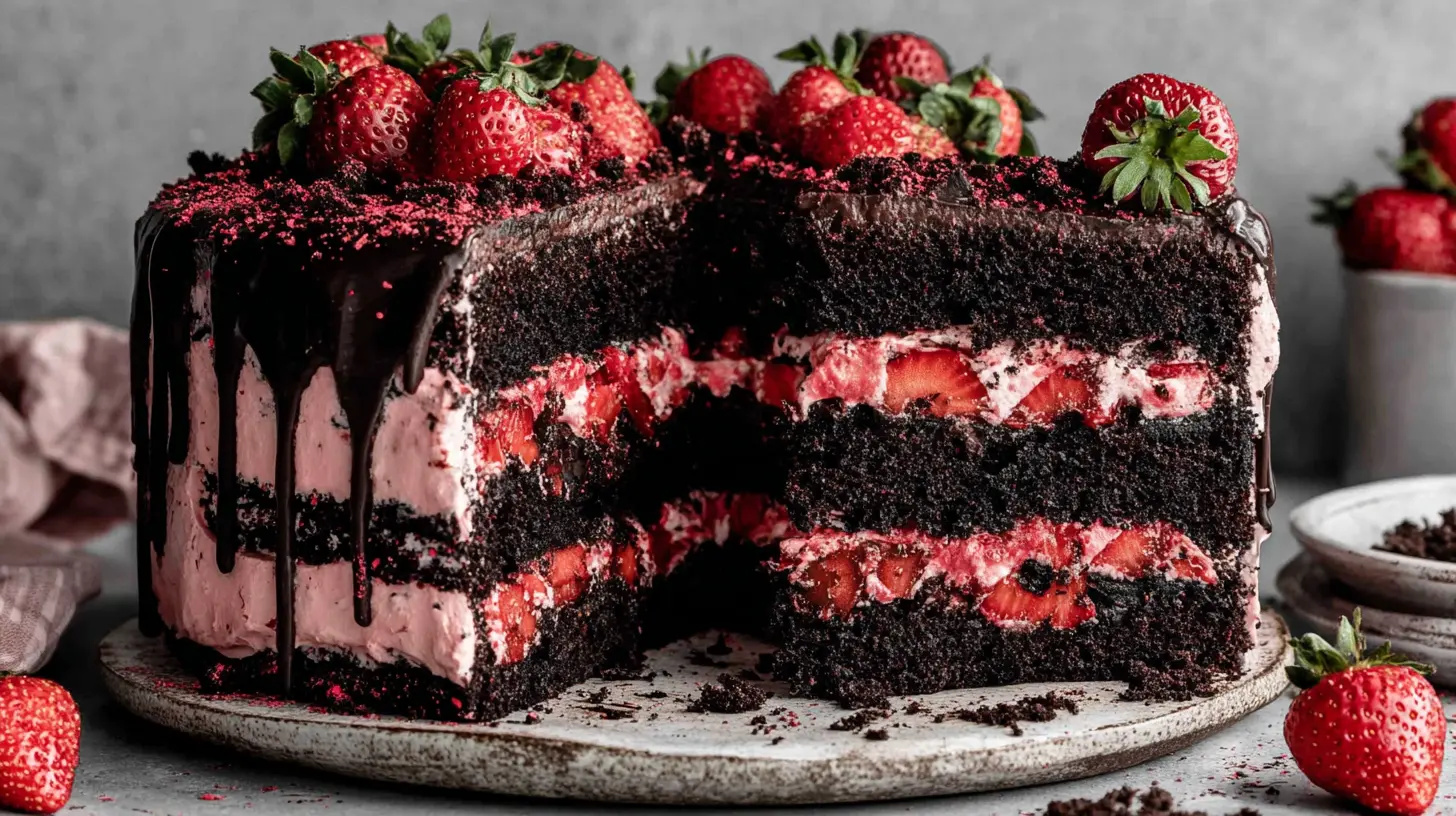
Rich Strawberry Chocolate Layer Cake for Celebrations
Ingredients
Method
- Add chopped strawberries and granulated sugar to a medium saucepan over medium-high heat. Cook, stirring occasionally, for 23-28 minutes until the mixture thickens to a jammy consistency. In a small bowl, stir together cornstarch and water until dissolved. Add the cornstarch mixture to the hot strawberries. Cook, stirring, for 30-60 seconds until bubbly and thickened. Stir in vanilla. Taste and add 1-2 tablespoons more granulated sugar if desired. Transfer the filling to a shallow bowl or pan and chill in the fridge until cold.
- Preheat your oven to 350℉. Prepare three 9-inch cake pans. Rub shortening all over the inside of each pan with a paper towel. Cut and place a round of parchment paper inside each pan, then grease over the parchment paper. Add a handful of flour to each pan, tap to evenly coat the entire inside, and tap out any excess.
- Add hot water to a large glass measuring cup or bowl. Whisk in cocoa and espresso powder until completely dissolved, then set aside. In a large bowl, whisk together flour and sugars, breaking up any brown sugar lumps. Whisk in baking soda, baking powder, and salt. Ensure the water and cocoa mixture is lukewarm, then whisk in oil, buttermilk, and vanilla. In an empty measuring cup, add and lightly beat the eggs with a fork. Pour the cocoa liquid mixture and the lightly beaten eggs over the dry ingredients. Whisk gently to combine, ensuring no dry bits remain at the bottom of the bowl.
- Divide the batter evenly (735 grams per pan) among your three prepared pans. Bake at 350℉ for 24 to 28 minutes, or until a toothpick inserted into the center pulls out moist crumbs. Let cakes cool in the pans on wire racks for 10 minutes. Run a butter knife around the edges to loosen, then invert onto cooling racks to cool completely while preparing the frosting.
- Pulse freeze-dried strawberries in a food processor to a fine powder. In a large mixing bowl or stand mixer fitted with the paddle attachment, beat butter until creamy for about 60 seconds. Mix in powdered sugar in a few additions, using heavy cream as needed. Mix in the powdered strawberries, strawberry filling, vanilla, and a pinch of salt. Taste and add more powdered sugar if desired.
- Spread a small dollop of frosting on your cake plate to secure the cake. Place the first cake layer on the frosting, then place the cake plate on a cake turntable. Spread 1 and 1/4 cups (312 grams) of frosting over the layer, extending slightly beyond the edge. Pipe a border around the cake layer, then evenly spread a scant 1/2 cup (115 grams) of strawberry filling into the center, up to the border. Place the second cake layer on top. Spread any frosting overhang between the two layers to seal them, then chill for 5-10 minutes to set. Repeat with the second layer. Add the final layer upside down for a flat top. Apply a thin layer of frosting to the top and sides for a crumb coat. Use a cake scraper to smooth and remove excess. Refrigerate for 20-30 minutes until the crumb coat is set. Frost the top and sides of the cake with the remaining frosting, smoothing with a cake scraper or offset spatula. Refrigerate while making the drip.
- Add finely chopped chocolate to a small bowl. Heat heavy cream in a small saucepan over medium-high heat until simmering. Pour the hot cream over the chocolate, let sit for 4 minutes, then stir until completely smooth. Add 1-3 teaspoons vegetable oil to achieve a smooth, pourable consistency; test by letting chocolate drip off a spoon in an unbroken stream. Set the cake on a turntable. Pour the chocolate onto the center of the cake top. Spin the cake slowly while pushing ganache to the edges and over with an offset spatula to create drips. Chill for 20-30 minutes until the ganache is set. Use remaining frosting to pipe a border on top, if desired, and place strawberries in the frosting as garnish.
- Chill the cake for another 20 minutes to ensure the piped frosting is set. Store leftover cake in the fridge in an airtight container or cake carrier, pressing plastic wrap tightly over any cut portions to prevent drying out.
Nutrition
Notes
Tried this recipe?
Let us know how it was!Why You’ll Love This Strawberry Chocolate Layer Cake
You know that feeling? It’s a Saturday afternoon, and you’re staring at your phone, scrolling through pictures of these gorgeous, towering cakes. They look amazing, honestly. The kind of thing you’d see in a bakery window. And you think, “I could never make that.” I’ve been there. I mean, I’ve baked a lot of cakes, and I still get that little flutter of anxiety when I’m trying something new for a crowd.
But here’s the thing. This strawberry chocolate layer cake is different. It’s built to make you feel like a total rockstar. It’s got that rich chocolate berry sponge that’s so moist it practically melts, paired with a frosting that tastes like fresh strawberries and cream. And the best part? It’s a series of simple, manageable steps. You don’t need to be a pastry chef. You just need a little time and the desire to make something truly special. When you pull this out for Mother’s Day or a birthday, the look on people’s faces is worth every single minute.
Essential Ingredients for Success
Let’s talk ingredients. I think a lot of baking anxiety comes from not knowing why we use what we use. So, let’s break it down. For the deep, dark chocolate layers, we’re using black cocoa powder. It gives that almost Oreo-like color and a really intense flavor. You can find it online or in some specialty stores. If you only have regular cocoa powder, that’s totally fine, you know? Your cake will just be a lighter brown. The hot water and espresso powder? They’re there to “bloom” the cocoa, which basically just means waking up all that chocolatey flavor. It won’t taste like coffee, I promise.
Then there’s the buttermilk. This is the secret weapon for a supremely tender crumb. The acid in it reacts with the baking soda, giving you a beautiful rise. If you’re out, no panic. Add a tablespoon of lemon juice or white vinegar to a cup of regular milk and let it sit for 5 minutes. Good as gold. For the strawberries, fresh is best for the filling and garnish. But for the frosting, freeze-dried strawberry powder is a game-changer. It packs a huge punch of pure berry flavor without adding any extra liquid that would thin out your buttercream. I usually grab a bag from Trader Joe’s or the organic section at Ralphs.
Choosing the Right Cake Pans
This might seem minor, but it’s huge. Using the right pan is the difference between a cake that bakes evenly and one that’s burnt on the edges and raw in the middle. For this recipe, you’ll want two 9-inch round pans. Not 8-inch, not 10-inch. The 9-inch size gives us the perfect height for those lovely layers.
Light-colored aluminum pans are my go-to. They conduct heat gently and evenly. If you only have dark non-stick pans, that’s okay, but you might need to reduce your oven temperature by about 25 degrees Fahrenheit to prevent the edges from over-browning. And please, for the love of all things cake, line the bottoms with parchment paper. Just trace the pan, cut out the circle, and you’ve got a foolproof release system. A quick spray of baking spray on the sides helps too. Honestly, it saves so much frustration.
How to Make Strawberry Chocolate Layer Cake: A Step-by-Step Mindset
I’m not going to rewrite the recipe steps for you they’re right there in the card. But I want to walk you through the *mindset* of putting it all together. Think of it in three acts: the cake, the fillings, and the assembly. You can even spread these acts over two days if you need to.
First, the chocolate cake. The key here is not to overmix. You’ll whisk your dry ingredients in one bowl, your wet in another. Then, you just combine them. Mix until the last streak of flour disappears and then stop. Overmixing develops gluten, and that leads to a tough cake. We want tender. When you divide the batter between your pans, give them a few taps on the counter to pop any big air bubbles. This helps prevent tunnels.
While they bake and cool and they must cool completely, seriously, don’t rush this make your strawberry filling and frosting. The filling is just chopped berries, sugar, and a little cornstarch cooked down into a gorgeous, glossy jam. Let it cool completely too, or it’ll melt your frosting. For the frosting, the freeze-dried strawberry powder is your best friend. It gives that vibrant pink color and true fruit flavor. Whip it until it’s light and fluffy.
Now, the fun part: assembly. Place your first cake layer on a plate or cake stand. I like to put a little dollop of frosting underneath to keep it from sliding. Then, pipe a thick dam of frosting around the edge. This is your barrier. Spoon the cooled strawberry filling inside that dam. It keeps everything neat and contained. Top with the second layer, and give the whole cake a thin “crumb coat” of frosting. Pop it in the fridge for 20 minutes. This sets everything so your final coat of frosting goes on smooth and crumb-free. You’ve got this.
Pro Tips for Baking Success
Okay, here are the insider tips that make everything go smoother. These are the things I’ve learned from, well, making a mess a few times.
First, measure your flour correctly. If you have a kitchen scale, use it. It’s the most accurate way. If you’re using cups, fluff the flour in the bag, spoon it lightly into your cup, and level it off with a knife. Don’t scoop directly with the cup you’ll pack in too much flour and end up with a dry cake.
Room temperature ingredients are non-negotiable for the batter. They emulsify better, creating a smooth, cohesive batter that rises evenly. If you forget to take your eggs out, place them in a bowl of warm (not hot) water for 10 minutes. Good as new.
When you sift your cocoa powder with the hot water, you’re doing two things: getting rid of lumps and blooming the flavor. Don’t skip it. It only takes a minute and makes a real difference in your rich chocolate strawberry layers.
And for the ganache drip? Chill the frosted cake before you add it. I mean, really chill it. Like, 30 minutes in the fridge. This firms up the frosting so the warm ganache drips down the side just a little and then sets. If the cake is warm, the ganache will just run right off the bottom.
Common Visual Troubleshooting
Issue: Cake layers are domed or cracked on top.
Likely Cause: Oven temperature too high. Get an oven thermometer to check accuracy. Also, avoid opening the oven door during the first 25 minutes of baking.
Issue: Soggy strawberry layer or weeping frosting.
Likely Cause: The strawberry filling or puree wasn’t cooled completely before assembly. Patience is key here. Let everything come to room temp.
Issue: Frosting looks curdled or greasy.
Likely Cause: Your butter was too warm, or the cream cheese (if using) was too soft. Everything should be cool to the touch (around 65°F). If it breaks, beat in a tablespoon of extra powdered sugar to bring it back.
Delicious Variations & Swaps
Maybe you’re out of something, or you want to mix it up. Here are some tested ideas.
For the berries, you can use other fresh ones. Raspberries or a mix of berries make a fantastic berry chocolate dessert cake. Just adjust the sugar in the filling based on their tartness. I wouldn’t use frozen berries for the filling or decoration they get too mushy when thawed. But for the frosting, if you can’t find freeze-dried, you can reduce about 1/4 cup of good-quality strawberry jam by simmering it for a few minutes to thicken, let it cool, and swirl that into your buttercream.
Need a different pan? If you only have 8-inch pans, you’ll have extra batter. You can make a few cupcakes on the side! Bake time will be slightly longer, maybe 5-10 minutes. Start checking at 30 minutes. For a 9×13 sheet cake, bake for about 35-40 minutes. Use a toothpick to test for doneness.
Detailed Dietary Adaptations
I know many of you have dietary needs, so let’s get specific. These aren’t just “maybe it’ll work” ideas. I’ve tested these paths.
For a gluten-free strawberry chocolate layer cake, use a 1:1 gluten-free baking flour blend. I’ve had perfect results with Cup4Cup. Make sure your blend contains xanthan gum. The method and bake time remain exactly the same.
For dairy-free, it’s a bit more of a swap but totally doable. Use a neutral-flavored oil instead of butter in the cake. For the buttermilk, add 1 tbsp lemon juice to 1 cup of unsweetened almond or oat milk. For the frosting, use a high-quality, firm dairy-free butter stick (like Miyoko’s or Earth Balance sticks) and dairy-free heavy cream alternative. Check your chocolate for the ganache to ensure it’s dairy-free too.
Storage & Freezing Tips
Because of the fresh fruit and creamy frosting, you should store this cake in the refrigerator. Cover it well with a cake dome or some plastic wrap propped up with toothpicks so it doesn’t smudge. It’ll stay fresh for up to 4 days.
You can absolutely make this strawberry chocolate layer cake ahead of time. Bake and cool the layers, then wrap them tightly in plastic wrap. They’ll keep at room temp for a day, in the fridge for 3 days, or frozen for a month. The frosting can be made and stored in an airtight container in the fridge for 3 days just re-whip it before using. Assemble the cake the day before you need it, but wait to add the fresh strawberry garnish on top until just before serving so they look their best.
To freeze the whole assembled cake (without fresh berry garnish), freeze it uncovered on a tray until solid, then wrap it tightly in a few layers of plastic wrap and foil. Thaw overnight in the fridge.
Frequently Asked Questions (FAQ)
More Delectable Cake Recipes
If you loved the process of building this strawberry chocolate layer cake, you’re probably hooked on layer cakes now. I get it. There’s something so satisfying about creating those beautiful slices. You should try a classic vanilla layer cake with chocolate fudge frosting next, or maybe a lemon blueberry cake when those berries are in season. The techniques you learned here the crumb coat, the filling dam, the ganache drip they all apply. You’re building a whole new set of kitchen skills.
Honestly, when you make this cake, you’re doing more than following a recipe. You’re creating a centerpiece. You’re making a memory. The smell of that chocolate baking, the pride of smoothing on that last coat of pink frosting, the quiet “wow” when you cut into it… that’s the good stuff. So go for it. You’re about to bake a masterpiece.
I’d love to see how your strawberry chocolate layer cake turns out! If you share it online, tag me so I can cheer you on. And for more baking inspiration and fun variations, check out my Pinterest boards. Happy baking!
Source: Nutritional Information


