

What Is Pumpkin Kasha?
I remember the first time I bought kasha. I stood in the aisle at Ralphs, holding a box of buckwheat groats, wondering what on earth to do with it. It looked like tiny little pyramids, all toasted and earthy. Fast forward a few years, and now it’s one of my favorite pantry staples. But here’s the thing kasha isn’t just buckwheat. In Eastern European cuisine, the word kasha actually refers to any cooked grain, like a porridge or pudding. And this pumpkin kasha recipe? It’s the coziest, creamiest version I’ve ever made.
Honestly, this is easier than it sounds. It’s a classic Russian-Ukrainian breakfast pudding that’s naturally gluten-free (if you use certified grains) and packed with fiber. Plus, the pumpkin adds a gentle sweetness and a ton of vitamin A. Don’t worry if you’re managing blood sugar the fiber in the grains and pumpkin helps keep things steady. We’ll get into that later.
Ingredients for Pumpkin Kasha
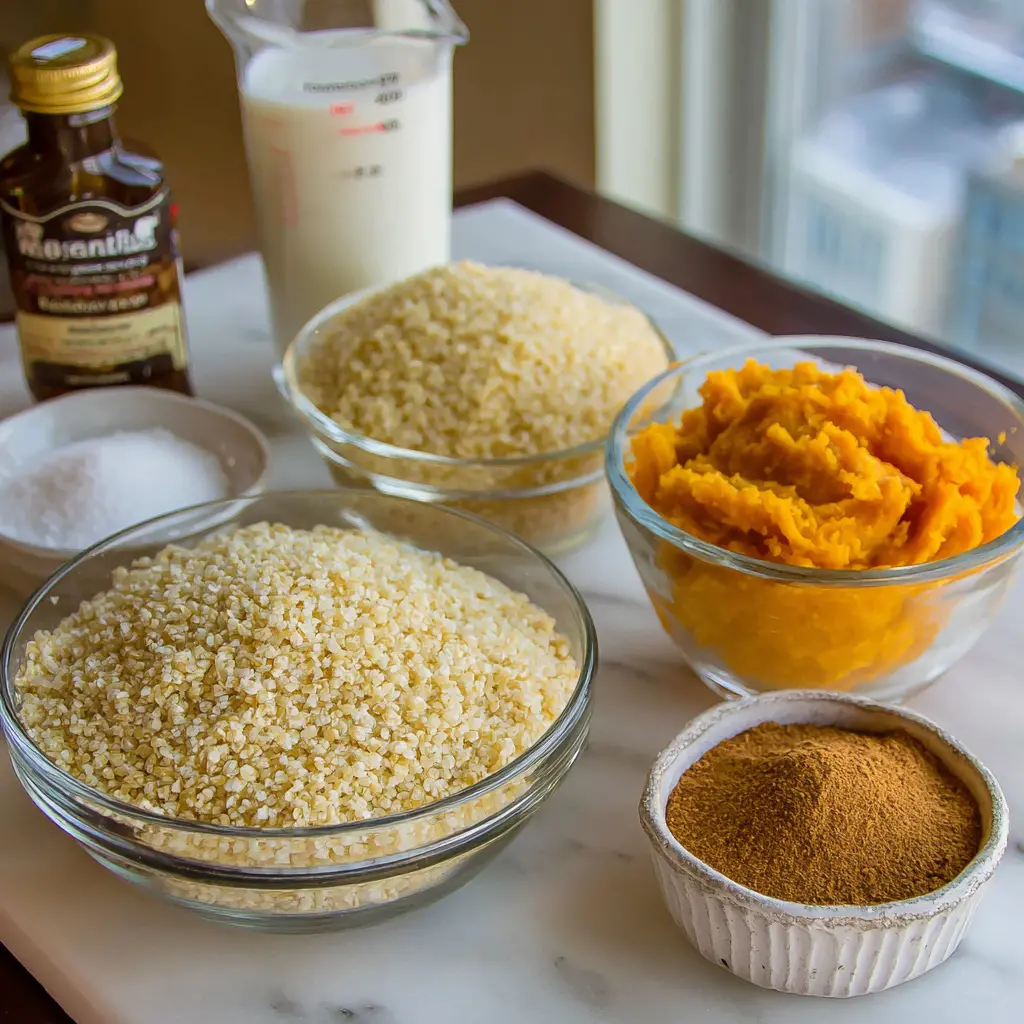
Let’s talk about what you’ll need. The beauty of this pumpkin kasha recipe is that it uses simple, everyday ingredients. You probably have most of them already.
- Whole milk This is key for the creamiest texture. You can swap in oat or coconut milk for a dairy-free version, but whole milk gives that rich, velvety finish.
- White rice Uncooked, long-grain works best. It cooks up tender and adds structure.
- Millet Uncooked, this little grain brings a subtle nuttiness and a fluffy texture. It’s a great alternative to quinoa or amaranth.
- Pumpkin puree Canned or fresh, doesn’t matter. No judgment if you’re not roasting a sugar pumpkin in June. Canned pumpkin is a year-round pantry staple.
- Granulated sugar Just a few tablespoons. You can swap in honey or maple syrup if you prefer.
- Vanilla extract Pure vanilla, please. It adds warmth and depth.
- Ground cinnamon That classic cozy spice. You can also add a pinch of nutmeg or ginger if you’re feeling adventurous.
That’s it. Seven ingredients. No weird stuff. No complicated techniques. Just good, honest food.
How to Make Pumpkin Kasha
Alright, let’s get cooking. This pumpkin kasha recipe has four main stages. I’ll walk you through each one, with tips so you nail it every time.
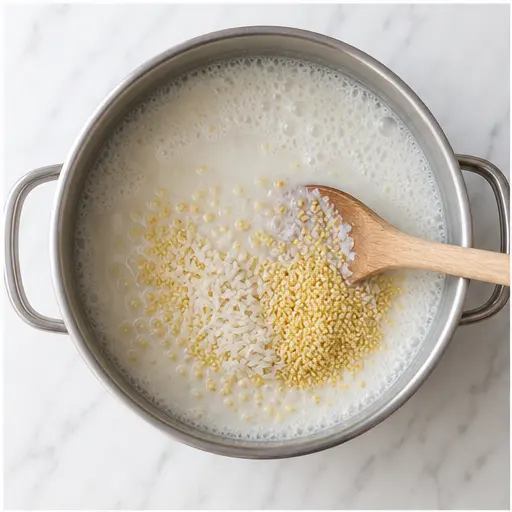
Stage 1: Cook the Grains in Milk
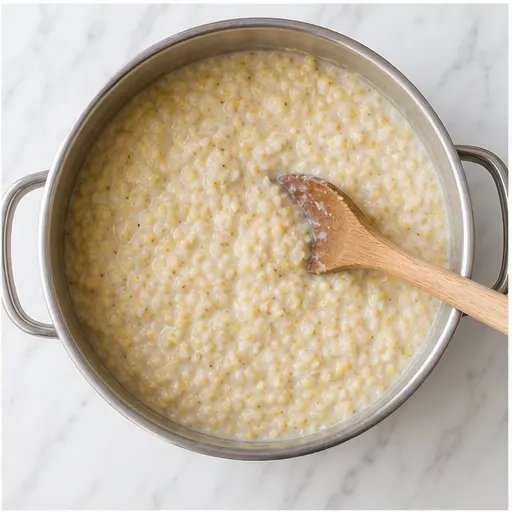
Start by bringing 4 cups of whole milk to a gentle boil in a large saucepan over medium-high heat. Watch it carefully milk can scorch fast. Once it’s bubbling at the edges, stir in 3/4 cup of white rice and 1/2 cup of millet. Reduce the heat to medium-low and let it simmer, stirring occasionally, until the grains are tender and fully cooked. This takes about 20 to 30 minutes. The kitchen will smell like warm, toasty milk. Honestly, it’s one of my favorite aromas.
Stage 2: Preheat and Prep the Dish
While the grains are cooking, preheat your oven to 350 degrees Fahrenheit. Lightly butter the bottom of a 9×13-inch ceramic or glass baking dish. This step is non-negotiable it prevents sticking and adds a little richness to the edges. Set it aside.
Stage 3: Mix in the Pumpkin and Spices
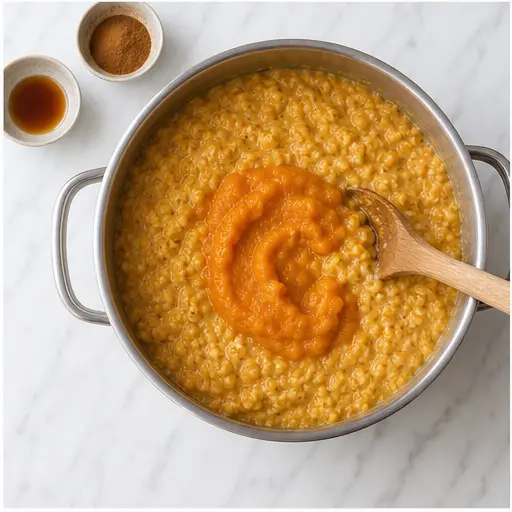
Once the grains are tender, remove the saucepan from the heat. Now comes the fun part. Mix in 1 tablespoon of vanilla extract, 1 teaspoon of ground cinnamon, and 3 tablespoons of granulated sugar. Then stir in 2 cups of pumpkin puree until everything is well combined and smooth. The color will shift from pale beige to a gorgeous warm orange. It’s like fall in a pot.
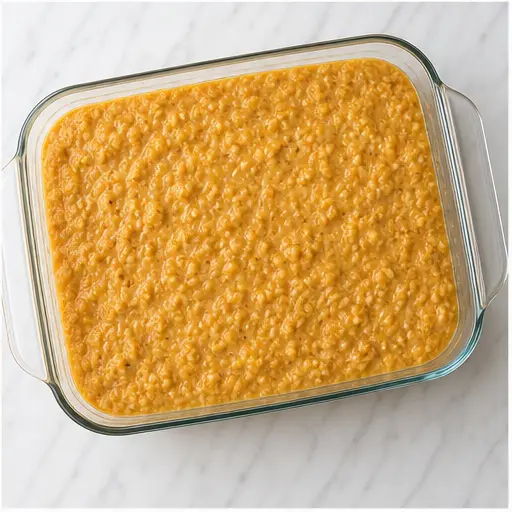
Stage 4: Bake Until Golden
Pour the mixture into your prepared baking dish and spread it into an even layer. Bake for about 60 minutes, or until the sides turn a deep golden brown and the center is set. The top will develop a slight crust, while the inside stays creamy. Let it cool slightly before serving warm. This is where patience pays off.
Tips for the Best Pumpkin Kasha
I’ve made this pumpkin kasha recipe more times than I can count. Here are the things I’ve learned along the way.
Grandma’s Tips for Creamy Perfection
- Opt for whole milk. It gives the creamiest texture. If you need dairy-free, oat or coconut milk work great.
- Don’t over-stir once the grains are cooked. It can break down the texture and make it gummy.
- Be careful not to burn the milk. Stir occasionally when boiling, and keep the heat medium-low during simmering.
- Let it rest after baking. The pudding will set as it cools, making it easier to serve.
Another thing if you’re making this ahead, it’s totally fine. The pumpkin kasha actually gets better after a day in the fridge. The flavors meld together beautifully. Just reheat gently in the microwave or oven with a splash of milk to bring back that creamy texture.
Ways to Serve Pumpkin Kasha
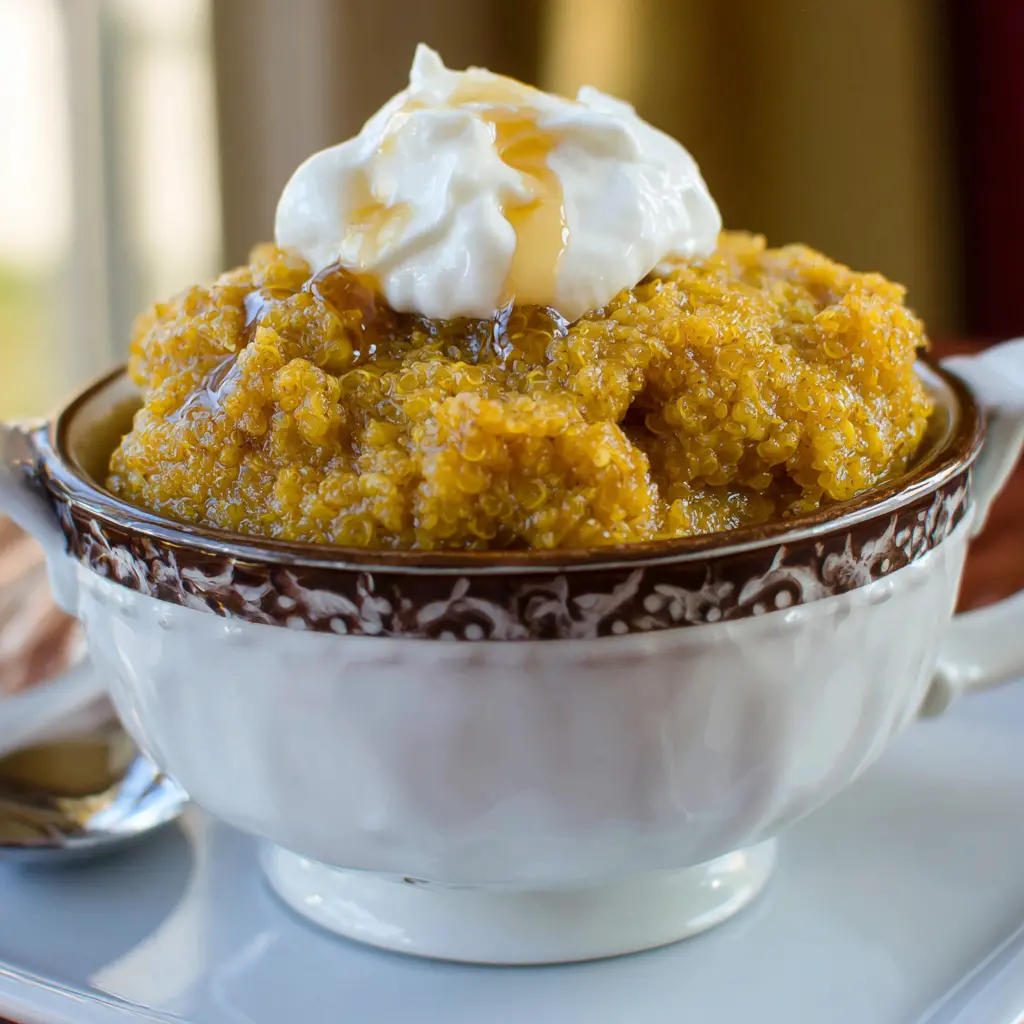
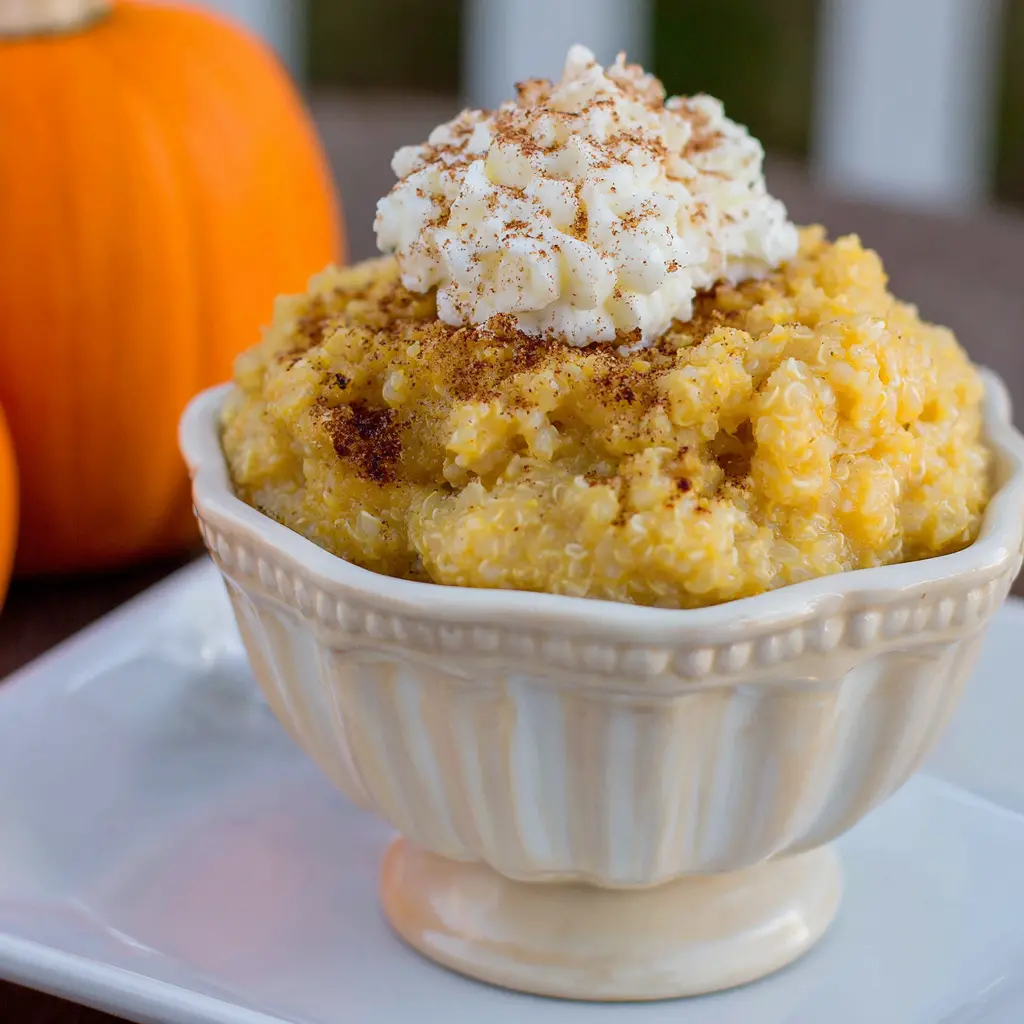
This pumpkin kasha is incredibly versatile. For breakfast, I love serving it warm with a dollop of Greek yogurt, a drizzle of maple syrup, and some sliced apples or chopped walnuts. It’s hearty enough to keep you full until lunch.
For dessert, try it with a scoop of vanilla ice cream or a swirl of whipped cream. The warm spices and creamy texture make it feel indulgent, but it’s actually pretty healthy. You can also top it with pumpkin seeds or dried cranberries for a little crunch.
And if you’re feeling fancy, serve it in individual ramekins for a dinner party. Trust me, your guests will be impressed.
Storing and Reheating Leftovers
Store any leftover pumpkin kasha in an airtight container in the fridge for up to 4 days. The texture might firm up a bit as it chills, but that’s normal. When you’re ready to reheat, add a splash of milk and microwave in 30-second intervals, stirring between each. Or reheat gently in a saucepan over low heat.
You can also freeze individual portions in freezer-safe bags for up to 3 months. Thaw overnight in the fridge before reheating. This is a great meal prep option for busy mornings.
Common Mistakes to Avoid
Even with a simple recipe like this, things can go wrong. Here’s what to watch out for.
- ❌ Mistake: Burning the milk when boiling. ✅ Solution: Stir occasionally and keep the heat at medium-high, not high. Once the grains are in, reduce to medium-low.
- ❌ Mistake: Not rinsing grains thoroughly. ✅ Solution: Rinse rice and millet in a fine mesh strainer to remove any impurities or dust.
- ❌ Mistake: Over-stirring once grains are cooked. ✅ Solution: Stir gently and only as needed. Over-stirring breaks down the grains and makes the pudding gluey.
- ❌ Mistake: Serving porridge too thin. ✅ Solution: Let it sit uncovered for a few minutes after baking. It will thicken as it cools.
Frequently Asked Questions
This pumpkin kasha has become a staple in my kitchen. It’s comforting, healthy, and so easy to make. Whether you’re looking for a cozy breakfast, a diabetes-friendly dessert, or just something new to try, this recipe delivers. Tag me when you make it I love seeing your spin.
Happy cooking!
Classic Pumpkin Kasha Breakfast Pudding
Ingredients
Method
- In a large saucepan over medium-high heat, bring the milk to a gentle boil. Stir in the rice and millet. Reduce the heat to medium-low and let it simmer, stirring occasionally, until the grains are tender and fully cooked, about 20 to 30 minutes.
- Preheat your oven to 350 degrees Fahrenheit. Lightly butter the bottom of a 9x13-inch ceramic or glass baking dish.
- Remove the saucepan from the heat.
- Mix in the vanilla extract, cinnamon, and sugar. Then stir in the pumpkin puree until everything is well combined and smooth.
- Pour the mixture into the prepared baking dish and spread it into an even layer.
- Bake for about 60 minutes, or until the sides turn a deep golden brown and the center is set. Let cool slightly before serving warm.
Nutrition
Notes
Tried this recipe?
Let us know how it was!Source: Nutritional Information


