
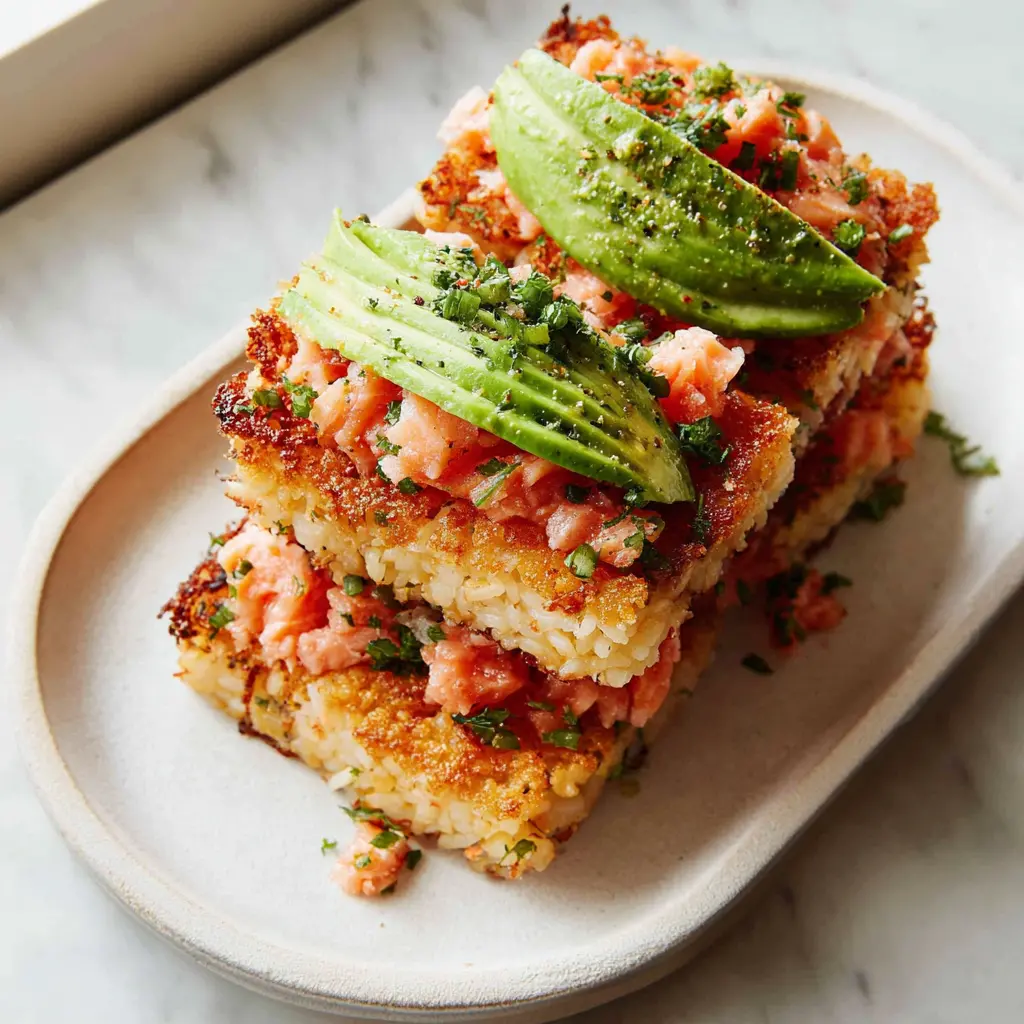

Crispy Rice Salmon Stack
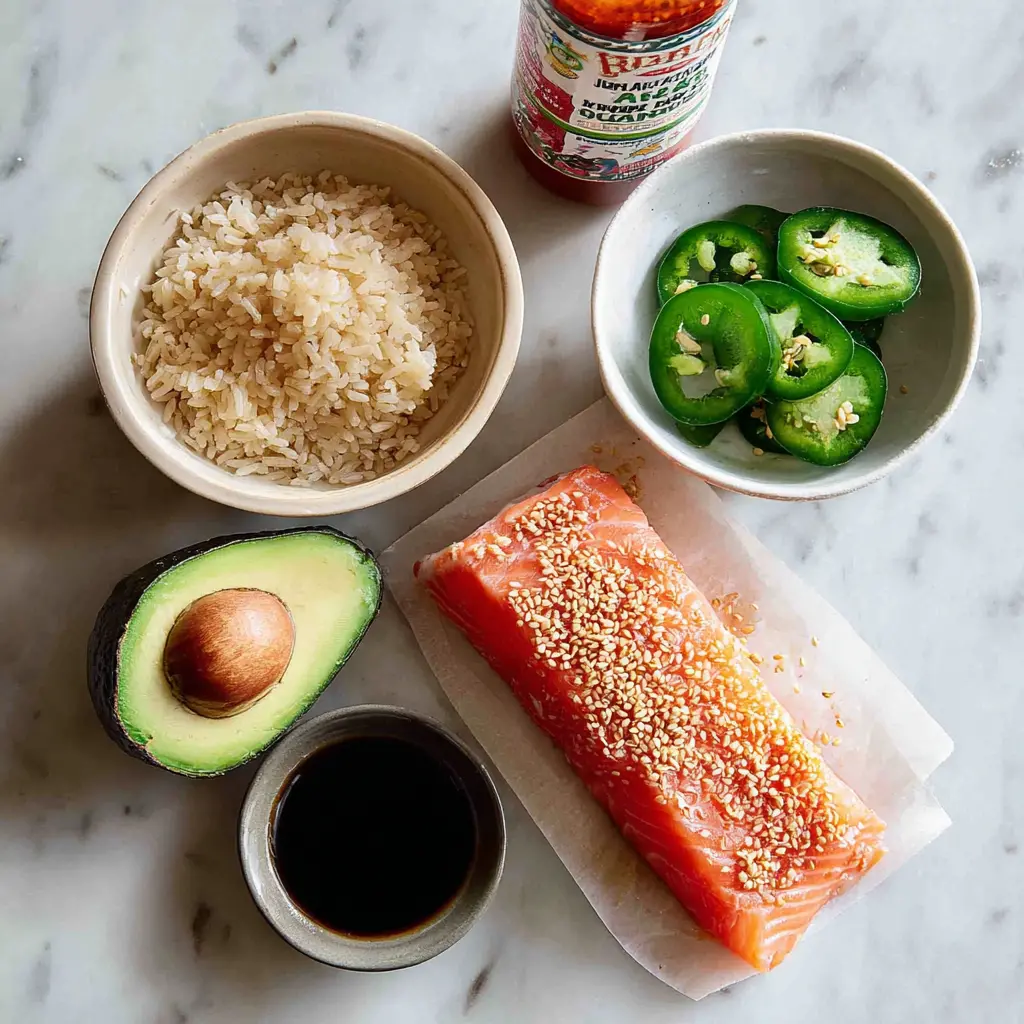
Ingredients
Method
- Rinse the short grain rice under cold water until the water runs clear, then cook according to the package directions.
- While the rice cooks, combine the rice vinegar, sugar, and kosher salt in a small saucepan. Warm over medium-low heat, whisking until the sugar and salt dissolve completely. Pour this seasoned vinegar over the hot rice and gently fold with a rice paddle or spatula, fanning the rice to cool it slightly and evenly distribute the seasoning.
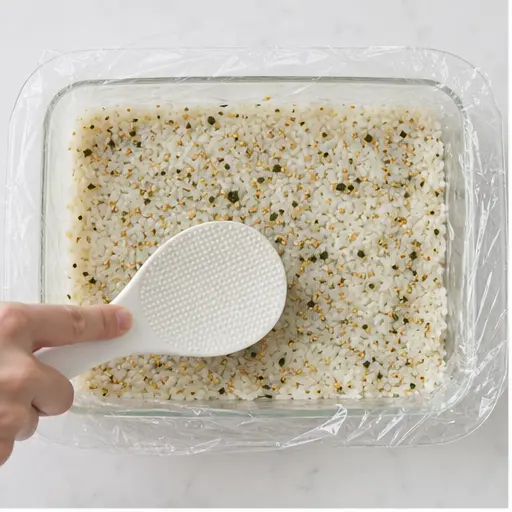
- Line an 8x8-inch baking dish with plastic wrap, leaving some overhang. Press the seasoned rice into the dish in an even, firm layer. Cover the surface with another sheet of plastic wrap and press gently to compact the rice without squishing it. Freeze for at least 3 hours, until the rice is firm enough to cut cleanly.
- While the rice chills, dice the sushi-grade salmon into small 1/4-inch cubes. In a bowl, combine the salmon with the Kewpie mayo, sriracha, soy sauce, toasted sesame oil, and sliced green onion. Toss gently until every piece is coated. Cover the bowl with plastic wrap and refrigerate until you're ready to assemble.
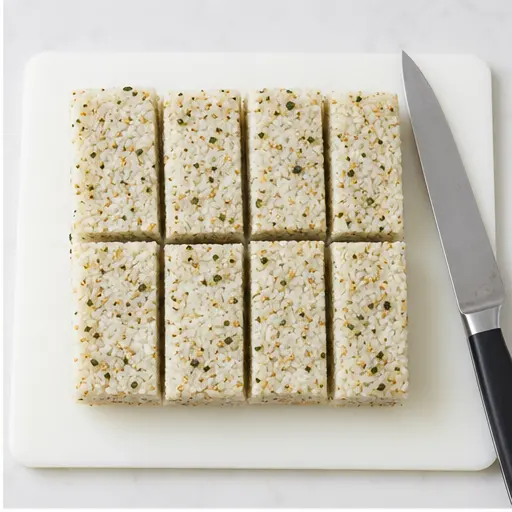
- Remove the frozen rice block from the dish and peel off the plastic wrap. Use a sharp knife to cut the block into 18 rectangles: 6 columns by 3 rows.
- Pour neutral oil into a wide, heavy-bottomed skillet or pot to a depth of about 1/2 inch. Heat over medium heat until shimmering. Working in batches of 3 to 4 pieces, fry the rice rectangles for 1 to 2 minutes per side, until golden brown and crispy. Adjust the heat if they brown too quickly. Transfer the fried rice to a paper towel-lined plate to drain and cool.
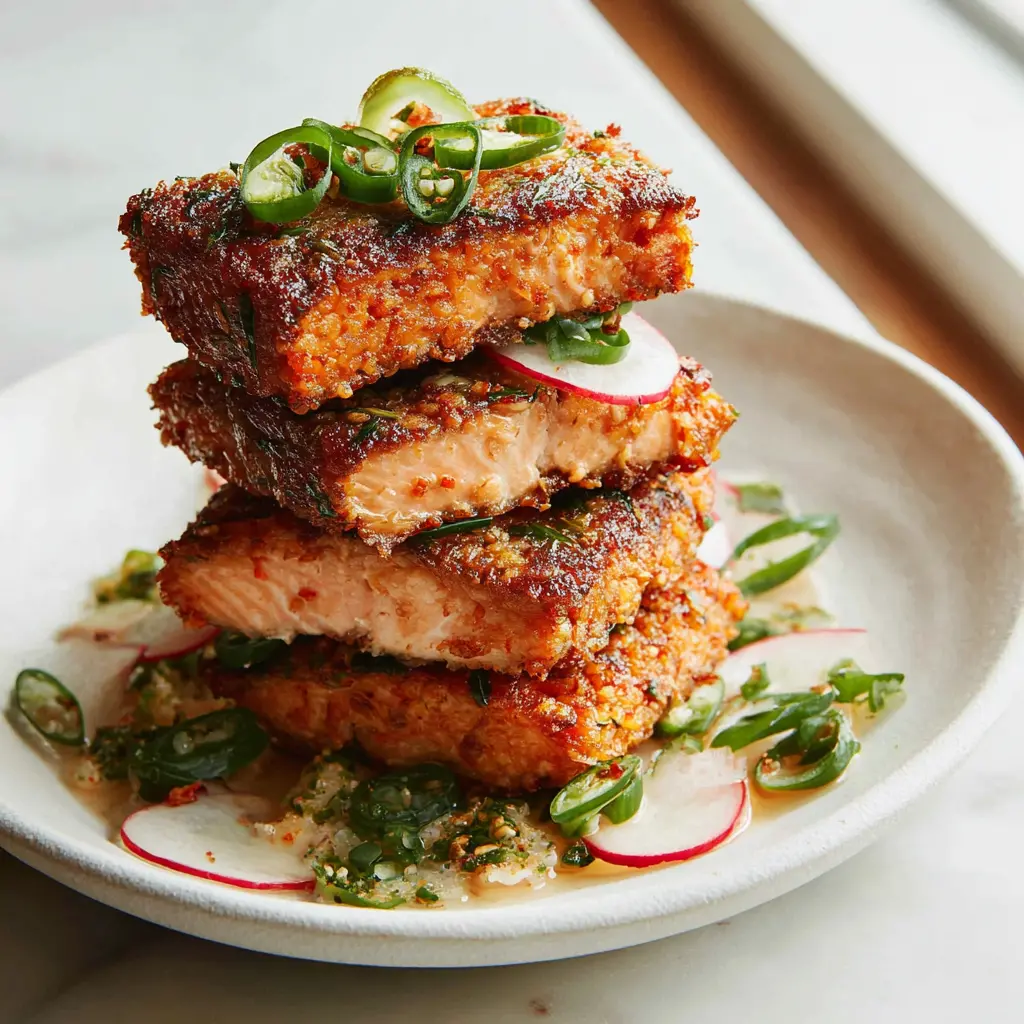
- Once the crispy rice blocks are cool enough to handle, top each one with a slice of avocado, a generous spoonful of spicy salmon, a jalapeño slice, a drizzle of sweet chili sauce, and a sprinkle of toasted sesame seeds. Serve immediately for the best texture.
Nutrition
Notes
Tried this recipe?
Let us know how it was!Why You’ll Love This Crispy Rice Salmon Stack
Let me be honest with you. The first time I tried to make a Crispy Rice Salmon Stack, I ended up with a sad pile of soggy rice and lukewarm fish. It was not pretty. But after a few failed attempts and some serious trial and error, I figured out the secrets. And now? This dish is my go-to for every dinner party, potluck, and even those nights when I just want to feel like a fancy chef in my own kitchen.
This crispy rice salmon stack brings together everything I love about sushi-inspired flavors but in a fun, handheld form. You get that satisfying crunch from the golden rice, the creamy richness of avocado, and the spicy kick of seasoned salmon. It’s a salmon stack appetizer that looks like it came from a high-end restaurant, but I promise, you can totally pull it off at home.
What I love most? You can prep most of it ahead of time. The rice block freezes beautifully, the spicy salmon mixture can hang out in the fridge, and all you have to do right before serving is fry and assemble. That means less stress and more time actually enjoying your guests.
Ingredients You’ll Need
Here’s the thing about this recipe the ingredient list is short, but each one plays a crucial role. Don’t skip any of them, and definitely don’t try to substitute without understanding what you’re doing. Trust me, I’ve tried.
For the crispy rice base:
- Short grain rice This is non-negotiable. Short grain rice has the perfect starch content to hold together when pressed and fried. Long grain rice will fall apart.
- Rice vinegar, sugar, and kosher salt This is your sushi seasoning. It gives the rice that classic tangy-sweet flavor that makes everything taste authentic.
- Neutral oil Avocado or canola oil works best. You want something with a high smoke point that won’t impart its own flavor.
For the spicy salmon:
- Sushi-grade salmon This is important. You’re eating it raw, so quality matters. Look for “sushi-grade” or “sashimi-grade” at your fish counter.
- Kewpie mayo If you can find it, use it. It’s creamier and richer than regular mayo. But if you can’t, regular mayo works just fine.
- Sriracha, soy sauce, and toasted sesame oil The holy trinity of spicy, salty, and nutty flavors.
- Green onion Adds a fresh bite and a pop of color.
For serving:
- Hass avocado Creamy, buttery, and the perfect counterpoint to the crunchy rice.
- Jalapeño Thin slices add heat and a beautiful green accent.
- Toasted white sesame seeds and sweet chili sauce The finishing touches that make it pop.
Substitutions and Variations
I get it. Sometimes you can’t find sushi-grade salmon, or maybe you just want to mix things up. Here are some swaps that actually work.
Instead of salmon:
- Sushi-grade ahi tuna This is probably the most common swap. It has a firmer texture and a milder flavor.
- Sushi-grade hamachi (yellowtail) Buttery and rich, absolutely delicious.
- Smoked salmon If you’re nervous about raw fish, this is a great option. Just chop it up and mix it the same way.
- Cooked salmon Leftover grilled or pan-seared salmon works in a pinch. Flake it and toss with the mayo mixture.
- Cooked shrimp or faux crab Both work surprisingly well.
Other easy swaps:
- Serrano pepper instead of jalapeño for a slightly different heat profile.
- Minced chives instead of green onion.
- Regular mayo instead of Kewpie just add a tiny pinch of sugar to mimic the sweetness.
Dietary notes: This recipe is naturally gluten-free as written, since soy sauce is the only potential source of gluten. Just use tamari or coconut aminos if you need it strictly gluten-free. For a low-carb option, you can try a cauliflower rice alternative, but fair warning it won’t hold together the same way and the texture will be different.
How to Make Crispy Rice Salmon Stack
Alright, let’s break this down into manageable stages. I’m going to walk you through the four main parts, with all the little tips I wish someone had told me the first time.
Stage 1: Make the seasoned rice
Start by rinsing your short grain rice under cold water until the water runs clear. This removes excess starch and prevents the rice from becoming gummy. Cook it according to the package directions I usually use a rice cooker because it’s foolproof, but a pot on the stove works too.
While the rice is still hot, pour over a mixture of rice vinegar, sugar, and salt that you’ve warmed until dissolved. Fold it gently with a rice paddle or spatula, fanning the rice as you go. This cooling and fanning step is what gives sushi rice its signature glossy sheen and perfect texture.
Line an 8×8-inch baking dish with plastic wrap, leaving some overhang. Press the seasoned rice into the dish in an even, firm layer. Cover the surface with another sheet of plastic wrap and press gently to compact it. Don’t mash it into a paste just firm enough so it holds together. Freeze for at least 3 hours, until the rice is completely firm.
Stage 2: Make the spicy salmon
While the rice chills, dice your sushi-grade salmon into small 1/4-inch cubes. In a bowl, combine the salmon with Kewpie mayo, sriracha, soy sauce, toasted sesame oil, and sliced green onion. Toss gently until every piece is coated. Cover and refrigerate until you’re ready to assemble.
Here’s a pro tip: if your salmon is fresh but hasn’t been previously frozen, freeze it for at least 24 hours to kill any potential parasites. Then thaw it in the fridge until it’s still cold but sliceable. Food safety first, always.
Stage 3: Fry the crispy rice
Remove the frozen rice block from the dish and peel off the plastic wrap. Use a sharp knife to cut the block into 18 rectangles 6 columns by 3 rows. This is where you’ll hear that satisfying sound of the knife cutting through the firm rice.
Pour neutral oil into a wide, heavy-bottomed skillet to a depth of about 1/2 inch. Heat over medium heat until shimmering. Working in batches of 3 to 4 pieces, fry the rice rectangles for 1 to 2 minutes per side, until golden brown and crispy. The sizzle when they hit the oil is music to my ears. Adjust the heat if they brown too quickly you want a deep golden color, not burnt. Transfer to a paper towel-lined plate to drain and cool.

Stage 4: Assemble the stacks
Once the crispy rice blocks are cool enough to handle, it’s time for the fun part. Top each one with a slice of avocado, a generous spoonful of spicy salmon, a jalapeño slice, a drizzle of sweet chili sauce, and a sprinkle of toasted sesame seeds.
Serve immediately for the best texture. The contrast between the warm, crunchy rice and the cool, creamy salmon and avocado is pure magic.

Tips for the Best Crispy Rice
I’ve made this recipe more times than I can count, and I’ve learned a few things the hard way. Here are my non-negotiable tips for success.
Common Mistakes and How to Fix Them
❌ Not freezing the rice long enough: The rice block needs to be completely firm, like a block of ice. If it’s still soft, it will fall apart in the oil. Freeze for at least 3 hours, or even overnight.
❌ Not washing the rice: Skipping this step leads to mushy, sticky rice that won’t crisp up properly. Wash until the water runs clear.
❌ Packing the rice too loosely: Air bubbles create weak spots that cause the rice to fall apart during frying. Press firmly and evenly.
❌ Frying when the oil isn’t hot enough: The oil should be shimmering but not smoking. If it’s too cool, the rice will absorb oil and become greasy instead of crispy.
❌ Not cooling on a wire rack: Paper towels work in a pinch, but a wire rack allows air to circulate and keeps the rice crispy longer.
Texture targets: You’re looking for a deep golden brown color on all sides. The rice should sound crunchy when you tap it with a fork, and the interior should be tender but not mushy. If it’s pale, keep frying. If it’s dark brown, your oil is too hot.
Equipment recommendations: A heavy-bottomed skillet or cast iron pan works best for even heat distribution. A ring mold assembly isn’t strictly necessary here since the rice is already cut into rectangles, but if you want to get fancy, you can use one for the avocado and salmon layers.
Storage and Leftovers
Let’s be real these are best eaten fresh, right after assembly. The magic is in that contrast between warm crispy rice and cool toppings. But if you have leftovers, here’s what to do.
Store leftover crispy rice salmon bites in an airtight container in the refrigerator for up to 2 days. The rice will lose its crunch, but the flavors will still be good.
To reheat: The best way to bring back some crispiness is to pop the rice pieces in an air fryer at 350°F for 2-3 minutes, or in a 375°F oven on a baking sheet for about 5 minutes. Then reassemble with fresh avocado and salmon mixture. Don’t microwave it will turn the rice into a sad, soggy mess.
Make-ahead strategy: This is where this recipe really shines. You can freeze the pressed rice block up to a week in advance. The spicy salmon mixture can be made a day ahead and kept covered in the fridge. Then on serving day, all you have to do is fry and assemble. Perfect for entertaining.
Frequently Asked Questions
This is the dish that will have everyone asking for the recipe. Seriously. Every time I bring these to a gathering, I end up texting the ingredients to at least three people before the night is over. The combination of crunchy, creamy, spicy, and fresh is just irresistible. And honestly? You don’t need to be a sushi chef to pull it off. Just follow these steps, trust the process, and get ready to impress.
If you make this Crispy Rice Salmon Stack, tag me in your photos I love seeing your creations! And if you’re looking for more party-perfect appetizers, check out my other viral recipes on Pinterest.
Source: Nutritional Information


