
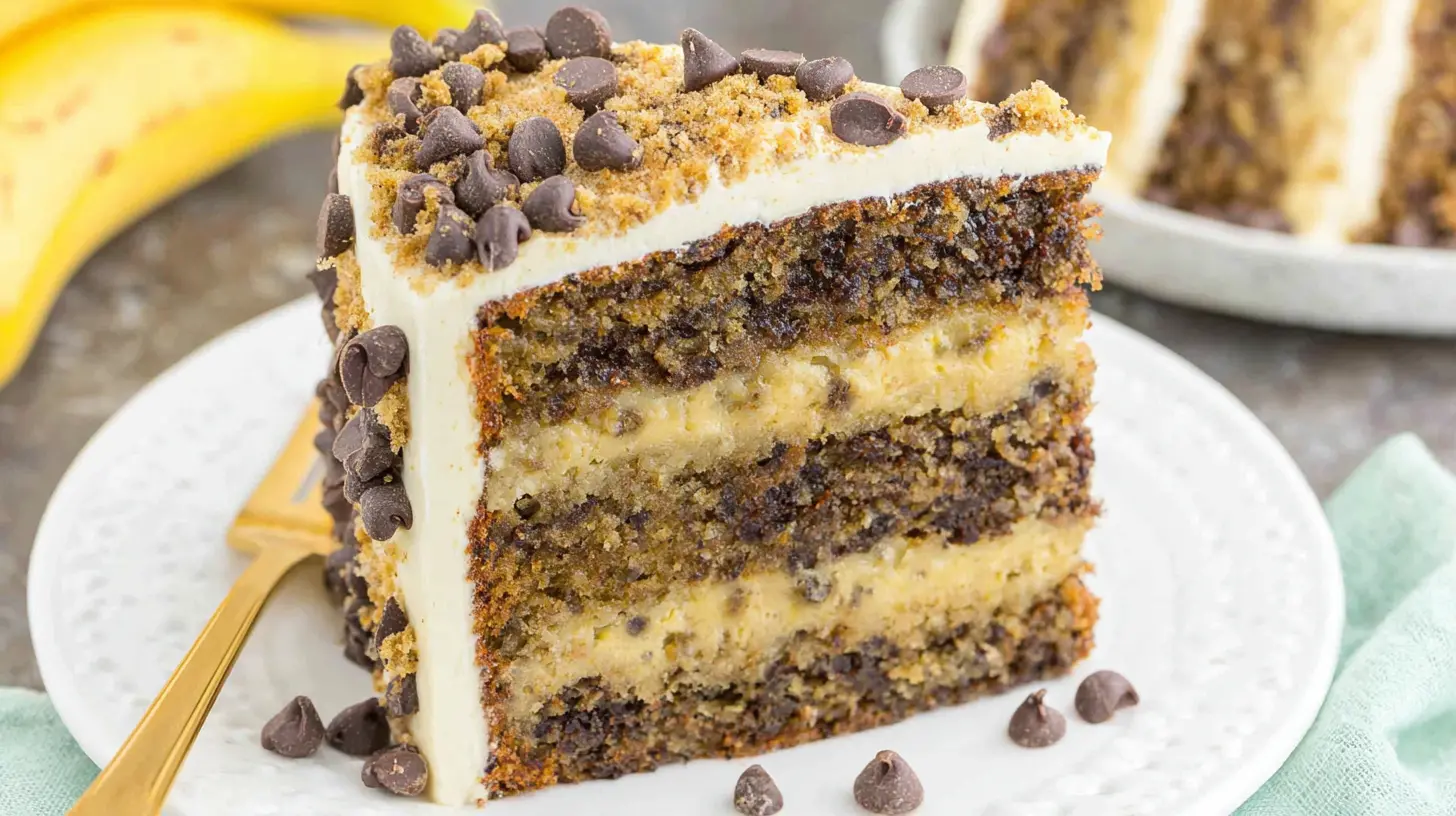

Moist Chocolate Chip Banana Layer Cake
Ingredients
Method
- Preheat the oven to 350°F (176°C). Prepare three 8-inch cake pans by lining the bottoms with parchment paper and spraying the sides with baking spray.
- Combine flour, baking powder, baking soda, cinnamon, and salt in a medium bowl; set aside.
- Add butter, sugars, oil, and vanilla extract to a large mixer bowl. Beat until light in color and fluffy, about 2-3 minutes; do not shorten the creaming time.
- Add the eggs and egg white one at a time, mixing until mostly combined after each addition. Scrape down the sides of the bowl as needed to ensure all ingredients are well incorporated.
- Add half of the dry ingredients to the batter and mix until mostly combined.
- Add the mashed banana and mix until well combined.
- Add the remaining dry ingredients and mix until well combined and smooth. Scrape down the sides of the bowl as needed to ensure all ingredients are well incorporated. Do not overmix the batter.
- Gently stir in the chocolate chips.
- Divide the batter evenly among the three cake pans. Bake for 25-30 minutes, or until a toothpick inserted into the center comes out clean.
- Remove cakes from the oven. Allow them to cool for 2-3 minutes in the pans, then invert them onto a wire cooling rack to cool completely.
- Add cream cheese and butter to a large mixer bowl. Beat until well combined.
- Slowly add about half of the powdered sugar and the cocoa powder. Beat until smooth.
- Add the vanilla extract and beat until smooth.
- Add the remaining powdered sugar and beat until smooth.
- Assemble the cake by layering cake and frosting, alternating until all cake layers are used. Cover the assembled cake with the remaining frosting. Slice, serve, and enjoy.
Nutrition
Notes
Tried this recipe?
Let us know how it was!Why You’ll Absolutely Love This Chocolate Banana Layer Cake
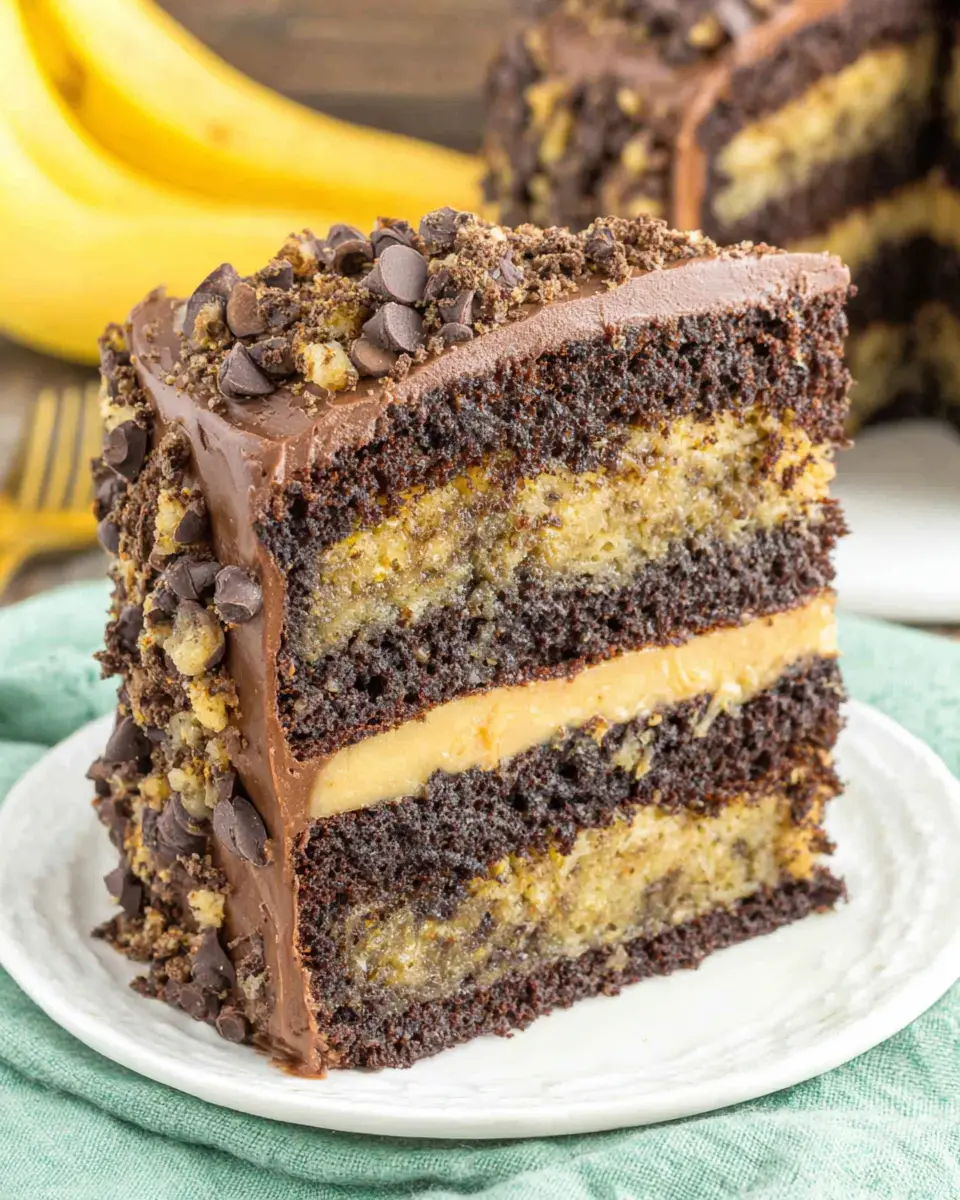
Honestly, when it comes to desserts that just make everyone happy, a good chocolate banana layer cake is pretty much top-tier. I mean, who doesn’t love that classic combo? It’s comforting, it’s familiar, but when it’s done right, it’s also incredibly elegant. You know, sometimes you just want a showstopper dessert that isn’t going to make you pull your hair out in the kitchen.
I get it, layered cakes can feel a little intimidating, like maybe they’re only for professional bakers. I’ve been there, trust me. Uneven layers, frosting disasters, the whole nine yards. But I’m telling you, this chocolate banana layer cake recipe is different. It’s designed to be achievable, even for an intermediate home baker. You’ll end up with a perfectly moist banana cocoa sponge, rich chocolate cream cheese frosting, and layers that look, and taste, absolutely amazing. Imagine the compliments you’ll get at your next gathering, especially as we head into spring. It’s a delightful treat perfect for a mild spring afternoon gathering, bringing a touch of comforting sweetness to the season.
Crafting Perfectly Moist Chocolate Cake Layers
The secret to an incredibly soft and flavorful chocolate banana layer cake really starts with the cake itself. We’re not just throwing ingredients in a bowl here. There’s a method, and once you understand the why, it’s so much easier. For instance, using overripe bananas is crucial. Those black-speckled beauties aren’t just for banana bread, you know? They’re packed with natural sweetness and moisture, which is key for a truly moist banana cake.
When you’re mashing your bananas, don’t go for a super smooth puree. A few small lumps are actually just right, adding a lovely texture to the banana sponge cake. Another little trick for ensuring a truly moist texture in this soft cocoa banana cake is the combination of both butter and vegetable oil. Butter gives you that amazing flavor, but oil keeps things incredibly tender and moist, even after a few days. It’s a baking science win-win, honestly.
And yes, we’re baking this at 325 degrees Fahrenheit, not the usual 350 degrees Fahrenheit. This lower, slower bake helps the cake rise evenly and prevents it from drying out, giving you that perfectly tender crumb we’re aiming for. It’s a small change, but it makes a huge difference, especially for a rich layered banana cake like this one.
Whipping Up Rich Chocolate Cream Cheese Frosting
Now, let’s talk about that rich chocolate cream cheese frosting. This is where the decadent dessert factor really kicks in. Achieving that perfect balance of tang from the cream cheese and deep cocoa flavor is an art, but it’s not hard, I promise. You want your cream cheese and butter to be at room temperature, absolutely essential. If they’re too cold, you’ll get lumpy frosting, and nobody wants that. I mean, you’ll spend ages trying to beat out those lumps.
For the chocolate, we’re melting semi-sweet chocolate chips. The trick here is to go slow. Melt chocolate slowly in the microwave in 20-second intervals, stirring after each. This prevents scorching, which can ruin the flavor and texture. You want it smooth and glossy, just right. Once it’s melted, let it cool a bit before adding it to your cream cheese mixture. If it’s too hot, it can melt your butter and make your frosting a runny mess. I learned that the hard way, you know.
If you find your buttercream is overly soft after you add all the ingredients, especially that melted chocolate, don’t panic. Just cover the bowl and place it in the refrigerator for about an hour. It’ll firm up. Remember to give it a good re-beat before you use it to get that fluffy frosting consistency back. It’s an easy fix, honestly.
Assembling Your Showstopper Layer Cake
Okay, the cake layers are baked, the chocolate cream cheese frosting is ready, and now for the fun part: assembly. This is where your homemade cake recipe starts to look like a truly special occasion cake. Don’t worry about past failures with uneven layers or messy frosting, we’ve got some tricks up our sleeve to make this easy.
First, make sure your cake layers are completely cool. I mean, really cool. Warm cakes will melt your frosting, and that’s a sad sight, honestly. Here’s a pro tip: only put the cakes in the freezer for 45 minutes if using immediately to cool quickly. If you’re saving them for another day, transfer them to plastic wrap first and keep them in the freezer for up to 30 days unfrosted. This helps with cake pan preparation too, as chilled cakes are much easier to handle.
When you’re layering, a little trick is to use a small offset spatula to spread your frosting evenly. Go for thin, even layers of frosting between each cake. Don’t try to make it perfect on the first go around for the outside. Do a thin crumb coat first. This traps any loose crumbs, giving you a smooth canvas for your final, thicker layer of frosting. It’s a game-changer for cake assembly, trust me. The aroma of that rich chocolate flavor combining with the sweet banana recipes, you’ll be so proud.
Troubleshooting Common Cake Conundrums
Look, even the best bakers run into issues sometimes. It’s just part of the baking journey. But knowing how to fix things, or better yet, prevent them, makes all the difference. I’ve certainly had my share of cake mishaps, I mean, who hasn’t?
Common Mistakes & Fixes for Chocolate Banana Layer Cake
Mistake: Your semi-sweet chocolate chips sink to the bottom of the cake layers.
Solution: The trick is to toss them in a little bit of all purpose flour before folding them into the batter. This creates a barrier, preventing them from sinking, and ensures an even distribution of chocolatey goodness throughout your banana sponge cake.
Mistake: The cake is dry or dense.
Solution: This often happens from overmixing the batter, which develops the gluten too much, or overbaking. Make sure you’re mixing just until combined, and trust that 325°F oven. Overripe bananas and buttermilk cake recipe components also really help with moisture.
Mistake: Frosting is too runny or won’t hold its shape.
Solution: This can be from warm ingredients or overbeating. Ensure your butter and cream cheese are room temperature, but not warm. If it gets too soft, pop it in the fridge for 20-30 minutes, then re-beat. Sometimes, honestly, you just need a little more powdered sugar.
Mistake: Your cake layers stick to the pans.
Solution: This is usually a pan preparation issue. Make sure you’re greasing and flouring your cake pans thoroughly. You can also line the bottoms with parchment paper for extra insurance. It’s a small step, but a crucial one for perfect layers.
Pan Sizes & Oven Configuration Guide
Baking can sometimes feel like a puzzle, especially when recipes call for specific pan sizes you don’t have, or when your oven seems to have a mind of its own. I get it. We’re not all working with a professional kitchen setup, especially in some of those smaller LA kitchens, you know?
This chocolate banana layer cake recipe is designed for three 8-inch round cake pans. But what if you only have two 9-inch pans? You can absolutely use two 9-inch pans instead of three 8-inch ones! Your cake layers will be a little thinner, so you’ll probably need to adjust the baking time down slightly, maybe by 5-10 minutes. Just keep an eye on them and use the toothpick test. If you want a similar height, you could increase the recipe by about 1.5 times, but then you’d still have two thicker layers.
If your oven only fits one or two 6-inch cake pans at a time, don’t worry. You can put two pans in at a time, probably one on the middle rack and one on the bottom rack, ensuring there’s good airflow. The batter for the others can sit on the counter for a bit, maybe 20-30 minutes, waiting for the first batch to bake. It won’t affect the batter too much, honestly, as long as it’s not sitting there for hours. Just be gentle when you finally pour it.
And yes, we preheat the oven to 325 degrees Fahrenheit and bake it at that. It’s not 350 degrees Fahrenheit like most cakes, and there’s a reason. This lower temperature helps prevent the outside of the cake from baking too quickly and forming a crust before the inside is done, leading to a truly moist banana cocoa sponge. It’s a key part of getting that perfect texture.
Delicious Variations for Your Chocolate Banana Layer Cake
Once you’ve mastered the classic chocolate banana layer cake, it’s fun to play around with variations. I mean, that’s what baking is all about, right? Making it your own. You’ve already got that amazing foundation with the moist banana cake and rich chocolate flavor, so let’s get creative.
For an extra layer of flavor and a bit of crunch, you could definitely add some chopped pecans or walnuts to your banana sponge cake batter. Just remember that little trick about tossing them in a bit of all purpose flour first to prevent them from sinking. It’s a subtle addition that really makes the sweet banana chocolate slice even more interesting.
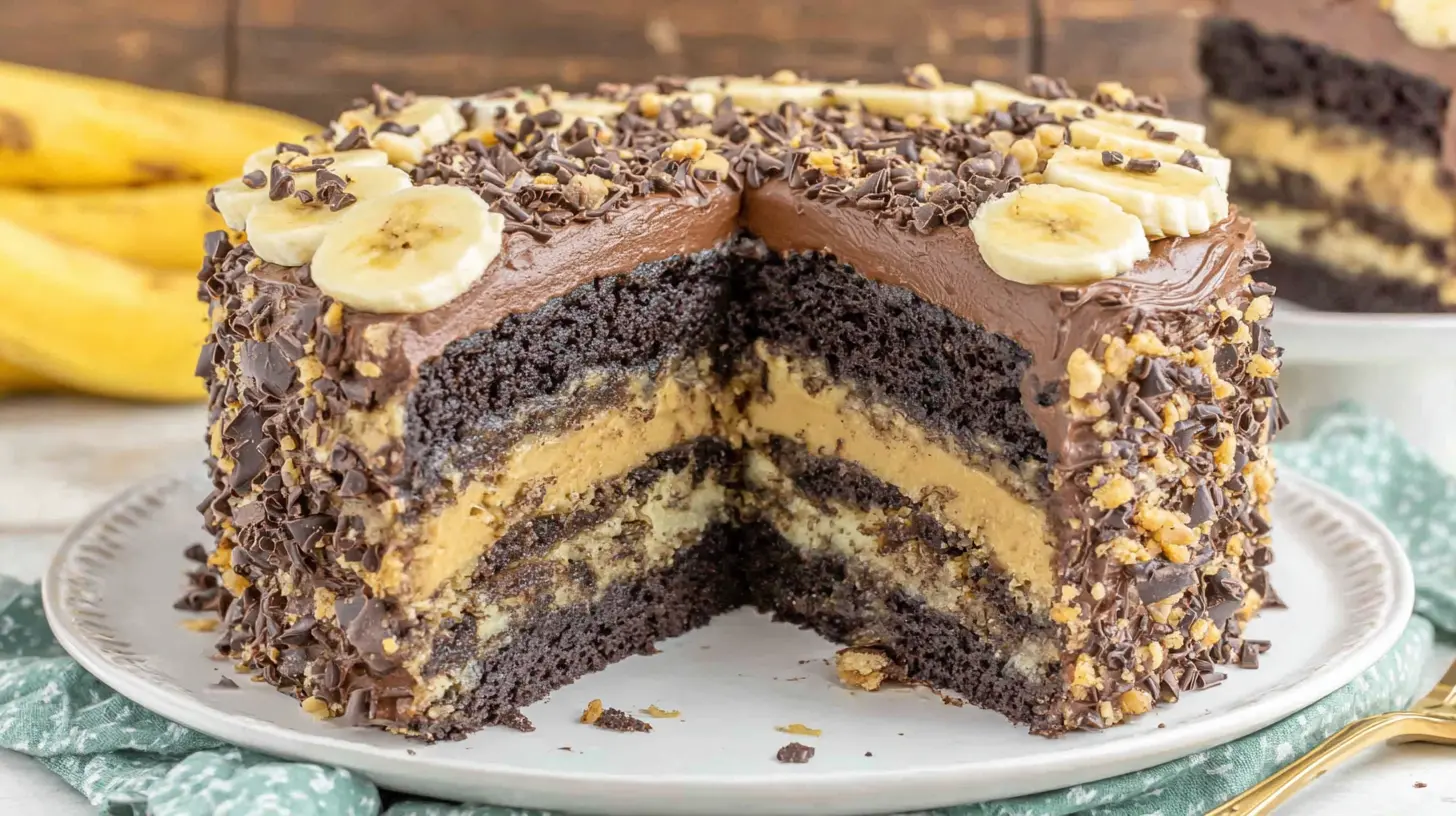
If you’re a fan of peanut butter, you could spread a thin layer of creamy peanut butter over the cake layers before frosting them. It’s an amazing pairing with banana and chocolate. Or, for a more intense chocolate experience, a sprinkle of extra semi sweet chocolate chips between the layers or on top as a garnish is always a good idea. It just adds that little something extra to your decadent dessert.
And yes, you can absolutely make this as a sheet cake instead of a layer cake! A 9×13 inch pan works really well. The baking time will be longer, probably around 60-70 minutes, but still at that 325 degree Fahrenheit temperature. Just keep an eye on it and use the toothpick test for doneness. It’s a great option for a more casual gathering or if you’re bringing it to a potluck. You could also easily make this chocolate banana layer cake gluten-free, a 1:1 gluten-free all-purpose flour substitute works really well in this recipe, honestly. I’ve tried it, and it’s just as good.
Comprehensive Make-Ahead & Freezing Strategy
Life in Los Angeles is busy, I know. Sometimes you need to bake ahead to make things work, especially if you’re planning a special occasion cake or just want a treat on hand. The good news is, this chocolate banana layer cake is pretty forgiving when it comes to making it ahead of time. You’ve got options, which is always nice, you know?
For the cake layers themselves, once they’re completely cooled, wrap each one tightly in plastic wrap. You can store them at room temperature for a day or two, or pop them in the freezer for up to a month. If you’re freezing them, make sure they’re well-wrapped to prevent freezer burn. Just thaw them on the counter before you’re ready to assemble. This is an amazing time-saver for cake assembly.
The chocolate cream cheese frosting can also be made ahead. Store it in an airtight container in the refrigerator for up to 3-4 days. When you’re ready to use it, let it come to room temperature for about 30 minutes, then give it a good re-beat with your electric mixer until it’s light and fluffy again. It’ll be just right for spreading.
Now, if you’re making the entire chocolate banana layer cake ahead and planning to freeze it, here’s a critical tip: DO NOT add fresh bananas as a garnish or between layers if they’re not cooked into the cake. They will brown and get mushy when thawed. You can either leave them out completely and add fresh slices when serving, or use banana chips for decoration. For storage, a frosted cake should be stored covered in the refrigerator for up to 4 days. If you want to freeze slices, wrap them individually in plastic wrap and then store in an airtight container in the freezer. They’ll be good for about a month. To reheat, just let them thaw on the counter for a bit, maybe 20-30 minutes, until they reach your preferred temperature.
Frequently Asked Questions
Storing Your Delicious Chocolate Banana Layer Cake
You’ve put all that effort into making this truly amazing chocolate banana layer cake, so you want to make sure it stays fresh and delicious, right? I mean, it’s a showstopper, and it deserves to be enjoyed for as long as possible. Proper storage is key here, honestly.
Once your chocolate banana layer cake is assembled and frosted, the best place for it is in the refrigerator. Keep it covered, either with a cake dome or loosely with plastic wrap, to prevent it from drying out or absorbing other fridge odors. It’ll stay perfectly tender and moist for up to 4 days. This is great if you’ve done some meal prep on Sunday for the week, you know, or just want a slice after your Trader Joe’s run.
If you’ve got leftovers, or if you’re planning really far ahead, you can freeze individual slices. Just wrap each slice tightly in plastic wrap, then place them in an airtight freezer-safe container or a freezer bag. They’ll keep well for about a month. To enjoy a frozen slice, just let it thaw at room temperature for about 20-30 minutes before serving. It’ll be just as good as fresh, honestly!
When you’re ready to serve, I think letting the whole cake or individual slices come to room temperature for about 20 minutes really brings out the full flavor and perfect texture. You can garnish with a few fresh banana slices or maybe some chocolate chips for that extra touch. That first bite of a rich layered banana cake, it’s so good!
Enjoy Your Homemade Masterpiece!
Well, there you have it! You’ve successfully baked a truly impressive, perfectly moist chocolate banana layer cake. I know sometimes baking a multi-layered cake can seem like a huge undertaking, but you’ve navigated it like a pro, and I’m so proud of you. Take a moment to really admire your work, you know? That beautiful banana cocoa sponge, the rich chocolate cream cheese frosting, those perfect layers. It’s a masterpiece.
Now, go on and share this decadent dessert with your loved ones. Get ready for those compliments, because they’re coming! This chocolate banana layer cake is more than just a recipe, it’s an experience, a comforting and satisfying treat to enjoy. Don’t forget to snap a picture and maybe share your baking triumph. If you’re looking for more baking inspiration and ideas for your next sweet banana recipe, check out my Pinterest boards. You’ve got this, and I can’t wait to see what you bake next!
Source: Nutritional Information


