
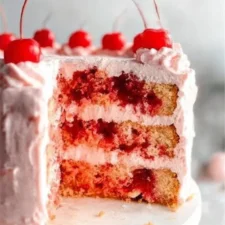
Sweet Cherry Vanilla Layer Cake
Ingredients
Method
- Preheat the oven to 350°F (175°C). Grease and flour a 9x13 inch baking pan.
- Combine the cake mix, eggs, vegetable oil, water, and almond extract in a large mixing bowl. Mix on medium speed for about 2 minutes until well combined.
- Gently fold in the cherry pie filling and chocolate chips.
- Pour the batter into the prepared pan and spread evenly.
- Bake for 30-35 minutes, or until a toothpick inserted in the center comes out clean.
- Allow to cool before serving.
Nutrition
Notes
Tried this recipe?
Let us know how it was!Why You’ll Love This Cherry Vanilla Layer Cake
Honestly, I get it. The idea of baking a layer cake can feel a little, well, *daunting*. You know, all those separate layers, the frosting that just won’t cooperate, the fear of a dry crumb. I’ve been there, staring at a recipe, thinking, “Can I actually pull this off?” But what if I told you that creating a stunning, moist, and utterly delicious cherry vanilla layer cake is actually way easier than you think? This isn’t just another pretty dessert; it’s a showstopper that’s surprisingly approachable, even if you’re not a seasoned baker. This recipe is designed to take the stress out of creating an impressive dessert. We’re talking about a sweet treat that looks like it took you all day, but really, it’s a clever shortcut to pure deliciousness. Imagine the delightful aroma of almond and cherry filling wafting through your kitchen on a mild Los Angeles spring afternoon. It’s the kind of cake that makes people ask for the recipe, trust me. You’ll feel so proud slicing into this beautiful cherry vanilla layer cake, revealing those soft, flavorful layers.Gathering Your Cake Essentials
Before we even think about turning on the oven, let’s make sure we’ve got all our ducks in a row. Baking is so much more enjoyable when you’re not scrambling for ingredients halfway through, you know? This recipe keeps things streamlined, focusing on quality components that deliver big flavor without a huge fuss.Choosing Your Cherries
For this cherry vanilla layer cake, we’re leaning into the convenience and vibrant flavor of quality **cherry pie filling**. It’s a fantastic shortcut that still gives you that lovely fruit texture and sweet-tart balance. When you’re picking it out at Ralphs or Vons, look for a brand that isn’t overly syrupy; you want those plump cherry pieces to really shine. If you’re feeling a bit adventurous and it’s peak season at the Santa Monica Farmers Market, you could absolutely use fresh sweet cherries to make your own filling from scratch, but the pie filling works perfectly well for our purposes here. It’s all about making baking fit your life, I mean.Essential Baking Equipment
You don’t need a fancy kitchen full of gadgets for this, honestly. A few key pieces of equipment will set you up for success. You’ll want two 8-inch round **baking pans**, maybe even three if you prefer thinner layers, which I think gives a nicer presentation. A good **stand mixer** (or a sturdy hand mixer) is a lifesaver for getting that **cake mix** light and fluffy. Don’t forget your measuring cups and spoons, a rubber spatula for scraping down the bowl, and parchment paper to line your pans. It’s those little things that make a big difference in the long run, you know?Baking Your Cherry Vanilla Layer Cake
Okay, let’s get into the fun part: making this amazing cake. I know some people get nervous about baking, but each step here is totally manageable. We’re building this beautiful **cherry vanilla layer cake** one simple piece at a time. The goal is a super **moist cake recipe** that everyone will rave about.Whipping Up the Vanilla Cake Layers
This is where our **white cake mix** comes in to save the day, making things so much simpler, you know? You’ll combine the cake mix with your **large eggs**, **vegetable oil**, **water**, and a touch of **almond extract**. That almond extract really elevates the “vanilla” flavor from the cake mix and pairs beautifully with the cherry. The trick here is to mix until just combined. I learned this the hard way: over-mixing is a cardinal sin in baking. It develops the gluten too much, and you’ll end up with a dense, dry cake. We want soft, tender layers, so stop mixing as soon as everything looks smooth. Divide your batter evenly between your prepared **baking pans**, and into the oven they go. You’re looking for that lovely **golden brown** top, and a springy texture when lightly touched.Crafting the Cherry Filling
For our incredible cherry filling, we’re keeping it easy with the **cherry pie filling**. You could even stir in a tiny bit more **almond extract** to really boost that complementary flavor profile. If your pie filling seems a little too wet, you can gently drain off some of the excess liquid. The key is to have a filling that’s thick enough to stay put between the cake layers without making everything slide around. It should be **just right**, with plenty of those beautiful cherry pieces. This filling is so good, I mean, you’ll probably want to make extra for other desserts.Perfecting the Vanilla Frosting
A great **vanilla frosting** is the crown jewel of any layer cake, wouldn’t you agree? While the recipe card will give you the precise ingredients, the real secret to a velvety smooth frosting is patient mixing. You want to beat it until it’s light and fluffy, almost cloud-like. If it feels too stiff, add a tiny splash of water or milk, one teaspoon at a time, until you reach that perfect spreadable consistency. If it’s too thin, a bit more powdered sugar can save it. That almond extract can make an appearance here too, amplifying the overall flavor profile of your **cherry vanilla layer cake**. It’s all about balance and texture.Assembling Your Masterpiece
Now for the grand finale: putting it all together! This is where your **homemade cake** really starts to look like a **celebration dessert**. First, make sure your **cake layers** are completely cool. Seriously, don’t rush this part, or your frosting will melt into a sad mess. I’ve definitely tried to rush it before, and it wasn’t pretty. Level your cakes with a serrated knife if they have domed tops; this makes for a much more stable and aesthetically pleasing cake. Apply a thin crumb coat of frosting first, chilling it for about 15-20 minutes. This traps any loose crumbs and gives you a pristine surface for your final layer of frosting. Then, spoon on your cherry filling, leaving a small border, and stack those layers. Take your time, and remember, even if it’s not absolutely perfect, it’s still going to be amazing.Tips for a Perfect Cake
Achieving that truly **aesthetic berry cake** isn’t just about following steps; it’s about understanding a few key principles. This isn’t being fussy, it’s the difference between a good cake and one that makes everyone gasp. First, let’s talk about **almond extract**. This is one of those ingredients where quality really shines through. Use a pure, high-quality almond extract, both in the cake batter and in your frosting. It just gives a more complex, bright flavor that complements the cherry so well. You know, it’s like the secret ingredient that makes people wonder what your special touch is. Next, about those **cake layers**: avoid over-mixing the batter. I mean, it’s probably the most common mistake home bakers make. As soon as your **white cake mix** ingredients are just combined, stop. Over-mixing leads to a dense, tough crumb, and we’re aiming for a soft, **moist cake recipe**. Trust me on this, a light hand here is **worth it**. When it comes to the filling, if you’re ever making your own from scratch using fresh sweet cherries, you’d want to make sure they’re ripe and flavorful. Even with cherry pie filling, if it seems too watery, a quick drain can help. And here’s the real secret for any layer cake: leveling your cakes. Before you even think about frosting, grab a serrated knife and trim off any domed tops. This creates a flat surface for each layer, making your **cherry vanilla layer cake** much more stable and easier to frost smoothly. It looks so much more professional, honestly. Finally, and this is a high-value tip I can’t stress enough: chill your assembled cake for at least four hours before serving. This isn’t just for the frosting to set; it allows the flavors to meld beautifully and makes for clean, perfect slices. It’s hard to wait, I know, but it’s **worth it**.Cherry Vanilla Cake Variations
This **cherry vanilla layer cake** is wonderfully adaptable, you know? While the classic is so good, sometimes you want to switch things up. If it’s not cherry season, or if you’re just craving a different fruit, you’ve got options. Strawberry, raspberry, or blueberry pie filling would all make a delicious substitute for the cherry. I’ve even seen people use apple or peach pie filling for a different kind of sweet treat. For a citrusy twist, you could try lemon, lime, orange, apricot, or even cranberry pie filling. The base **white cake mix** and **almond extract** pairing is really versatile. When it comes to the cake itself, if you’re using a scratch recipe (which this isn’t, but for general knowledge), you could substitute buttermilk for regular milk for a tangier, more tender crumb. And if you happen to have cake flour on hand, you’d typically use a bit more of it instead of all-purpose flour for an even finer texture. For this specific recipe, using **white cake mix** keeps things simple and consistent, but it’s good to know your options!Troubleshooting Common Cake Issues
Look, I’ll be honest, even the best bakers run into little hiccups sometimes. It’s part of the baking journey, you know? The thing is, knowing what can go wrong and how to fix it makes all the difference. This problem-first approach helps you prevent those frustrating moments with your **cherry vanilla layer cake**.Common Mistakes & Fixes
Mistake: Your cake layers turn out dry and dense.
Solution: This is almost always due to over-mixing the batter. Remember, once the **white cake mix** and other ingredients are just combined and smooth, stop mixing. Also, check your oven temperature; an oven that’s too hot can dry out cakes quickly. A good oven thermometer is your friend here.
Mistake: The cake layers dome excessively in the middle.
Solution: Often, this means your oven is too hot, causing the outside to set before the middle can fully rise. Try lowering your oven temperature by 25°F and extending the baking time slightly. Alternatively, you can level the domed tops with a serrated knife once cooled, which is what I usually do anyway for a neat presentation.
Mistake: Your cherry filling makes the cake soggy or unstable.
Solution: This can happen if the **cherry pie filling** is too wet. Gently drain some of the excess syrup before spreading it. Also, make sure you don’t overfill the layers; a nice, even amount is **just right**. Chilling the cake after assembly really helps the filling set up properly.
Mistake: The frosting is too thin or too thick to spread.
Solution: If it’s too thin, gradually beat in more powdered sugar. If it’s too thick, add water or milk, one teaspoon at a time, until you reach your desired consistency. It’s a delicate balance, but you’ll get the feel for it, I think.
Mistake: Cake slides or leans after assembly.
Solution: Uneven layers are usually the culprit here. Make sure you level your cake layers properly. A thin crumb coat of frosting followed by a chill in the fridge helps stabilize everything before the final frosting goes on. And remember to chill the finished cake for at least four hours; it makes a huge difference in stability.
Cherry Vanilla Cake FAQs
Storage & Serving Suggestions
Once you’ve poured your heart into creating this amazing **cherry vanilla layer cake**, you’ll want to make sure it stays fresh and delicious. The good news is, it’s pretty easy to store. Keep your cake covered with plastic wrap or a cake dome in the refrigerator. This helps keep the cake moist and prevents the frosting from drying out. It’ll be perfectly good for about 3 to 5 days. If you’re looking to extend its life, this cake freezes beautifully. For a whole frosted cake, pop it into the freezer uncovered for about an hour to let the frosting firm up. Then, wrap it tightly in plastic wrap, followed by a layer of aluminum foil, and place it in a freezer-safe bag or container. For individual slices, wrap each one in plastic wrap or foil. It’ll keep in the freezer for up to three months. When you’re ready to enjoy it, simply thaw the cake overnight in the refrigerator, or for a few hours on the countertop. Now, for serving, and this is a crucial tip: pull your **cherry vanilla layer cake** out of the fridge about 15-30 minutes before you plan to slice it. Butter cakes and frosting tend to firm up when chilled, so letting it sit at room temperature for a bit allows the cake to soften and the flavors to truly sing. You’ll get those beautiful, clean slices, and the taste will be so much richer. It’s truly a **celebration dessert**!Your Masterpiece Awaits!
You’ve done it! You’ve transformed simple ingredients into an absolutely stunning **cherry vanilla layer cake**. When you present this beautiful cake, with its soft layers, sweet cherry filling, and fluffy vanilla frosting, you’ll feel that incredible sense of accomplishment. I mean, who wouldn’t be impressed? This isn’t just a cake; it’s a testament to your baking prowess, a delicious memory waiting to be made. So go ahead, grab your **white cake mix** and **cherry pie filling** on your next Trader Joe’s run. You’ve got this, and the reward is so good. Don’t forget to share your creations; I love seeing them! For more inspiration, check out my Pinterest boards.Source: Nutritional Information


