

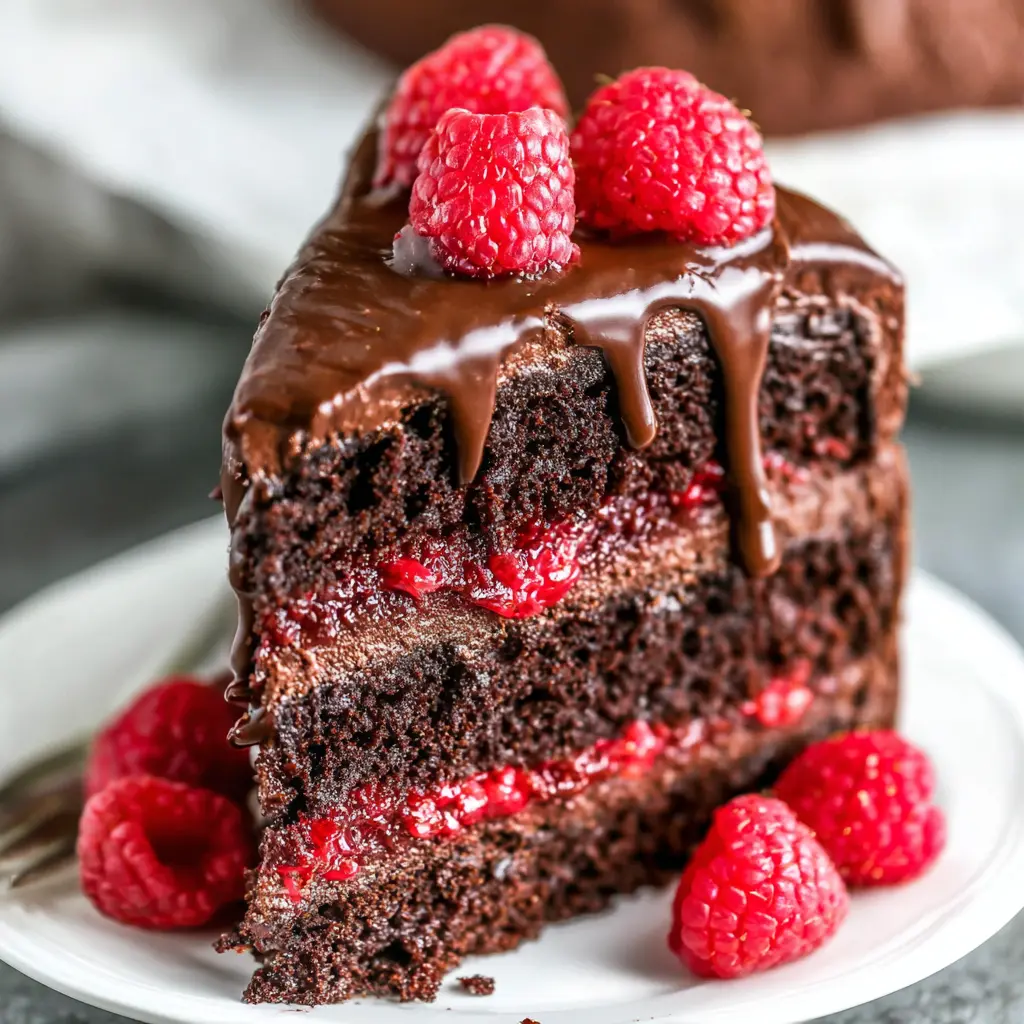
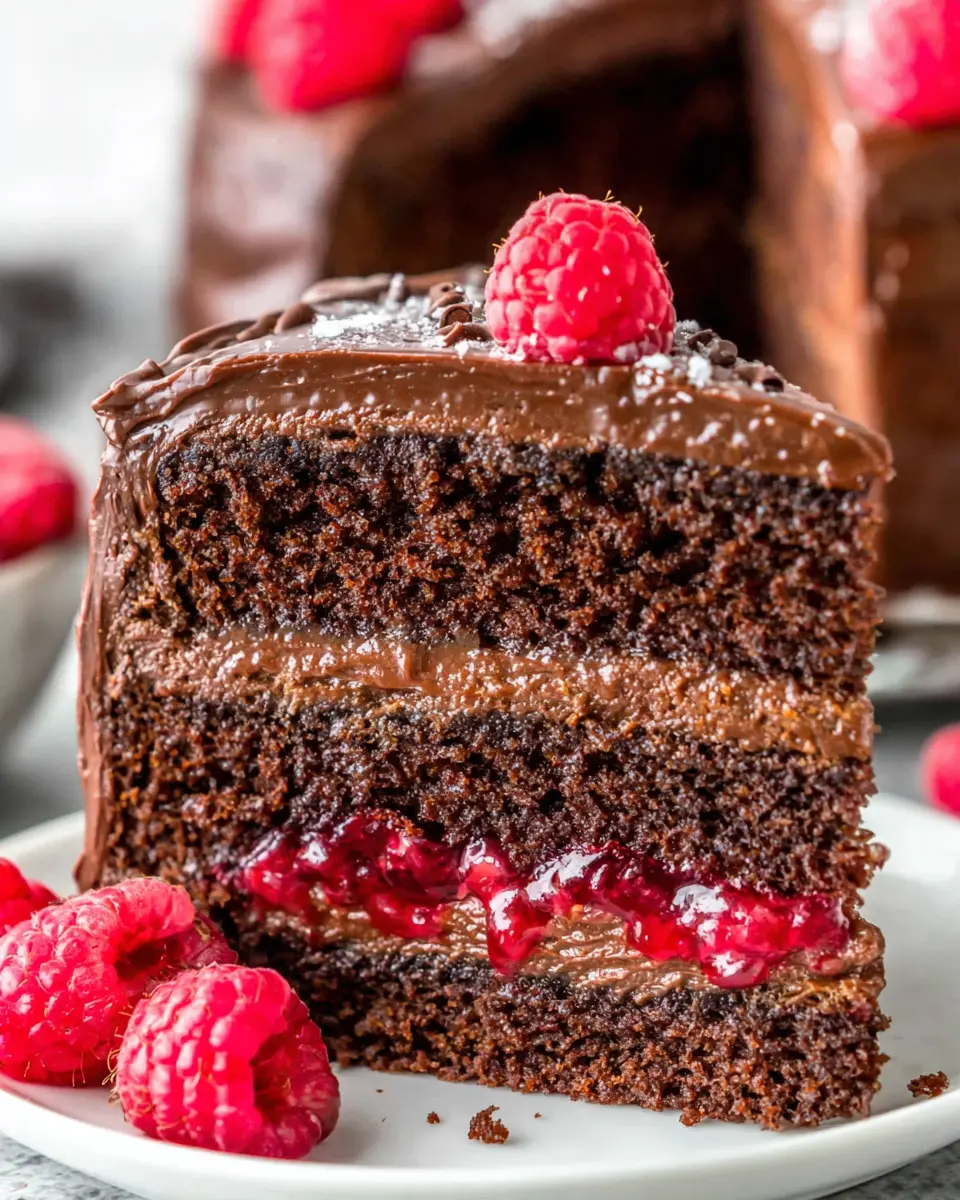
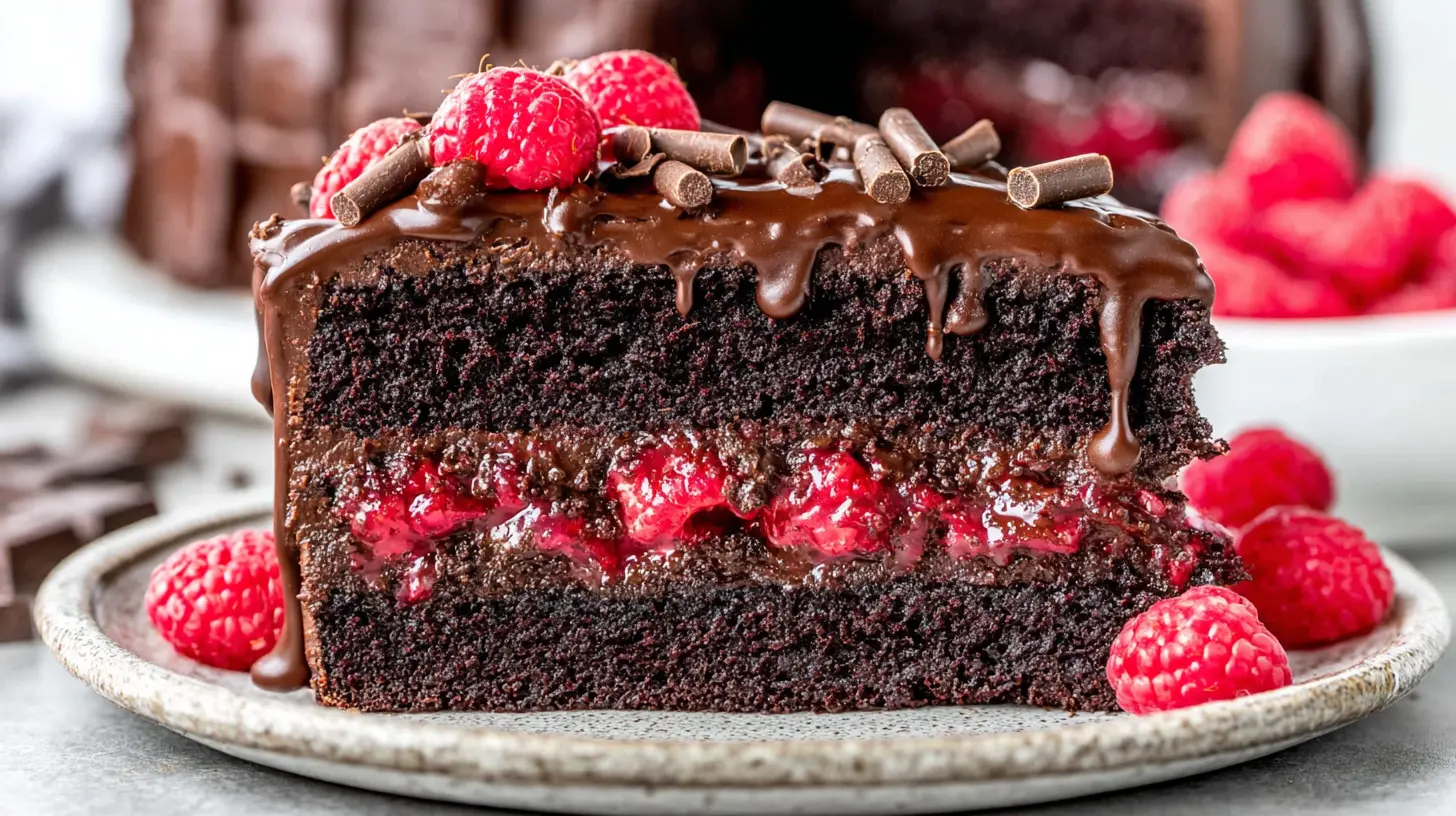
Rich Raspberry Chocolate Layer Cake
Ingredients
Method
- Combine sugar, cornstarch, and water in a medium saucepan over medium heat; stir to combine. Heat until the mixture is wet and the sugar melts.
- Add raspberries and stir to coat them with the sugar mixture.
- Continue cooking until raspberries soften and release juice. Mash the raspberries with your spatula.
- Remove from heat when the raspberry juice thickens, after about 5 minutes. Strain to remove seeds, if desired. Pour the mixture into another bowl and refrigerate until cool.
- Preheat oven to 350°F (176°C). Prepare three 8-inch cake pans with non-stick baking spray and parchment paper in the bottom.
- Add flour, sugar, cocoa, baking soda, baking powder, and salt to a large mixer bowl and combine. Set aside.
- Add milk, vegetable oil, vanilla extract, and eggs to a medium bowl and combine.
- Add the wet ingredients to the dry ingredients and beat until well combined.
- Slowly add hot water to the batter and mix on low speed until well combined. Scrape down the sides of the bowl as needed to ensure everything is combined.
- Divide the batter evenly between the prepared cake pans. Bake for 22-25 minutes, or until a toothpick inserted comes out with a few moist crumbs.
- Remove cakes from the oven and cool for 2-3 minutes, then transfer to a cooling rack to finish cooling.
- Add butter to a large mixer bowl and beat until smooth.
- Add melted chocolate in 2-3 batches and mix until well combined.
- Add cocoa powder and mix until well combined.
- Add about half of the powdered sugar, salt, and half of the heavy cream; mix until well combined.
- Add the remaining powdered sugar and mix until smooth.
- Add the remaining heavy cream as needed to achieve the desired frosting consistency.
- To make the chocolate ganache, add chocolate chips to a medium bowl.
- Heat heavy whipping cream in the microwave until it just begins to boil; watch closely as it heats quickly.
- Pour the hot cream over the chocolate chips. Let it sit for 2-3 minutes, then whisk until smooth. Set aside.
- To layer the cake, first use a large serrated knife to level the cake tops by removing any domes.
- Place the first cake layer on a serving plate or cardboard cake circle.
- Pipe a dam of chocolate frosting around the outside of the cake layer.
- Spread about 1/4 cup of chocolate ganache on top of the cake, within the dam.
- Drop spoonfuls of raspberry filling (use about half per layer) over the chocolate ganache, then spread into an even layer.
- Add the second cake layer, then repeat steps 6 through 8.
- Add the third and final cake layer on top.
- Frost the top and outside of the cake with the remaining chocolate frosting.
- Use the remaining chocolate ganache to drizzle chocolate around the cake edges, then fill in the center. If the ganache firms, reheat for a few seconds until pourable.
- Pipe swirls with the remaining chocolate frosting around the top of the cake. Decorate with additional raspberries and chocolate sprinkles, if desired.
- Refrigerate the cake until ready to serve. Serve at room temperature for best results.
Nutrition
Notes
Tried this recipe?
Let us know how it was!Why This Raspberry Chocolate Layer Cake is Your Next Project
Honestly, when you see a beautifully layered cake, it just feels special, doesn’t it? Like, someone really put their heart into it. And you know, a raspberry chocolate layer cake? That’s definitely one of those showstoppers. It’s got that rich chocolate flavor, but then you get that bright, tangy pop from fresh raspberries. It’s just amazing. I mean, it really is.
Now, I get it. A layered cake can seem a little intimidating, a big project, right? Especially if you’re a beginner-to-intermediate baker. You might be thinking, “Will it actually look like the picture? Will it be worth all the effort?” Trust me, I’ve been there. But here’s the thing: this raspberry chocolate layer cake recipe? It’s designed to make you feel like a total pro. We’re going to break it down, step by step, so you’ll get a beautifully presented, stable cake every single time. It’s a sweet layered berry cake that’s perfect for spring gatherings, a celebration cake, or just because you want something truly delicious.
Gathering Your Baking Essentials
Before we even think about mixing, let’s talk ingredients and tools. This isn’t being fussy; it’s the difference between a good cake and a truly amazing one. For this rich chocolate raspberry cake, you’ll need the usual suspects, of course: all-purpose flour, granulated sugar, natural unsweetened cocoa powder (I’ll tell you more about this later), baking soda, baking powder, salt, milk, vegetable oil, vanilla extract, large eggs, hot water, unsalted butter, semi-sweet chocolate chips, Hershey’s dark cocoa powder, powdered sugar, and heavy whipping cream. Sounds like a lot, I know, but you probably have most of it already.
When you’re at the store, like Ralphs or maybe even Trader Joe’s for some good quality semi-sweet chocolate chips, think about what you’re buying. For cocoa powder, I really love Ghirardelli or Hershey’s Special Dark for a deep, rich chocolate flavor. You’ll use natural unsweetened cocoa powder for the cake itself, and then a darker one for the buttercream. For raspberries, fresh berries are always my first choice, especially this time of year when they’re so vibrant. But frozen raspberries work perfectly fine for the filling, too. Just make sure they’re unsweetened.
As for equipment, you’ll want three 8-inch round cake pans for even baking. An offset spatula is going to be your best friend for smooth frosting. And a cooling rack? Absolutely essential. I mean, you can’t cool cakes on a flat surface, that’s just a recipe for soggy bottoms. A good sturdy stand mixer is amazing here, but a hand mixer will do the trick too, you know.
The Science Behind a Perfect Layer Cake
Baking isn’t just throwing things in a bowl; there’s a real method to the deliciousness. Understanding the ‘why’ makes all the difference, honestly. Take room temperature ingredients, for instance. Everyone says use them, but why? Well, cold butter and eggs don’t emulsify properly with sugar, leading to a lumpy batter. Room temperature ingredients, on the other hand, create a smooth, homogenous mixture that traps air more efficiently. That air is what gives you a light, moist cake. So, when I say use room temperature ingredients, especially eggs and butter, it’s because it genuinely matters for a moist chocolate raspberry slice.
Another thing: don’t over-mix your batter. I know, it’s tempting to keep going, but once you add the flour, you’re developing gluten. Too much gluten means a tough, dense cake. We want a tender crumb, right? So mix just until combined. And measuring flour? Spoon it into your measuring cup and level it off. Don’t scoop it directly from the bag; you’ll pack in too much, and that’s a common culprit for dry, crumbly cake layers. This isn’t being fussy, it’s the difference between a dense brick and a fresh berry cocoa sponge that melts in your mouth.
Crafting Your Raspberry Chocolate Layer Cake
Okay, let’s get into the good stuff. Making this rich chocolate raspberry cake is a process of components, but each one is totally manageable. You’ll tackle the raspberry filling recipe first, then the chocolate sponge cake layers, followed by the buttercream, and finally a decadent chocolate ganache.
The Secret to a Vibrant Raspberry Filling
The raspberry filling is where that bright, fresh berry flavor really shines. You’ll combine fresh or frozen raspberries, granulated sugar, cornstarch, and water. The cornstarch, you know, is our thickening agent. It helps the filling set up so it doesn’t just run out of your cake layers. Cook it down over medium heat, stirring constantly, until it thickens. It should coat the back of a spoon and hold its shape a bit, but still be spreadable. You don’t want it too runny, or it’ll make your cake soggy. And you can’t have a stable cake structure with a liquid filling, can you?
Baking Moist Chocolate Cake Layers
For the chocolate cake layers, we’re going for a moist, tender chocolate sponge cake. You’ll whisk together your dry ingredients first, then add the wet. The hot water at the end? That’s a little trick. It “blooms” the cocoa powder, deepening the chocolate flavor significantly. You’ll notice the batter gets this amazing, rich dark chocolate color. And for even more depth, a tiny bit of espresso powder, about a teaspoon, really deepens the chocolate flavor without making it taste like coffee. It’s a secret weapon, honestly.
If you don’t have buttermilk, don’t sweat it. You can make a DIY version by adding a tablespoon of white vinegar or lemon juice to regular milk and letting it sit for five minutes. It works like a charm. Once your cake layers are baked, you absolutely must cool them completely on a cooling rack before you even think about assembly. Warm cake plus frosting equals a melted mess, and nobody wants that. I mean, who has time for a collapsed cake?
Whipping Up a Silky Chocolate Buttercream
This chocolate buttercream frosting is just so good. It’s rich, it’s creamy, and it’s what holds everything together. You’ll start with softened unsalted butter and powdered sugar, then add in your dark cocoa powder, a pinch of salt, vanilla extract, and a little heavy whipping cream. The key is to beat it until it’s light and fluffy. If your buttercream becomes too stiff while you’re working, just melt a small amount of it in the microwave for a few seconds, then beat it back into the rest. It’ll bring it right back to that perfect consistency. And to get rid of any pesky air bubbles, spread it on the inner side of your mixing bowl in a back-and-forth motion with your offset spatula. It really makes a difference for that smooth, bakery-style finish.
Decadent Chocolate Ganache for Drizzling
A velvety chocolate ganache is the crowning glory on this raspberry chocolate layer cake. It’s simpler than you think. You’ll just heat heavy whipping cream until it’s simmering, then pour it over semi-sweet chocolate chips. Let it sit for a few minutes, then whisk until smooth and glossy. The aroma alone is enough to make your mouth water, honestly. This ganache adds another layer of rich chocolate flavor and a beautiful sheen. You can make this ahead of time, too, and just gently reheat it when you’re ready to drizzle.
Assembling Your Showstopping Raspberry Chocolate Layer Cake
Okay, this is where the magic happens. You’ve got all your components ready: perfectly cooled cake layers, vibrant raspberry filling, silky buttercream, and that amazing ganache. This part, honestly, is what makes people go, “Wow!”
First things first, level your cake layers. Use a serrated knife or a cake leveler to trim off any domes, creating a flat surface for stacking. This is crucial for a stable cake structure. Then, place your first cake layer on your serving plate or cake stand. Now, here’s a pro tip: pipe a ring of buttercream frosting around the very edge of that first layer. This creates what we call a “dam.” It’s going to hold your raspberry filling in place and stop it from oozing out the sides. I mean, nobody wants a messy cake, right?
Spoon about half of your raspberry filling into the center of that buttercream dam, spreading it evenly but making sure not to overfill it above the buttercream border. Then, gently place your second cake layer on top. Repeat the dam and filling process, then top with your final cake layer. Once your cake layers are stacked, I recommend chilling the cake for at least 20 minutes. This helps set the filling and makes it much easier to frost. You’ll feel the cake firm up, and that’s when you know it’s just right.
Expert Baking Tips for Layer Cake Mastery
Making a homemade cake, especially a layered one, is a journey. But with a few baking tips, you’ll feel so much more confident. I mean, these are things I’ve learned over countless hours in the kitchen, you know?
For an even more moist cake recipe, you can make a cake soak. Just a simple syrup with a little cocoa powder, brushed onto your cooled cake layers before frosting. It adds an extra layer of moisture and flavor. Trust me on this, it’s amazing. And when it comes to decorating, don’t feel pressured to make it look perfect. A rustic crumb coat, a sprinkle of fresh raspberries, and a drizzle of that rich chocolate ganache? That’s an elegant dessert right there.
I think, probably, the biggest tip for any layer cake is patience. Don’t rush the cooling, don’t rush the chilling. Each step serves a purpose, and allowing things to properly set makes the next step so much easier. You’ll save yourself so much frustration, honestly.
Troubleshooting Your Layer Cake: Mistakes & Solutions
Look, baking happens. We all run into little snags. But don’t worry if your raspberry chocolate layer cake isn’t absolutely perfect on the first try. I’ve definitely had my share of kitchen mishaps. Here are some common issues and how to fix them:
Common Mistakes & Fixes for Your Raspberry Chocolate Layer Cake
Mistake: Your cake is dry and crumbly.
Solution: This usually happens if you’ve used too much flour or over-mixed the batter. Remember to spoon measure your flour, and mix just until the ingredients are combined. For an extra moist cake, consider a cocoa simple syrup soak.
Mistake: The raspberry filling is too runny and seeping out.
Solution: The filling probably needed to cook down a bit longer to thicken up. If it’s too late, you can try adding a tiny bit more cornstarch slurry (cornstarch mixed with a little water) to the filling on the stovetop and cooking it again until it’s just right. Make sure you’ve piped a solid buttercream dam too!
Mistake: The cake layers cracked when I removed them from the pan.
Solution: This can happen if the cakes are still too warm or if they stuck to the pan. Always grease and flour your cake pans thoroughly, and let the cakes cool in the pans for about 10-15 minutes before inverting them onto a cooling rack. A cracked layer isn’t the end of the world, though; frosting hides a lot, you know!
Mistake: My buttercream looks lumpy or curdled.
Solution: This often means your butter wasn’t at the right room temperature, or you added your powdered sugar too fast. Keep beating it. Sometimes it looks worse before it gets better. If it’s really stubborn, gently warm a small portion and beat it back in, or try the spreading technique against the bowl to remove air bubbles.
Mistake: The cake isn’t stable and feels wobbly.
Solution: You probably didn’t chill the cake enough after stacking the layers. Chilling sets the buttercream dam and firms up the filling, creating a much more stable base for frosting. Make sure your cake layers are level too.
Delicious Variations & Dietary Adaptations
This raspberry chocolate layer cake is amazing as is, but you know, sometimes you want to mix things up! Or maybe you’ve got friends coming over with specific dietary needs. This recipe is pretty versatile, honestly.
For a different texture, you could swap out some of the buttercream for a chocolate mousse filling between the layers. Or, if you’re not a fan of seeds, you can easily press your raspberry filling through a fine-mesh sieve to get a seedless raspberry filling. If you’re making a smaller cake, you can scale this recipe down to a three-layer 6-inch version. Just adjust your baking times accordingly.
Want to change up the fruit? While this is a raspberry chocolate layer cake, you could substitute freeze-dried strawberries in the cake batter and strawberry jam for the filling. It’s a sweet layered berry cake with a different twist. If coffee isn’t your thing, just substitute the hot water in the cake batter with warm water. And for milk, whole or 2% milk works best for moisture, but you can use your preferred dairy or non-dairy milk.
Making it Accessible: Dietary Adaptations
For those looking for dietary adaptations, it’s totally doable. If you’re avoiding dairy, you can use a plant-based milk (like almond or soy milk) and a good quality dairy-free butter substitute for the buttercream. For the semi-sweet chocolate chips, just make sure to grab a dairy-free brand. You can also find vegan heavy whipping cream alternatives that work well in ganache. Honestly, there are so many great options at Whole Foods or even Ralphs these days.
For a gluten-free version, I’ve had success substituting the all-purpose flour with a 1:1 gluten-free baking flour blend. Just make sure it contains xanthan gum for structure. You might notice a slightly different texture, but it’ll still be a rich chocolate raspberry cake that’s pretty good. Always check your baking powder and baking soda to ensure they’re gluten-free, some brands can have hidden ingredients, you know.
Frequently Asked Questions
Storing and Serving Your Raspberry Chocolate Layer Cake
You’ve put in all that amazing work, so let’s make sure your raspberry chocolate layer cake stays fresh and delicious! After all, this is a special occasion cake, and you want it to last. Once frosted, cover your cake tightly with plastic wrap or store it in an airtight cake carrier. It’ll keep beautifully in the refrigerator for up to 5 days. I mean, usually it doesn’t last that long, but it’s good to know, right?
For the cleanest slices, always refrigerate your frosted cake for at least an hour before serving. This firms up the buttercream and ganache, making it much easier to cut without squishing the layers. When you’re ready to serve, let the cake come to room temperature for about 30-60 minutes before slicing. This allows the chocolate and cake to soften slightly, giving you the best texture and flavor. Decorate with a few fresh raspberries and maybe some chocolate shavings for an elegant dessert presentation.
Make-Ahead & Freezing Strategies
This raspberry chocolate layer cake is fantastic for making ahead. You can bake the cake layers up to 2 days in advance, wrap them tightly in plastic wrap, and refrigerate. Or, freeze them for up to 3 months! Just thaw them overnight in the fridge before assembling. The raspberry filling and chocolate buttercream can also be made up to 3 days ahead and stored in the refrigerator. Just bring the buttercream to room temperature and give it a quick beat before using.
A fully assembled and frosted cake freezes really well too! Wrap the whole cake tightly in several layers of plastic wrap, then a layer of foil. It’ll stay good in the freezer for up to 3 months. When you’re ready to serve, thaw it overnight in the refrigerator, then let it come to room temperature before enjoying. It’s so convenient for busy schedules, you know, especially if you’re planning a celebration cake for later.
Ready to Bake?
You did it! You’ve just created a truly showstopping raspberry chocolate layer cake. I mean, honestly, how amazing does that feel? From the rich chocolate sponge cake to the vibrant raspberry filling and that velvety ganache, every single bite is pure joy. You’ve tackled a multi-layered dessert, and you’ve gained some valuable baking tips along the way.
I’m so incredibly proud of you for diving in and mastering this. Now go ahead, cut yourself a generous slice, share it with your loved ones, and soak in all the compliments. You’ve earned it! If you’re looking for more inspiration, check out my Pinterest boards for tons of related recipes and cake decorating ideas. Happy baking!
Source: Nutritional Information


