

California-Style Crispy Southwest Wraps with Zesty Dressing
Ingredients
Method
- Begin by preparing the crispy chicken tenders according to their package instructions, typically baking them in a preheated oven until golden and cooked through.
- While the chicken bakes, prepare the zesty southwest dressing. In a small mixing bowl, combine the creamy mayonnaise, whole milk, salsa, taco seasoning mix, and ground cumin. Whisk all ingredients thoroughly until the dressing is smooth and well-combined, then set it aside.
- Heat the vegetable oil in a small skillet over medium heat. Add the thawed sweet corn kernels and cook, stirring occasionally, for about 5 to 7 minutes, or until they are lightly browned and slightly caramelized. Remove the skillet from the heat.
- Once the chicken tenders are fully cooked, carefully remove them from the oven and slice them into bite-sized strips or cubes.
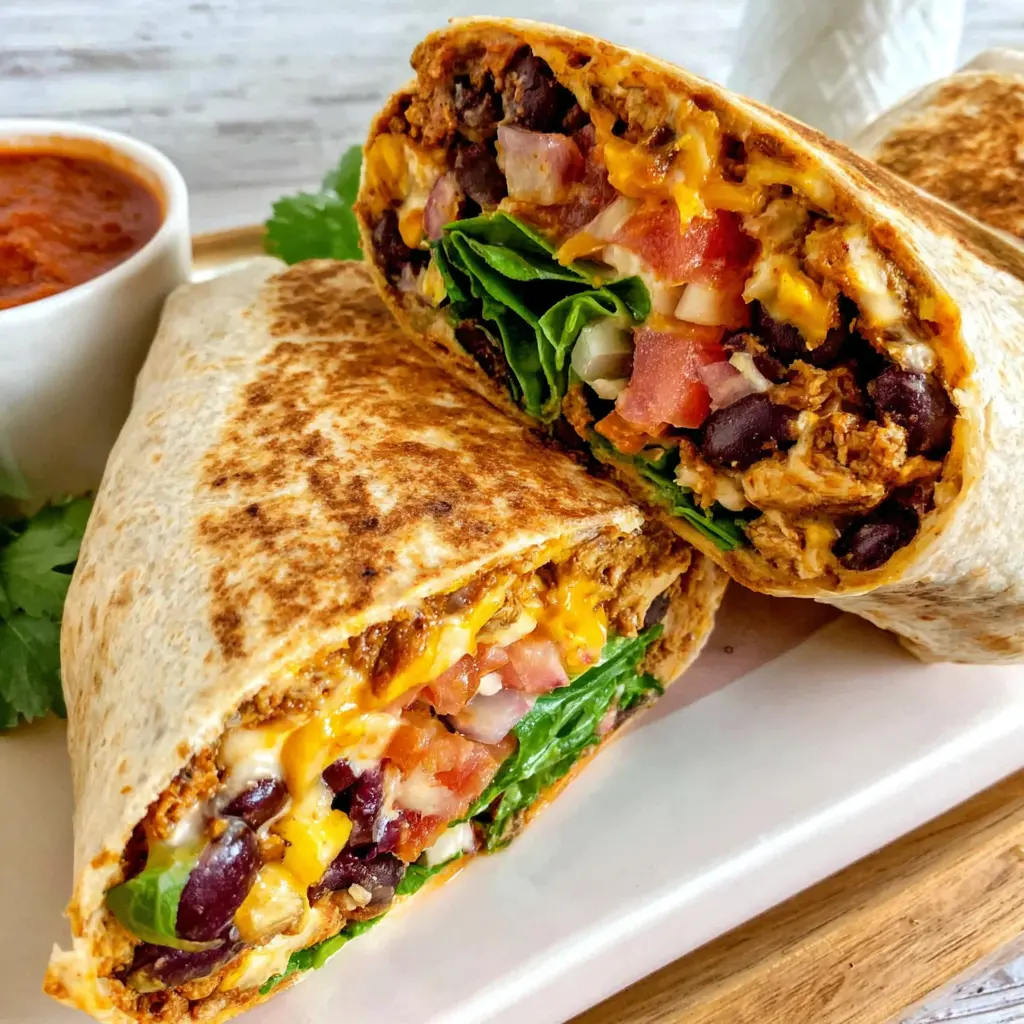
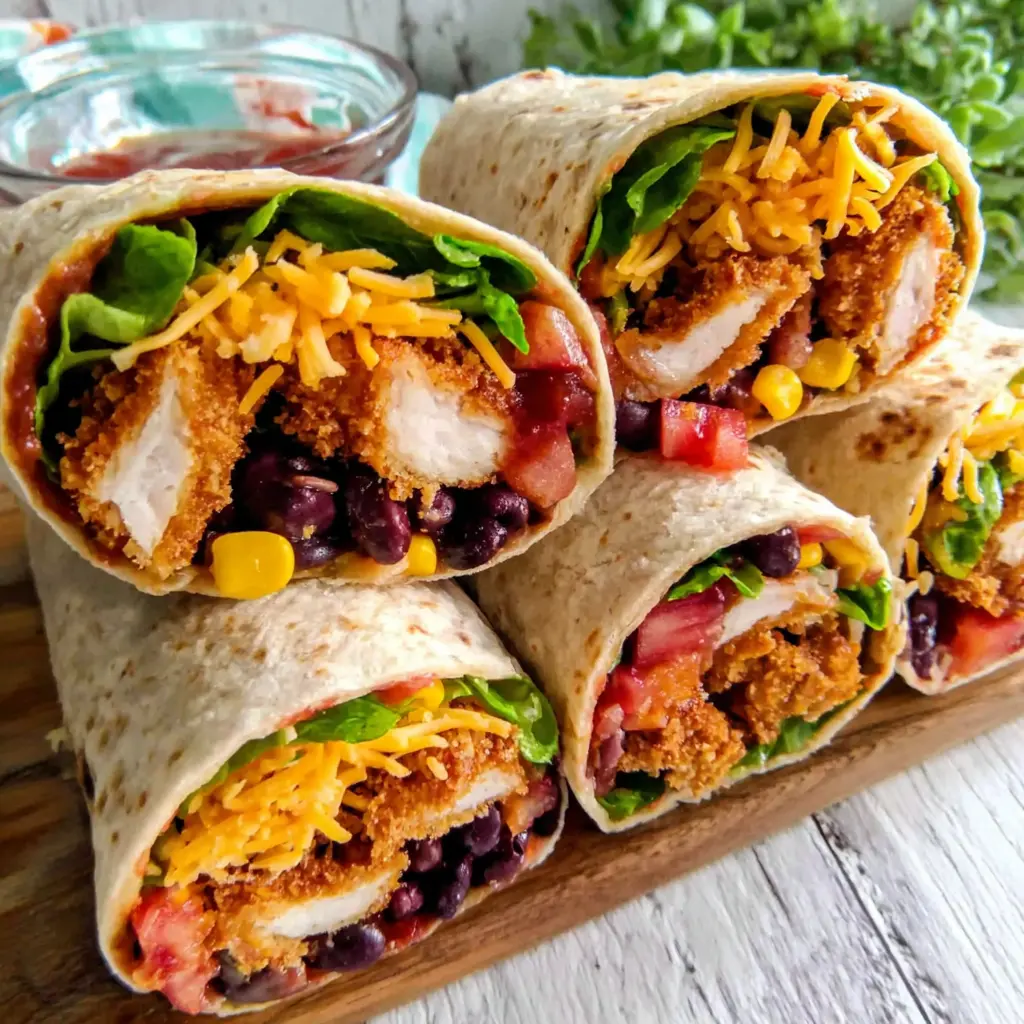
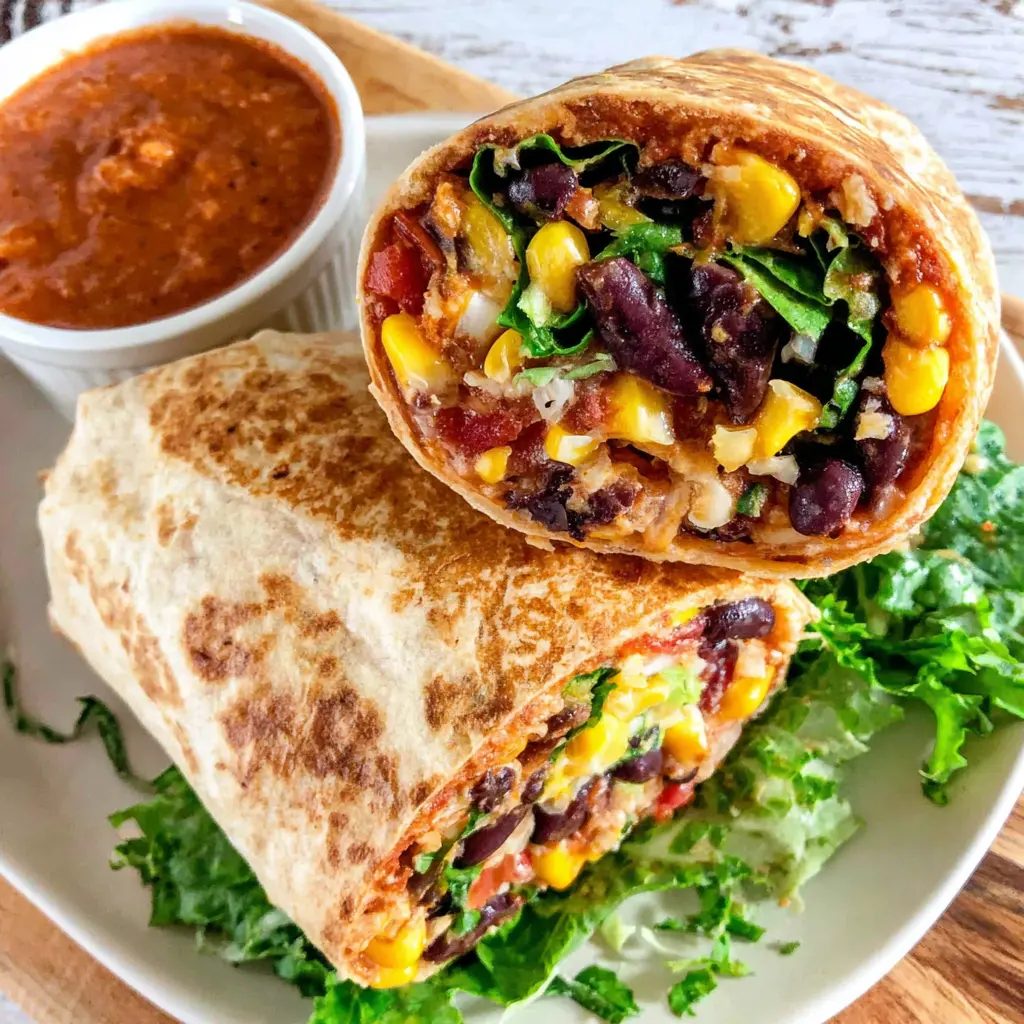
- To assemble each wrap, spread about 2 tablespoons of the prepared southwest dressing onto the lower half of a large flour tortilla. Layer with a fresh romaine lettuce leaf, a few thin tomato slices, a spoonful of the drained black beans, some cooked corn, and a portion of the sliced chicken strips. Drizzle with a little more dressing if desired.
- Tightly roll up each tortilla, ensuring the sides are folded in to secure the fillings. Slice each wrap in half diagonally and serve immediately, offering any remaining southwest dressing on the side for dipping.
Nutrition
Notes
Tried this recipe?
Let us know how it was!Why You’ll Love These Crispy Southwest Wraps
Okay, let’s be real for a minute. Have you ever bitten into what you *thought* was going to be a perfect wrap, only for it to be… well, soggy? A little disappointing, right? I’ve been there, more times than I’d like to admit!
That’s why I’m so excited to share this recipe for a truly amazing crispy southwest wrap. It’s got that incredible crunch you crave, packed with vibrant, fresh ingredients and those classic southwestern flavors we all adore. You’ll feel like you just ordered it from your favorite spot, but you made it right in your kitchen!
This isn’t just any wrap, though. This is a California-style crispy wrap, meaning we’re leaning into that fresh, bright produce that just screams “summer.” It’s ridiculously easy to make, super quick for those busy weeknights, and honestly, it’s a total game-changer for lunch or dinner. Trust me, you’re going to want this one in your regular rotation!
Ingredients for California-Style Crispy Southwest Wraps
Making a show-stopping crispy southwest wrap starts with quality ingredients, but don’t worry, we’re keeping it simple and accessible. Think fresh, colorful, and packed with flavor!
For the main event, you’ll need some pre-cooked crispy chicken tenders. These are such a time-saver, letting you get dinner on the table in a flash! Then, of course, large flour tortillas are our canvas. We’re also grabbing fresh romaine lettuce, juicy ripe tomatoes (especially good in summer!), a package of thawed frozen sweet corn, and a can of black beans. And who could forget a generous sprinkle of shredded sharp cheddar cheese? A little vegetable oil helps us get that perfect crispy tortilla texture, too.
See? Nothing too fancy, just good, honest ingredients that come together beautifully.
For the Zesty Southwest Dressing
Now, let’s talk about the dressing. This zesty southwest dressing is the secret sauce, literally! It ties everything together with a creamy, tangy kick. You’ll need creamy mayonnaise as your base, some whole milk to thin it out just right, and a good mild or medium salsa for that fruity, savory depth.
To really bring those southwestern flavors to life, we’re adding taco seasoning mix and a touch of ground cumin. The taco seasoning is a blend of spices that just screams “Southwest,” and cumin? Oh, that earthy, warm aroma is just essential. Whisk it all together, and you’ve got a dressing that’ll make your taste buds sing!
How to Make Crispy Southwest Wraps
Alright, let’s get to the fun part: assembling and crisping up these amazing wraps! It might seem like a lot, but I promise, it’s super straightforward. We’re going to break it down into four easy stages.
Stage 1: Prep Your Crispy Chicken & Dressing
First things first, get those pre-cooked crispy chicken tenders baking according to their package directions. You want them golden and cooked through, giving us that fantastic crunch inside our wrap. While they’re doing their thing, grab a bowl and whisk together your mayonnaise, whole milk, salsa, taco seasoning, and ground cumin for the dressing. Give it a good whisk until it’s smooth and creamy. Setting it aside lets those flavors really meld.
Stage 2: Sauté the Sweet Corn
Next, you’ll want to heat that vegetable oil in a small skillet over medium heat. Why? Because we’re going to add our thawed sweet corn kernels and cook them for about 5 to 7 minutes. This step is a little magic trick! Stirring occasionally, you’ll see them lightly brown and get slightly caramelized. That’s the flavor developing, becoming sweeter and more complex. It adds such a wonderful dimension to your crispy southwest wrap. Once they’re done, just pull the skillet off the heat.
Stage 3: Assemble Your Wraps with Care
Now, once your chicken tenders are perfectly cooked and sliced into bite-sized pieces, it’s assembly time! This is where we prevent those soggy wrap woes. Lay out a large flour tortilla. Spread about two tablespoons of that luscious zesty southwest dressing onto the lower half. This acts as a delicious base and helps everything stick. Layer on a fresh romaine lettuce leaf, a few thin tomato slices, a spoonful of drained black beans, some of that beautiful cooked corn, and finally, a generous portion of your sliced crispy chicken. A little extra dressing here is never a bad idea!
Stage 4: Roll, Slice, and Serve
Here’s where the “crispy wrap” magic really comes in! Tightly roll up each tortilla, making sure to fold in the sides as you go. This is crucial for structural integrity; you don’t want your delicious fillings escaping! The tighter, the better. Once rolled, slice each wrap in half diagonally. This makes them easier to handle and showcases all those vibrant layers inside. Serve immediately, perhaps with any extra southwest dressing on the side for dipping. The warm, crispy tortilla combined with the fresh, cool filling? Chef’s kiss!
Expert Tips for Perfect Crispy Wraps
Achieving that truly crunchy, satisfying crispy southwest wrap isn’t just about the ingredients; it’s about a few clever techniques. Here are my go-to tips to make sure your wraps are always a hit:
- Don’t Overfill: This is a big one! Overfilling your wraps makes them super hard to roll tightly, and that’s a recipe for a messy meal. Start with less filling than you think you need; you can always add more next time.
- Roll ‘Em Tight: Seriously, roll those wraps as snugly as you can! A tightly rolled wrap holds its shape better, preventing everything from falling out while you eat. It also helps with even crisping.
- Base Layer First: Spreading some of the dressing on the tortilla before adding fillings helps everything adhere. It’s like edible glue! For extra adherence, some folks even spread a thin layer of cream cheese or sour cream, though our zesty dressing does the trick beautifully.
- The Crispiness Secret: To get that genuinely crispy tortilla texture, pan-fry your assembled wraps in a tiny bit of vegetable oil over medium heat until golden brown and crunchy on both sides. Or, if you have an air fryer, a few minutes at 350°F (175°C) will work wonders!
- Preventing Soggy Wraps: To avoid sogginess, make sure your lettuce is dry, and don’t over-sauce the initial layer. A fresh romaine lettuce leaf also acts as a great barrier between the dressing and the tortilla.
- Iceberg for Extra Crunch: While romaine is great, if you want even MORE crunch, swap in some shredded iceberg lettuce. It holds up beautifully.
- Oil Control: When pan-frying, use just a tablespoon of vegetable oil. Too much oil can make your wraps greasy instead of perfectly crispy. We’re going for crunchy, not oily!
- Fresh is Best: For the absolute best crispiness, assemble and crisp your wraps fresh. Reheating pre-assembled, pan-fried wraps in the microwave can make them lose their crunch.
Crispy Southwest Wrap Variations
One of the best things about a crispy southwest wrap is how wonderfully customizable it is! This recipe is a fantastic starting point, but feel free to play around with it. Here are some ideas:
- Protein Swaps: Our recipe uses pre-cooked crispy chicken tenders, which are fantastic. But you could absolutely use grilled chicken breast for a lighter touch, or even canned chicken for ultimate speed. For a plant-based option, simply leave out the chicken!
- Make it Meatless: Easily turn this into a vegetarian wrap recipe! Skip the chicken and load up on extra black beans, corn, and maybe add some spinach or other chopped veggies you enjoy.
- Tortilla Choices: We use large flour tortillas, but any type of tortilla you like will work! Wheat tortillas can add a nutty flavor, and if you’re watching carbs, low-carb tortillas are a great swap.
- Bean Alternatives: Black beans are a classic here, but pinto beans would also be delicious and fit right into those southwestern flavors.
- Cheesy Options: Sharp cheddar is lovely, but if you want something lighter, try spreading a little laughing cow cheese on the tortilla instead of shredded cheddar. Or mix in some Monterey Jack!
- Spice it Up: If you like a spicier chicken wrap, add a pinch more taco seasoning to your dressing, or choose a hotter salsa. A dash of your favorite hot sauce inside wouldn’t hurt either!
- Fresh Additions: For that true California-style vibe, consider adding thin slices of fresh avocado or some finely diced bell peppers (though they aren’t in our base recipe, they make a great optional addition!).
Storing Your Southwest Wraps
While these crispy southwest wraps are truly best enjoyed fresh, sometimes you just need to plan ahead. Here’s how I handle storing them and some tips for meal prep wraps:
- Filling Prep: The best way to get ahead is to prepare your filling (sliced chicken, cooked corn, black beans, sliced tomatoes, shredded cheese) and the zesty southwest dressing up to 3 days in advance. Store them separately in airtight containers in the fridge.
- Assemble Fresh: For optimal crispiness, I always recommend assembling and crisping your wraps right before you plan to eat them. This prevents the tortilla from getting soggy from the fillings sitting too long.
- Leftovers: If you have an assembled wrap that’s already crisped, store it tightly wrapped in plastic wrap in the fridge for up to 1 day. The tortilla might lose some of its crispness, but it will still be delicious.
- Reheating: To reheat a pre-assembled wrap, avoid the microwave if you want to retain any crispiness; it tends to make them soft. Instead, warm it in a skillet over medium heat until heated through and re-crisped, or in an air fryer for a few minutes. You can also bake them in a single layer at 325°F (160°C) covered with foil for 15-20 minutes.
Common Questions About Crispy Southwest Wraps
Serving Suggestions for Your Crispy Southwest Wraps
Once you’ve made these incredible crispy southwest wraps, you might be wondering what to serve alongside them. Since we’re all about that fresh, vibrant California lifestyle, here are some ideas:
- Fresh Fruit: Especially in summer, a side of seasonal fruit like sliced peaches, nectarines, or a simple fruit salad is light and refreshing.
- Chips and Salsa: You can never go wrong with a classic! A bowl of tortilla chips with some extra mild salsa (or the leftover zesty southwest dressing!) is a perfect pairing.
- Simple Green Salad: A light green salad with a zesty vinaigrette would complement the richness of the wrap beautifully.
- Guacamole or Avocado Slices: If you’re an avocado fan (and who isn’t, in California?), a side of fresh guacamole or just some perfectly ripe avocado slices would be divine.
- Coleslaw: A crisp, creamy coleslaw can add another layer of texture and freshness.
These wraps are hearty enough to be a complete meal on their own, but these sides just make the experience even better!
Nutrition Information
For those mindful of their dietary intake, here’s a general breakdown of the nutrition information for one serving of our California-Style Crispy Southwest Wrap. Remember, these values are estimates and can vary based on specific brands and ingredient measurements.
Crispy Southwest Wrap Nutrition (per serving)
- Calories: 712
- Carbohydrates: 57g
- Protein: 25g
- Fat: 43g
- Saturated Fat: 10g
- Cholesterol: 70mg
- Sodium: 1200mg
- Fiber: 7g
- Sugar: 4g
This information can help you incorporate this delicious and satisfying crispy southwest wrap into your meal planning.
I hope you’re feeling inspired to whip up these incredible crispy southwest wraps! They’re truly a fantastic way to enjoy a quick, flavorful, and satisfying meal at home. If you make them, I’d love to hear what you think!
Don’t forget to save this recipe for later! You can find more delicious ideas and inspiration on our Pinterest page.
Source: Nutritional Information


