

The Secret to Perfectly Crispy Chicken Parmesan Bowl
You know that feeling when you’re craving chicken parm but don’t want the whole messy plate situation? The sauce sliding everywhere, the breading getting soggy before you even take a bite. I’ve been there more times than I care to admit. That’s exactly why I started making this Crispy Chicken Parmesan Bowl. It solves everything.
Honestly, it’s become my go-to weeknight dinner. The chicken stays crunchy, the cheese gets all bubbly and golden, and you get to eat it in a bowl over pasta or a simple salad. No fuss, no mess. Just pure comfort food that actually works for a busy family.
I promise, once you try this method, you’ll never go back to the soggy restaurant version. Let me show you how it’s done.
Why This Crispy Chicken Parmesan Bowl Works
So what makes this Crispy Chicken Parmesan Bowl different from all the others? It’s all about the technique. I’ve tested this recipe more times than I can count, and I’ve learned a few things along the way.
First, we’re using whole wheat breadcrumbs mixed with Parmesan cheese. That combo creates a crust that’s extra crunchy and full of flavor. Second, we’re baking the chicken at a high temperature 425°F which gives you that golden-brown finish without deep frying. And third, we’re not drowning the chicken in sauce. Just a light spoonful on top, then a blanket of mozzarella that melts into perfection.
I once made the mistake of using too much sauce. Rookie move. The breading turned into a sad, soggy mess. Never again. Now I know: less is more when it comes to the sauce.
The bowl format is genius for busy families. You can serve it over spaghetti, a bed of arugula, or even quinoa. Everyone builds their own bowl. Kids love it because it feels like a fun meal, not a chore.
Ingredients for the Best Crispy Chicken Parmesan Bowl
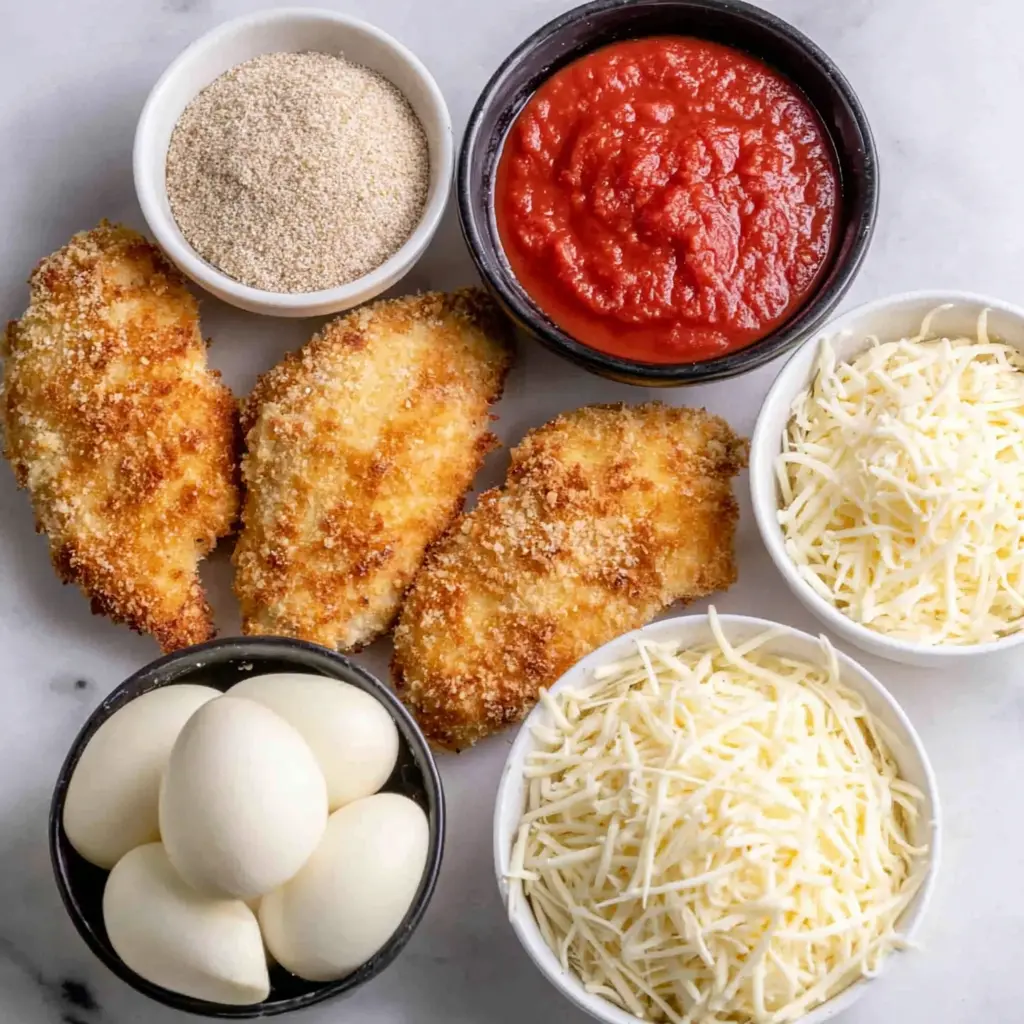
Here’s what you’ll need to make this Italian chicken bowl shine. The ingredient list is simple, but each one plays a key role.
- Boneless skinless chicken fillets About 1.5 pounds. Pound them to an even 1/4-inch thickness for even cooking.
- Whole wheat flour This is the first layer of our breading station. It helps the egg stick.
- Eggs Three large eggs, beaten. They act as the glue for the breadcrumbs.
- Whole wheat breadcrumbs The star of the show. They give that incredible crunch.
- Grated Parmesan cheese Mixed into the breadcrumbs for extra flavor and crispiness.
- Dried basil and parsley These herbs add that classic Italian flavor without any extra work.
- Marinara sauce Use a good quality jarred sauce or homemade. Just 1.5 cups is plenty.
- Shredded mozzarella cheese Go for the block and shred it yourself. Pre-shredded doesn’t melt as smoothly.
You’ve got this! The ingredients are all pantry staples, so you probably already have most of them on hand.
Step-by-Step: How to Build Your Crispy Chicken Parmesan Bowl
Let’s walk through the process. I’ll break it down into four main stages so it feels manageable, even on a busy Tuesday night.
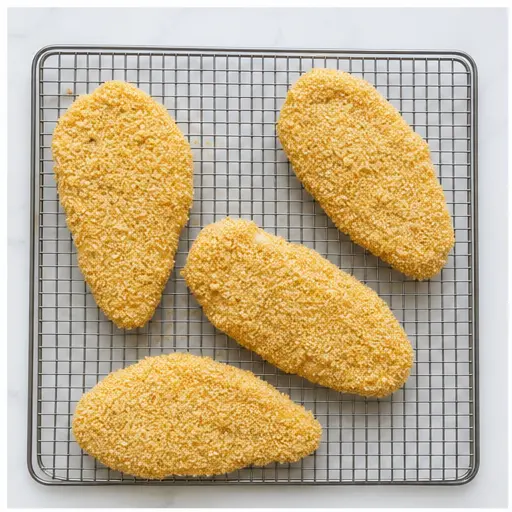
Stage 1: Prep and Bread the Chicken
Start by preheating your oven to 425°F. Line a baking sheet with parchment paper this makes cleanup a breeze. Now, butterfly each chicken fillet and pound them to an even 1/4-inch thickness. This is crucial. If they’re uneven, some parts will be dry while others stay undercooked.
Set up your breading station. You’ll need three shallow bowls: one with the whole wheat flour, one with the beaten eggs, and one with the whole wheat breadcrumbs mixed with Parmesan, black pepper, dried basil, and dried parsley. Coat each fillet first in flour, shaking off the excess. Then dip into the egg, letting any extra drip off. Finally, press into the breadcrumb mixture, making sure every inch is covered.
Here’s a tip I learned the hard way: let the breaded chicken rest on a wire rack for about 15 minutes before baking. This helps the coating adhere better. Trust me, it makes a difference.
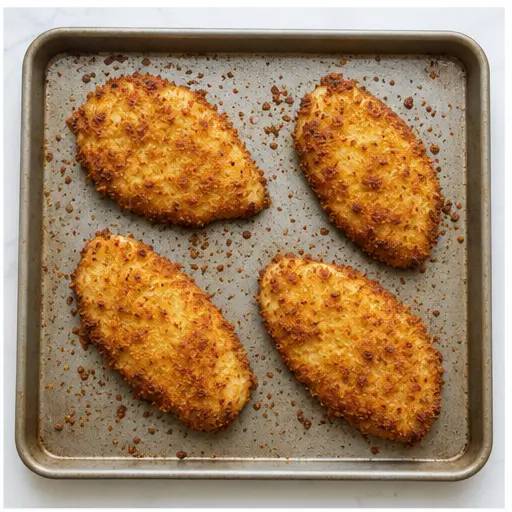
Stage 2: Bake Until Golden and Crispy
Place the breaded chicken on the prepared baking sheet. Don’t overcrowd them leave a little space between each fillet so the hot air can circulate. Bake for 30 minutes, flipping halfway through. You’re looking for a deep golden-brown color and an internal temperature of 165°F.
The sound when you flip them… that satisfying sizzle and crunch. That’s how you know it’s working. The kitchen will smell incredible at this point, like a cozy Italian restaurant.
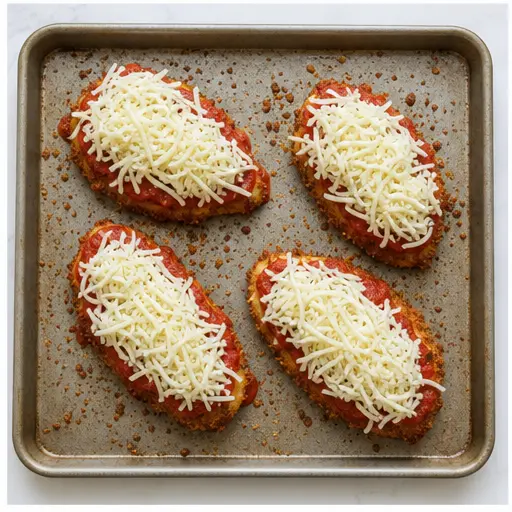
Stage 3: Add Sauce and Cheese
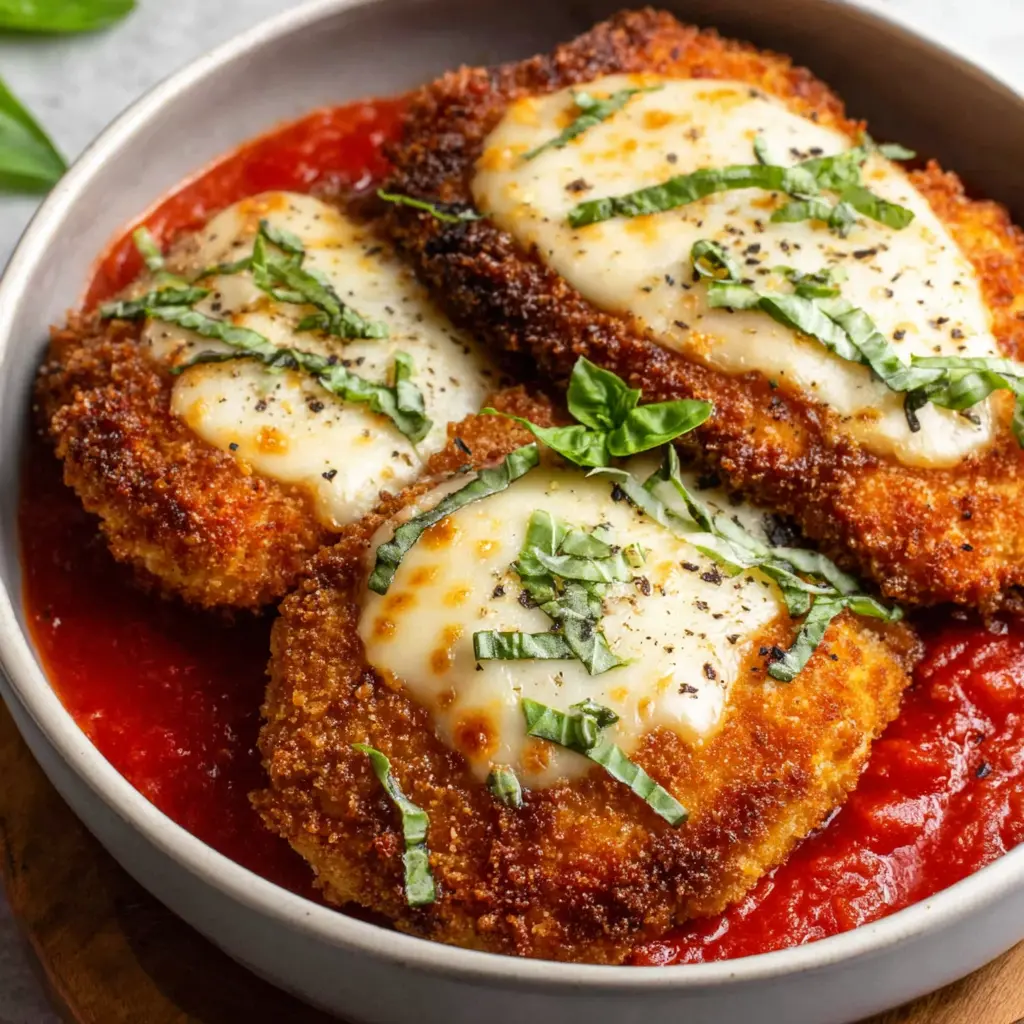
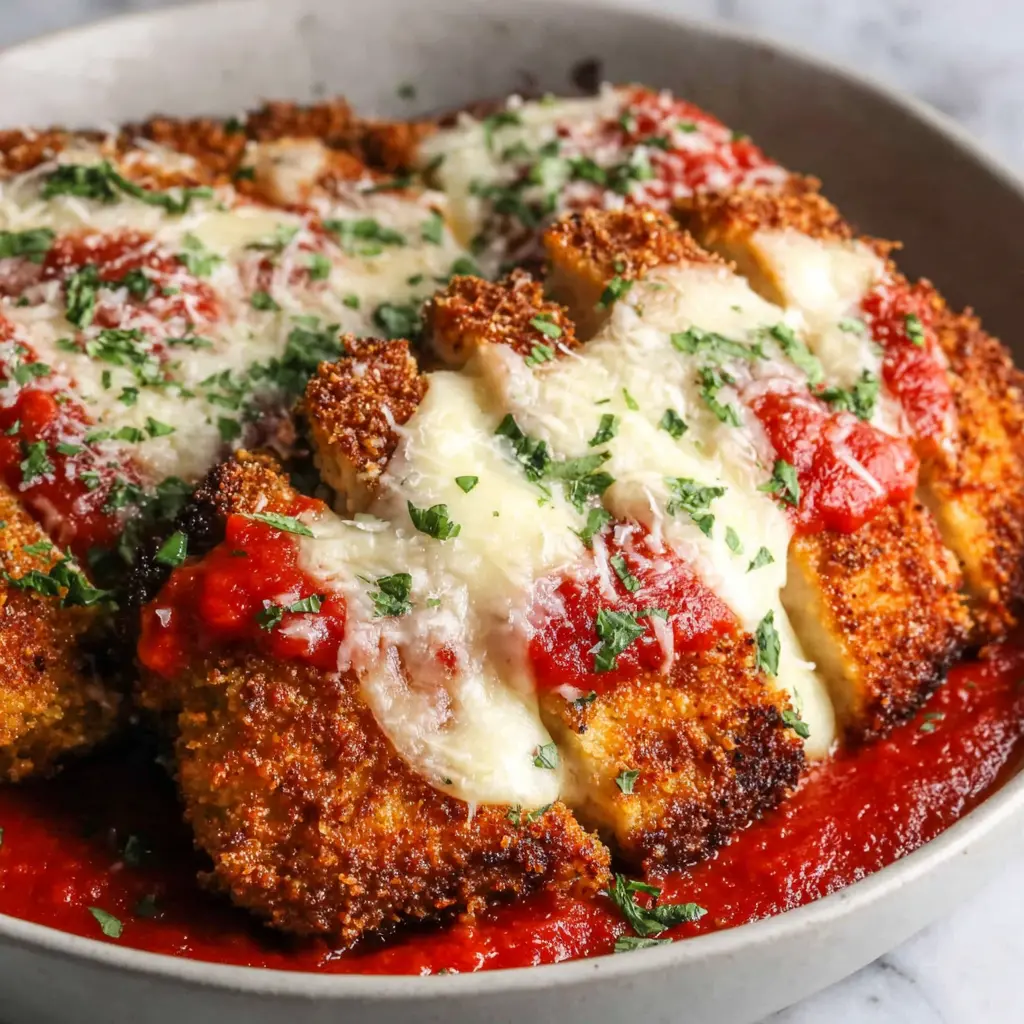
Once the chicken is cooked through, spoon a small amount of marinara sauce over each fillet. Remember, less is more. You want just enough to cover the surface, not drown it. Then top generously with shredded mozzarella.
Switch your oven to broil and cook for about 2 minutes. Watch it closely broilers can be unpredictable. You want the cheese to be melted and bubbly, with a few golden spots. That’s perfection right there.
Stage 4: Assemble Your Bowl
Now for the fun part. Grab your bowls and add a base cooked spaghetti, a handful of arugula, or even some quinoa. Place a crispy chicken fillet on top. Add a little extra sauce if you like, and maybe a sprinkle of fresh basil if you have it.
I love serving this with a side of garlic bread to soak up any extra sauce. But honestly, it’s perfect on its own too. The combination of crunchy chicken, gooey cheese, and tangy marinara is just unbeatable.

Substitutions and Variations for Your Bowl
One of the best things about this cheesy chicken pasta bowl is how adaptable it is. Here are some ways to make it work for your family.
- Gluten-free version: Swap the whole wheat flour and breadcrumbs for almond flour and gluten-free breadcrumbs. The recipe notes say this works beautifully.
- Keto-friendly option: Skip the pasta base and serve over a bed of sautéed spinach or zucchini noodles. The chicken itself is low-carb friendly.
- Vegetarian twist: Replace the chicken with thick slices of eggplant or firm tofu. Follow the same breading and baking process.
- Different base ideas: Try brown rice, cauliflower rice, or even a simple green salad. The bowl format makes it easy to customize.
- Spice it up: Add a pinch of red pepper flakes to the breadcrumb mixture for a little heat.
You’ve got so many options here. Feel free to experiment and find your favorite combination.
Tips for the Best Results Every Time
After making this oven-baked chicken parm dozens of times, I’ve gathered some insider tips that will help you nail it on the first try.
- Pound the chicken evenly. This is non-negotiable. Uneven thickness means uneven cooking. Use a meat mallet or a rolling pin.
- Season the chicken directly. Add a pinch of salt and pepper to the fillets before breading. Don’t rely on the breadcrumbs alone for flavor.
- Use fresh Parmesan. Grate it yourself from a block. The pre-grated stuff doesn’t melt as well and lacks that nutty flavor.
- Let the breading rest. That 15-minute rest on a wire rack helps the coating stick during baking. It’s a game-changer.
- Don’t skimp on the oven temperature. 425°F is the sweet spot. It gets the chicken cooked through while giving you that gorgeous golden crust.
- Use less sauce. I know I keep saying this, but it’s that important. Too much sauce = soggy breading.
- Shred your own mozzarella. Pre-shredded cheese has anti-caking agents that prevent smooth melting. Take the extra minute to shred it yourself.
Follow these tips, and you’ll have a savory parmesan chicken meal that rivals any restaurant.
Storage and Reheating: Keeping That Crispy Coating
Leftovers are a beautiful thing, but only if you know how to handle them. Here’s how to store and reheat your Crispy Chicken Parmesan Bowl so it stays crunchy.
Storage: Store each component separately in airtight containers. Keep the chicken, sauce, and base (pasta or salad) in their own containers. This prevents the breading from getting soggy. They’ll last in the fridge for up to 3 days.
Reheating: The oven is your best friend here. Place the chicken on a baking sheet and reheat at 350°F for about 10 minutes. This brings back the crispiness without drying it out. Avoid the microwave it’ll turn your beautiful crust into a sad, chewy mess.
You can also freeze the cooked chicken for up to 3 months. Wrap each fillet individually in plastic wrap, then place in a freezer bag. Thaw overnight in the fridge before reheating.
Frequently Asked Questions
Ready to Make Your Own Crispy Chicken Parmesan Bowl?
I hope you’re feeling inspired to try this Crispy Chicken Parmesan Bowl for yourself. It’s one of those recipes that looks impressive but is surprisingly simple to pull off. The crunchy coating, the melty cheese, the tangy marinara it all comes together in one beautiful bowl.
I’d love to hear how it turns out for you. Share your creation with me on Pinterest I’m always looking for new ideas and love seeing your kitchen wins. And don’t forget to pin this recipe for later!
Happy cooking, friend. You’ve got this.
Crispy Chicken Parmesan Bowl
Ingredients
Method
- Preheat your oven to 425°F. Line a baking sheet with parchment paper.
- Butterfly each chicken breast and pound to an even 1/4-inch thickness.
- Set up a breading station: one shallow bowl with whole wheat flour, one with beaten eggs, and one with whole wheat breadcrumbs, Parmesan, black pepper, dried basil, and dried parsley mixed together.
- Coat each chicken cutlet first in flour, then dip into the egg, and finally press into the breadcrumb mixture to cover completely.
- Place the breaded chicken on the prepared baking sheet and bake for 30 minutes, flipping halfway through, until golden and cooked through.
- Spoon marinara sauce over each cutlet and top with shredded mozzarella. Switch the oven to broil and cook for 2 minutes, until the cheese is melted and bubbly.
- Serve the crispy chicken Parmesan in bowls over pasta, salad, or on its own.
Nutrition
Notes
Tried this recipe?
Let us know how it was!Source: Nutritional Information


