
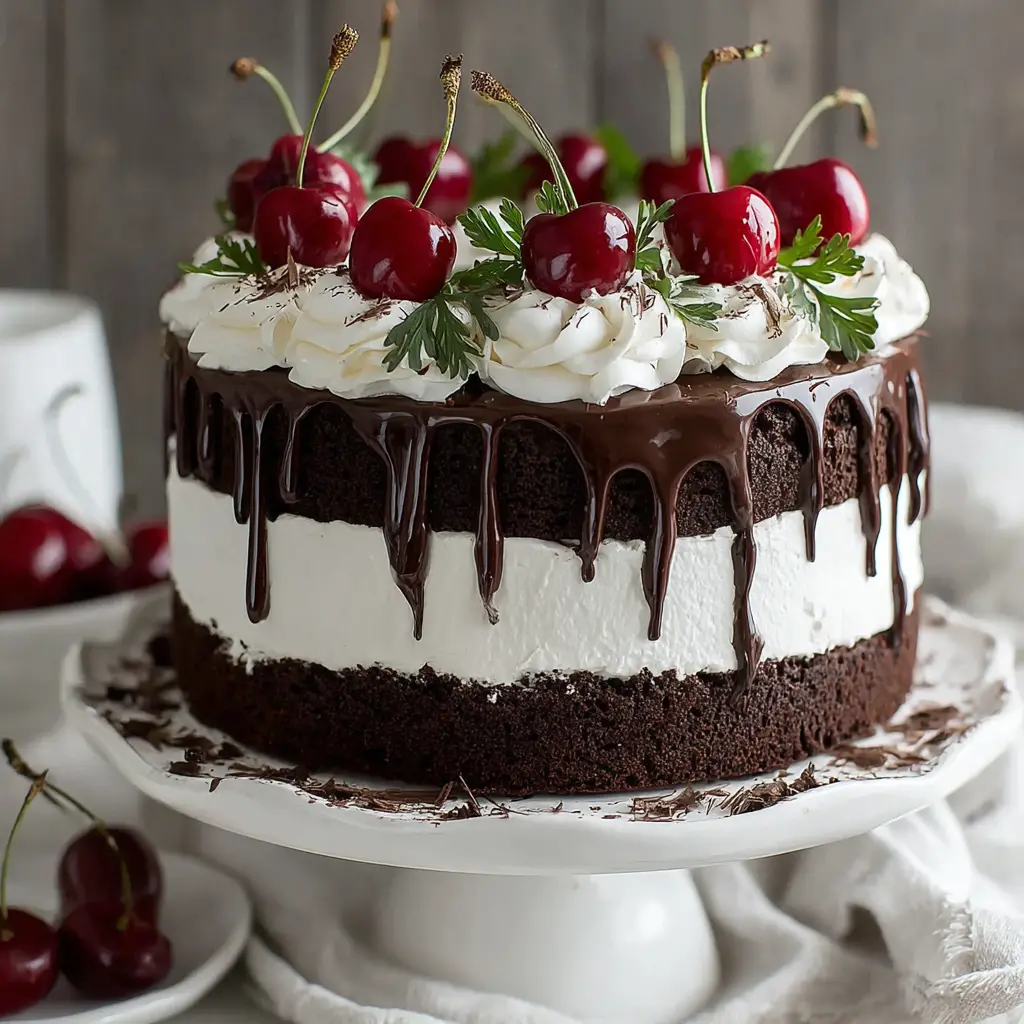

Chocolate Cherry Layer Cake
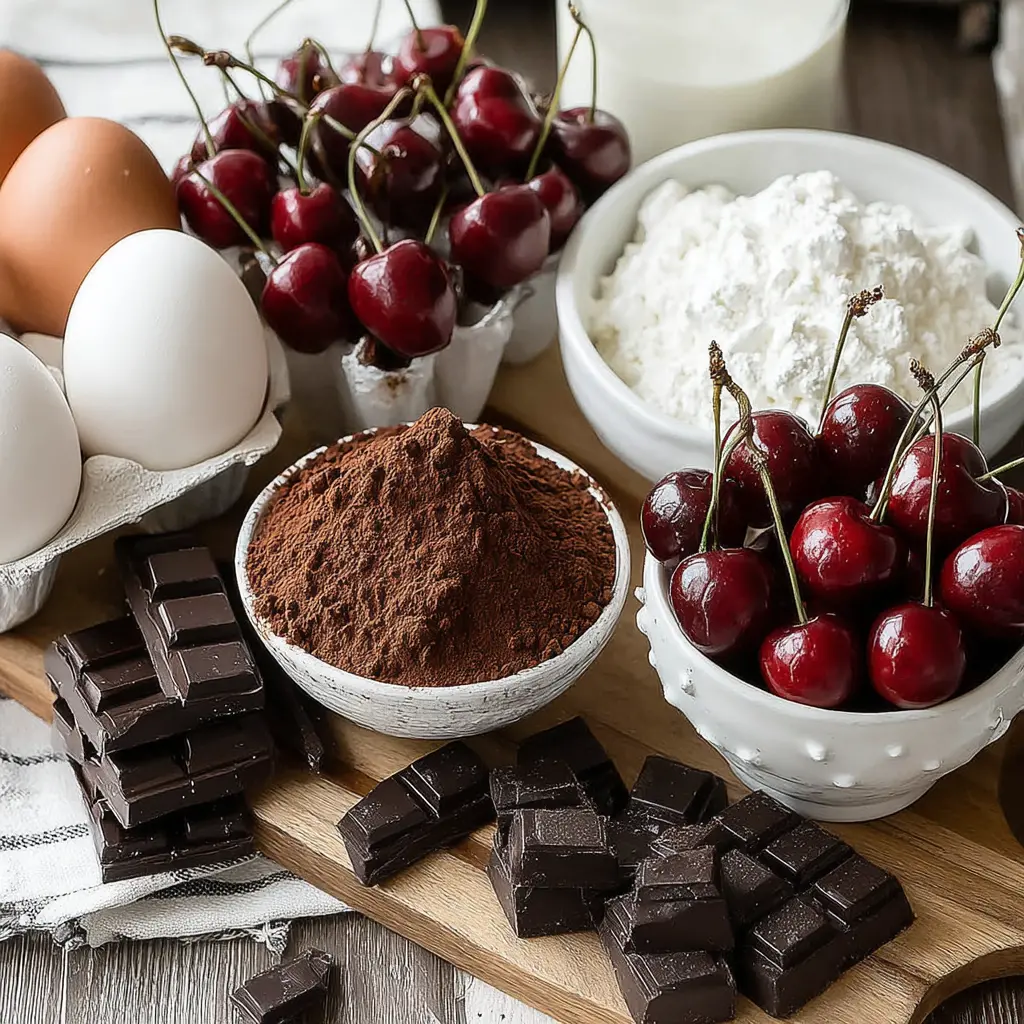
Ingredients
Method
- Preheat oven to 350°F. Grease two 8-inch round cake pans and dust with cocoa powder. Line the bottoms with parchment paper.
- In the bowl of a stand mixer fitted with the paddle attachment, combine flour, sugar, cocoa powder, baking soda, baking powder, and salt. Mix on low to blend.
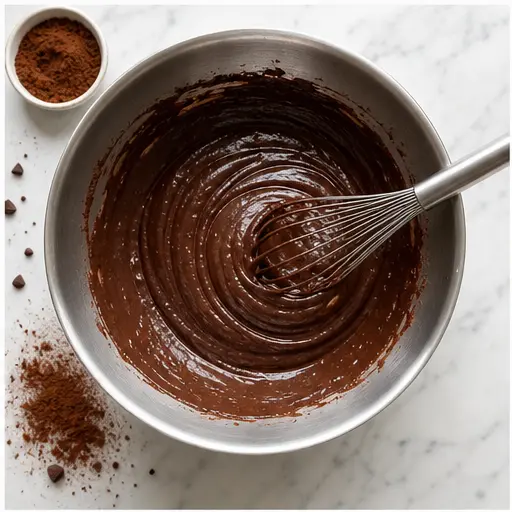
- In a separate bowl, whisk together oil, buttermilk, hot water (or coffee), eggs, and vanilla extract. Pour the wet ingredients into the dry ingredients and mix on medium speed for 2 to 3 minutes. The batter will be thin.
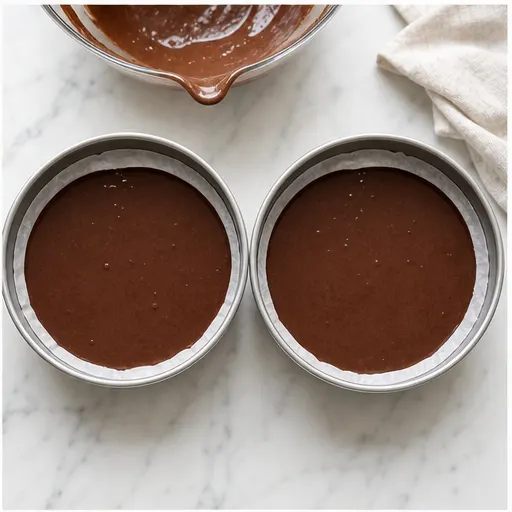
- Divide the batter evenly between the prepared pans. Bake for 45 minutes, or until a toothpick inserted in the center comes out clean.
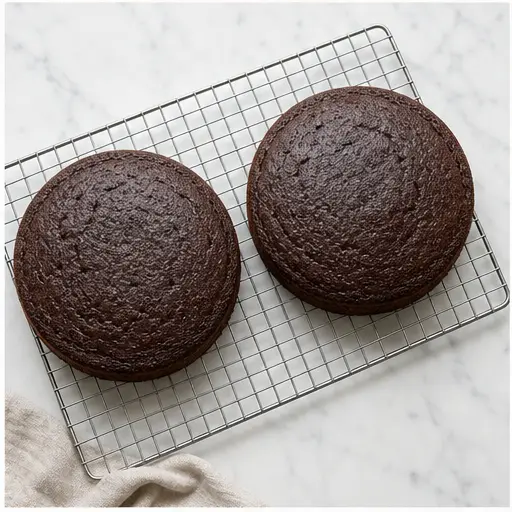
- Let the cakes cool in the pans for 10 minutes, then turn them out onto a wire rack to cool completely.
- In a small saucepan, combine sugar and water. Bring to a boil, stirring to dissolve the sugar. Simmer for 1 minute, then remove from heat. Stir in the cherry liqueur and let the syrup cool completely.
- In a chilled bowl with chilled beaters, whip the heavy cream and powdered sugar until stiff peaks form.
- Melt the dark chocolate in a double boiler or in the microwave in 20-second bursts, stirring between each burst, until smooth.
- Spread the melted chocolate in a thin, even layer onto a large sheet of parchment paper.
- Roll the parchment up from the short side, place on a baking sheet, and refrigerate or freeze until firm.
- Unroll the parchment to reveal chocolate bark. Break into pieces as desired.
- Slice each cooled cake layer in half horizontally to create four thin layers.
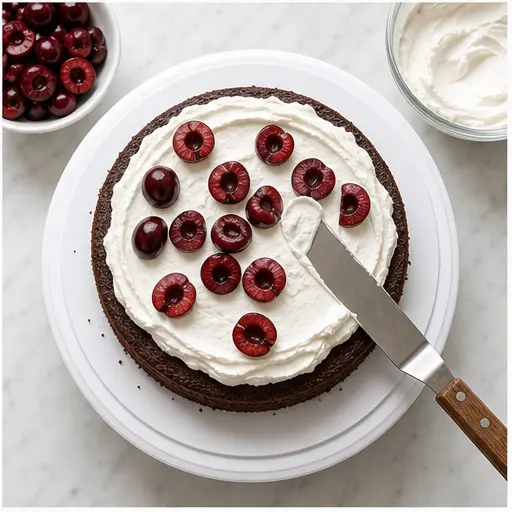
- Place one cake layer on a serving plate. Brush generously with cherry syrup. Spread about 1 cup of whipped cream on top, then scatter about 1 cup of cherries over the cream, pressing them in gently.
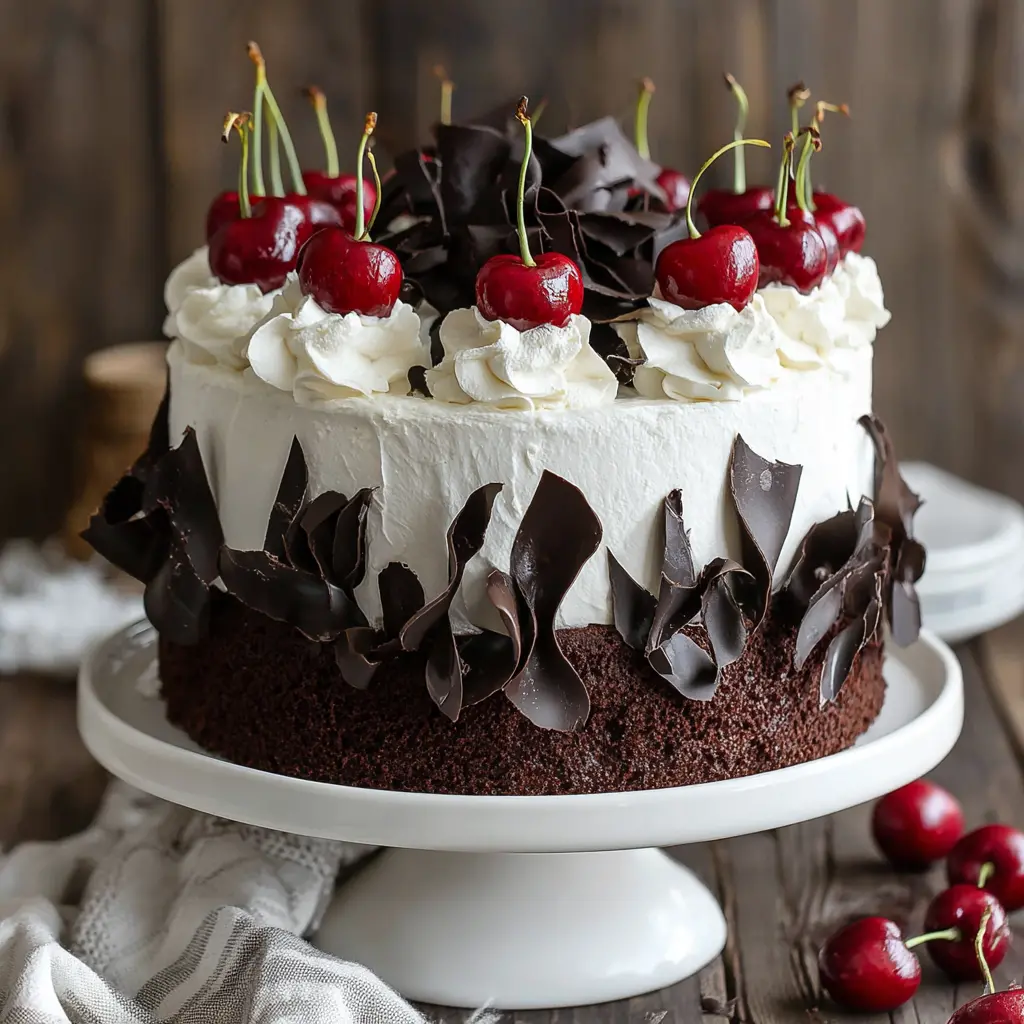
- Repeat with the remaining layers, finishing with a cake layer on top. Frost the entire outside of the cake with the remaining whipped cream.
- Decorate the top and sides with chocolate bark, chocolate shavings, and extra cherries as desired.
Nutrition
Notes
Tried this recipe?
Let us know how it was!Why This Chocolate Cherry Layer Cake Works
There’s a moment right before you slice into a layer cake that feels almost sacred. The anticipation, the slight wobble of the whipped cream, the way the chocolate layers peek through. I’ve had that moment go sideways more times than I care to admit – dry cake, runny filling, layers that slid off each other like they had better places to be.
This Chocolate Cherry Layer Cake is different. It’s the one I turn to when I need a showstopper that actually delivers. The kind of cake that makes people close their eyes on the first bite. And I promise you, it’s totally doable at home.
The secret? A few key techniques that work together. The cake batter uses buttermilk and hot water (or coffee) for a super moist crumb that stays tender for days. The cherry syrup brushed onto each layer adds moisture and that deep, fruity flavor. And the whipped cream frosting? Light, airy, and the perfect contrast to the rich chocolate. It’s a chocolate cherry dessert that feels special without being fussy.
Let’s get into it.
Ingredients for Chocolate Cherry Layer Cake
Before we start, let me walk you through what makes each ingredient pull its weight. This isn’t just a list – it’s your roadmap to a perfect cake.
The chocolate cake layers start with all-purpose flour, granulated sugar, and Dutch-processed cocoa powder. The Dutch-processed cocoa gives a deeper, more mellow chocolate flavor. If you only have natural cocoa powder, it’ll work fine – the cake will just be a touch lighter in color and slightly more acidic in taste.
Baking soda and baking powder both show up here. Yes, both. The baking soda reacts with the buttermilk’s acidity for lift, while the baking powder adds extra insurance. Salt balances the sweetness.
Vegetable oil keeps the cake moist even after refrigeration – butter would make it stiff when cold. Buttermilk adds tenderness and a subtle tang that plays beautifully with the cherries. Hot water (or hot coffee) blooms the cocoa powder for maximum chocolate flavor. Two large eggs and vanilla extract round it out.
For the cherry syrup, you’ll need granulated sugar, water, and cherry liqueur. If you want a non-alcoholic version, just swap the liqueur for cherry juice mixed with a splash of vanilla extract. Works perfectly.
The whipped cream frosting is simple: heavy whipping cream and powdered sugar. No complicated buttercream here. And for the cherry filling, you’ll want fresh cherries – about 2 1/2 cups, pitted and halved.
For decoration, we’re using dark chocolate for both the bark and shavings, plus extra cherries for garnish.
How to Make the Chocolate Cake Batter
This batter comes together in minutes, but there’s a trick: it’s intentionally thin. Don’t panic when you see it. That thin consistency is what gives you a tender, moist cake that doesn’t dry out.
Start by preheating your oven to 350°F. Grease two 8-inch round cake pans and dust them with cocoa powder – this prevents the dreaded white flour marks on your dark cake. Line the bottoms with parchment paper for easy release.
In your stand mixer bowl (or a large bowl if using a hand mixer), combine the flour, sugar, cocoa powder, baking soda, baking powder, and salt. Mix on low just to blend. No lumps allowed.
In a separate bowl, whisk together the vegetable oil, buttermilk, hot water (or hot coffee), eggs, and vanilla extract. Pour the wet ingredients into the dry and mix on medium speed for 2 to 3 minutes. The batter will be very thin – almost like a milkshake. That’s exactly right.
Divide the batter evenly between your prepared pans. Each pan should be about half full. The batter rises significantly, so 8×2-inch pans are important here.
Baking the Perfect Cake Layers
Pop those pans into the oven and bake for about 45 minutes. But here’s the thing – ovens vary, so start checking at 40 minutes. A toothpick inserted in the center should come out clean, maybe with a few moist crumbs but no wet batter.
Let the cakes cool in the pans for 10 minutes. Then turn them out onto a wire rack to cool completely. Don’t rush this step. If you try to slice or assemble warm cake layers, you’ll end up with a crumbly mess. Patience, my friend.
A note on pan choice: Straight-sided, reflective aluminum pans are your best bet. They conduct heat evenly and prevent doming. Dark non-stick pans can cause the edges to overbake before the center is done. If that’s all you have, reduce the oven temperature by 25°F and check a few minutes earlier.
Once completely cool, you can wrap each layer in plastic wrap and store at room temperature for up to 2 days. Or freeze them for up to 3 months. Just thaw overnight in the fridge before assembling.
Making the Cherry Syrup and Filling
This is the step that transforms a good chocolate cake into a memorable one. The cherry syrup adds moisture and that unmistakable cherry flavor that makes this a black forest cake variation at its finest.
In a small saucepan, combine 1/2 cup granulated sugar and 1/2 cup water. Bring to a boil, stirring to dissolve the sugar. Let it simmer for 1 minute, then remove from heat. Stir in the cherry liqueur (or cherry juice with vanilla) and let the syrup cool completely.
While the syrup cools, pit and halve your fresh cherries. You’ll need about 2 1/2 cups. If cherries aren’t in season, frozen cherries work beautifully – just thaw them first and drain any excess liquid. Canned cherries are fine too, but look for ones packed in juice rather than heavy syrup to avoid an overly sweet cake.
The cherry filling isn’t a cooked compote here – it’s fresh cherries pressed into the whipped cream. This keeps the texture bright and fresh, with each bite giving you a burst of juicy cherry.
Whipped Cream Frosting Tips
Whipped cream frosting is light, fluffy, and absolutely dreamy on this cake. But it can be finicky. Here’s how to get it right every time.
First, chill your bowl and beaters. I pop my metal mixing bowl and whisk attachment in the freezer for 15 minutes before starting. Cold tools = stable cream.
Pour 3 cups of heavy whipping cream into the chilled bowl. Add 1/4 cup powdered sugar. Whip on medium-high speed until stiff peaks form. You want the cream to hold its shape firmly – if it’s too soft, it won’t support the cake layers.
Don’t overwhip! Once you see stiff peaks, stop. Overwhipped cream turns grainy and then eventually becomes butter. If that happens, you can’t fix it. So watch carefully.
For a more stable frosting, you can add a tablespoon of instant vanilla pudding mix or a teaspoon of cornstarch with the powdered sugar. But honestly, if you’re serving this within 24 hours, the simple version works great.
How to Assemble the Cake
This is where it all comes together. And yes, it looks impressive, but it’s actually quite simple once you break it down.
First, slice each cooled cake layer in half horizontally to create four thin layers. Use a long serrated knife and a gentle sawing motion. If the layers are slightly domed, level them off first by slicing off the dome. Don’t worry if it’s not perfect – the whipped cream hides a multitude of sins.
Place one cake layer on your serving plate. Brush generously with cherry syrup. Spread about 1 cup of whipped cream on top, then scatter about 1 cup of cherries over the cream, pressing them in gently.
Repeat with the remaining layers, finishing with a cake layer on top. You should have four layers of cake, three layers of cream and cherries in between.
Now frost the entire outside of the cake with the remaining whipped cream. This is where the crumb coat technique comes in handy – spread a thin layer of cream all over the cake first to seal in the crumbs, then refrigerate for 15 minutes before applying the final coat. It makes for a much cleaner finish.
Decorate the top and sides with chocolate bark, chocolate shavings, and extra cherries. For the chocolate bark, melt 9 ounces of dark chocolate, spread it thin on parchment, roll it up, chill until firm, then unroll and break into pieces. It’s easier than it sounds and looks incredibly professional.
Variations and Substitutions
One of the best things about this recipe is how adaptable it is. Here are a few ways to make it your own:
- Non-alcoholic version: Replace the cherry liqueur in the syrup with cherry juice mixed with a splash of vanilla extract. You won’t miss the alcohol.
- Gluten-free option: Substitute the all-purpose flour with a good gluten-free flour blend. The cake will be super moist and a bit sticky, so line your pans with parchment and spray generously.
- Frozen cherries: Use them straight from the freezer – just thaw and drain well before adding to the filling. You might need a little extra cornstarch if you’re making a cooked filling, but for this fresh version, they work perfectly.
- Shortcut version: Use a good quality chocolate cake mix or devil’s food cake mix for the layers. The cherry syrup and whipped cream will still make it feel special.
- Different fruits: This technique works beautifully with other berries too – try raspberries, blackberries, or sliced strawberries.
Storage and Make-Ahead Tips
This cake is best enjoyed within 24 hours of assembly, thanks to the whipped cream frosting. But you can definitely work ahead.
Make ahead: Bake the cake layers and prepare the cherry syrup up to 2 days in advance. Store the cake layers wrapped tightly at room temperature, and keep the syrup in the fridge. Assemble and frost the day of serving.
Storing leftovers: Cover the cake loosely with plastic wrap or place it under a cake dome. It will keep in the refrigerator for up to 3 days. Let it sit at room temperature for about 20 minutes before serving for the best texture and flavor.
Freezing: You can freeze the fully assembled cake (without the fresh cherry garnish) for up to 1 month. Wrap it well in plastic wrap then foil. Thaw overnight in the refrigerator, then add fresh cherries and chocolate curls before serving.
Common Mistakes and Troubleshooting
Even experienced bakers hit snags sometimes. Here’s how to handle the most common issues:
Troubleshooting Your Chocolate Cherry Layer Cake
❌ Cake layers are dry: You likely overbaked them. Start checking at 40 minutes. Also, make sure you’re brushing each layer generously with cherry syrup – that’s your moisture insurance.
❌ Cake sinks in the middle: Your oven might be too cool, or you opened the door too early. Invest in an oven thermometer – they’re cheap and eye-opening.
❌ Whipped cream is too soft: Your cream was too warm, or you didn’t whip long enough. Chill everything thoroughly and whip to stiff peaks.
❌ Cake layers slide apart: You didn’t chill the cake between assembly steps. After each layer of cream and cherries, pop the whole thing in the fridge for 10-15 minutes to set.
❌ Cherry filling makes cake soggy: You’re using too much syrup or the cherries are too wet. Brush syrup lightly – you want moist, not soaked. And if using frozen cherries, drain them well.
❌ Frosting looks lumpy: You didn’t do a crumb coat. Always apply a thin layer first, chill, then finish with the final coat. Smooth as silk.
Frequently Asked Questions
You’ve got this. I know it looks like a lot of steps, but take it one stage at a time. Bake the layers one day, make the syrup and chill the cream the next, assemble and decorate the day you’re serving. Before you know it, you’ll be standing back, admiring a cake that looks like it came from a bakery. And when you take that first bite – the rich chocolate, the sweet-tart cherries, the light-as-air cream – you’ll know it was worth every minute.
Happy baking, friends. If you make this Chocolate Cherry Layer Cake, I’d love to hear about it. Drop a comment below or share your photos – nothing makes my day like seeing your beautiful creations.
For more inspiration, follow me on Pinterest where I’m always pinning my favorite sweet treats and baking tips.
Source: Nutritional Information


