
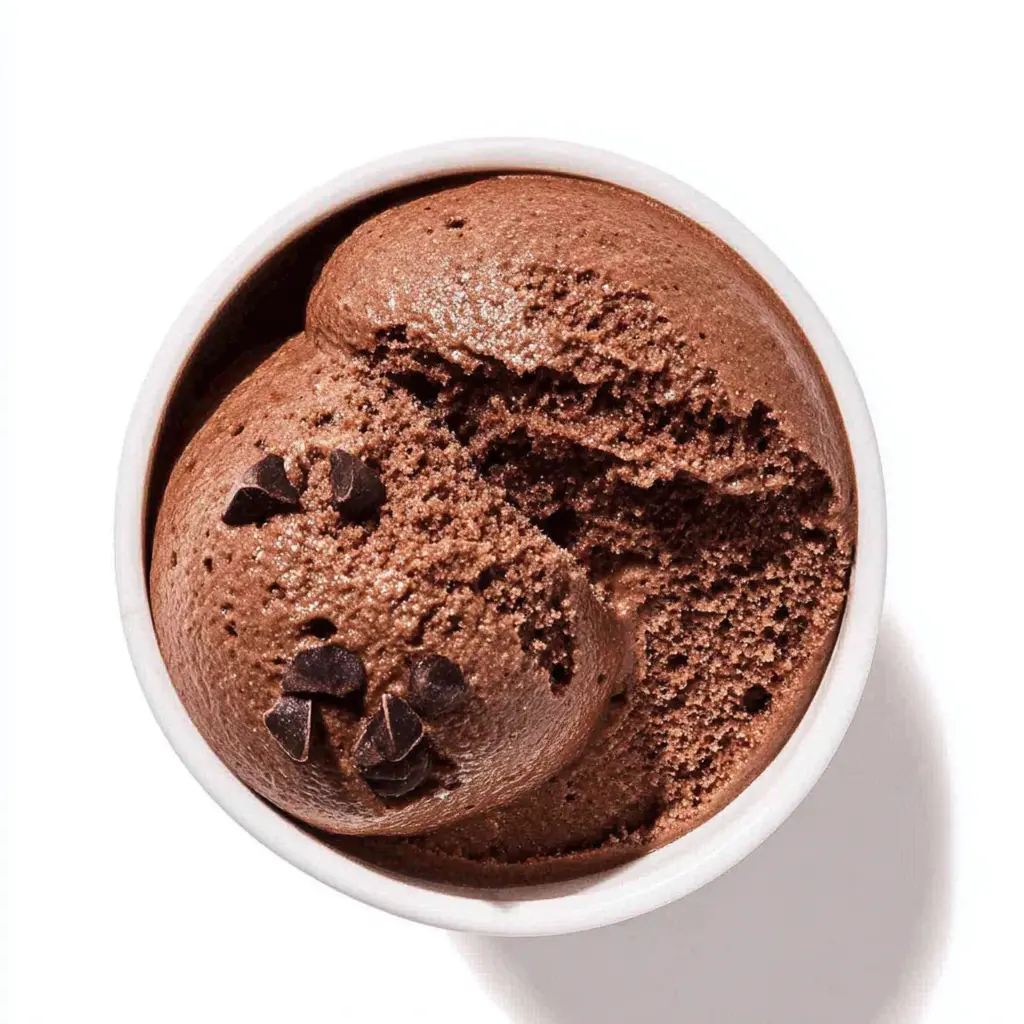

California Chickpea Chocolate Dessert Bowl
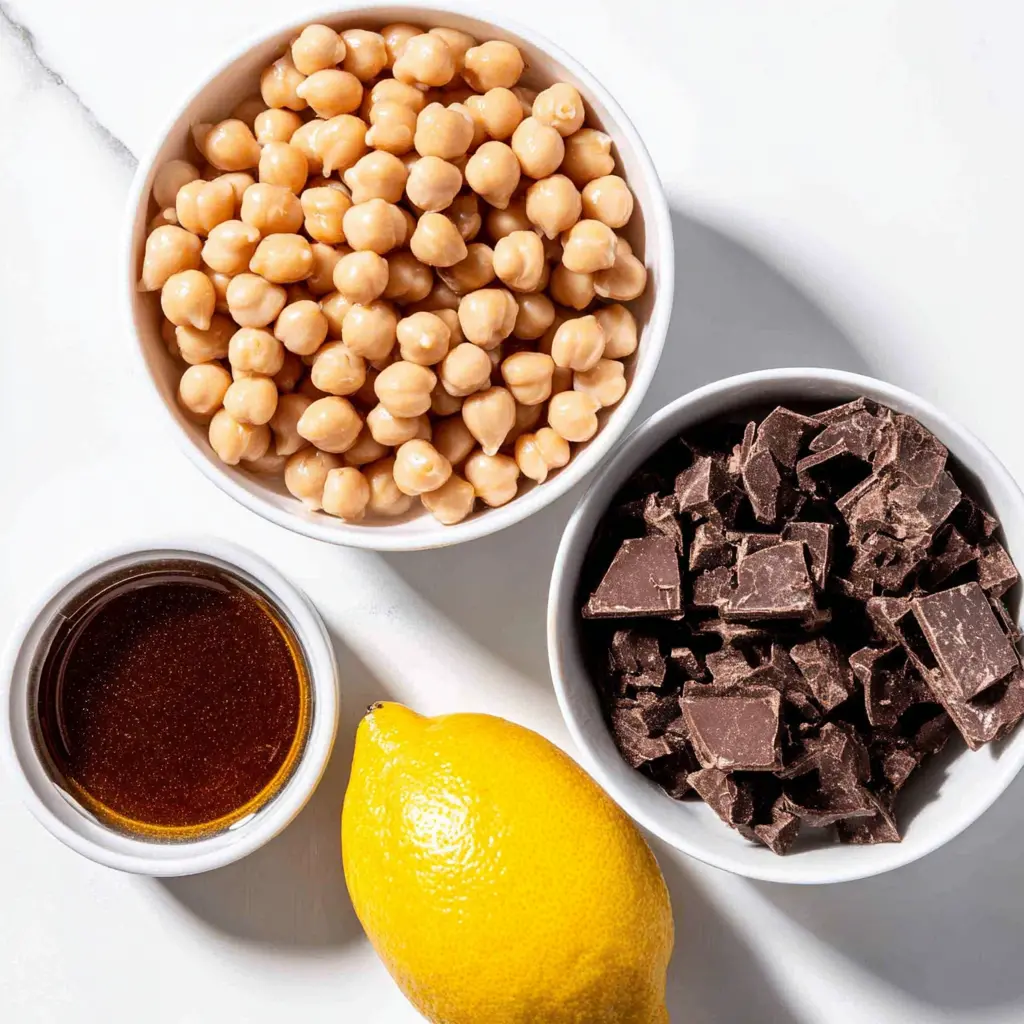
Ingredients
Method
- Drain the chickpeas, reserving the liquid (aquafaba) in a clean bowl. Set the chickpeas aside for another use, such as hummus or a curry.
- In a large mixing bowl, whisk together the aquafaba, lemon juice, and maple syrup until well combined. The lemon juice helps stabilize the foam.
- Using a stand mixer fitted with the whisk attachment, beat the aquafaba mixture on high speed until stiff peaks form, about 10 minutes. The foam should be thick enough that it doesn't slide when you tilt the bowl. Unlike egg whites, aquafaba cannot be over-whipped, so keep beating until it's very stiff.
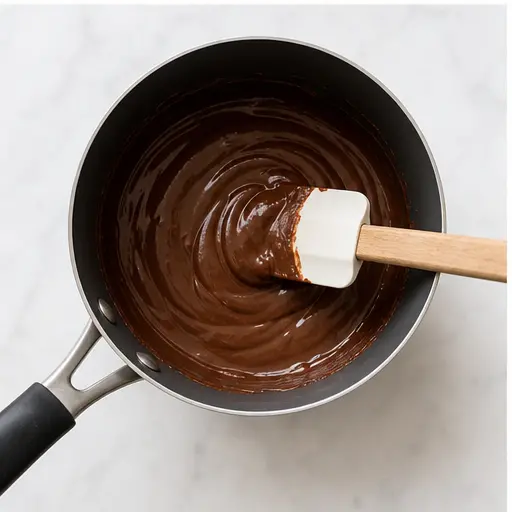
- Melt the dark chocolate chips using a double boiler or in a microwave-safe bowl in 20-second bursts, stirring until smooth. Let cool slightly.
- Gently fold the melted chocolate into the whipped aquafaba using a rubber spatula. The mixture may deflate a little, which is normal. Fold just until no streaks remain.
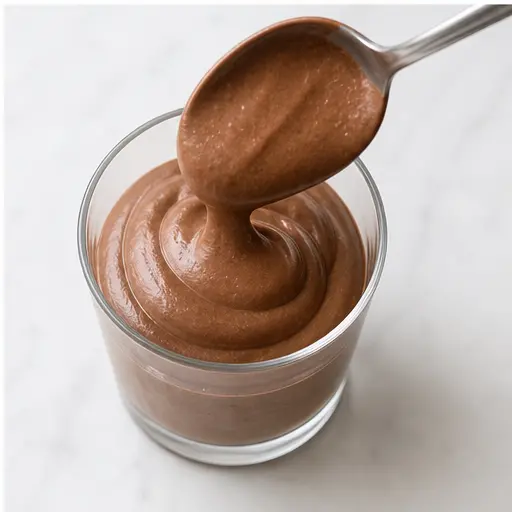
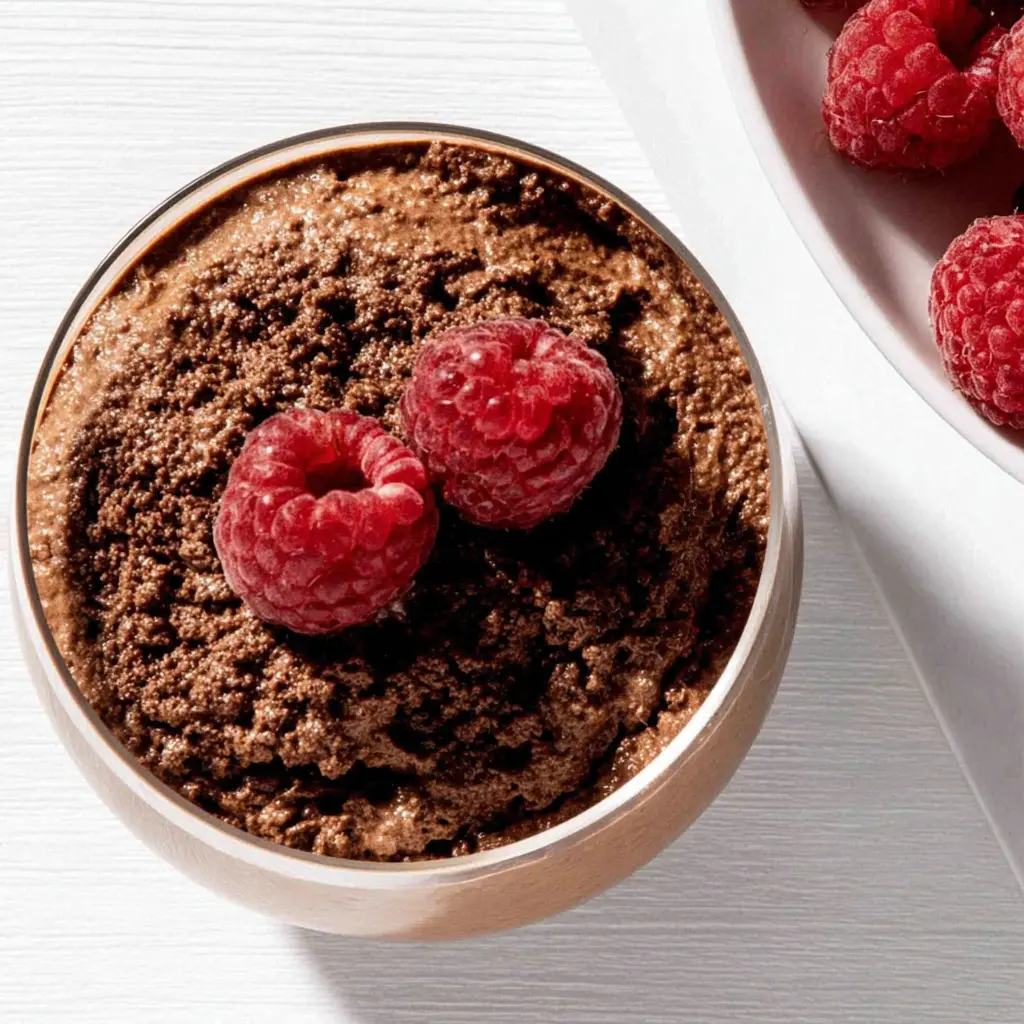
- Divide the mousse evenly among four small bowls or glasses. Refrigerate for at least 3 hours, or overnight, until set. Serve chilled.
Nutrition
Notes
Tried this recipe?
Let us know how it was!Why You’ll Love This Chickpea Chocolate Dessert Bowl
I know what you’re thinking: chickpeas in dessert? Stay with me. Honestly, I was the biggest skeptic when I first heard about this. But the first time I made this Chickpea Chocolate Dessert Bowl, I sat there with my spoon, staring at the bowl like, “Is this real life?” It’s that good.
This isn’t your average healthy dessert. It’s a light, airy, almost cloud-like mousse that tastes like pure indulgence. But here’s the kicker it’s packed with protein, totally vegan, and comes together in about 10 minutes of active work. The secret? Aquafaba, the liquid from a can of chickpeas. It whips up into stiff peaks just like egg whites, and when you fold in melted dark chocolate, magic happens.
I promise, you won’t taste a single chickpea. None. Zero. We’re starting a “no-chickpea-taste” club, and you’re the first member. This chickpea dessert is creamy, silky, and deeply chocolatey. It satisfies that late-night craving without the sugar crash. Plus, it’s a high protein dessert that actually keeps you full. What’s not to love?
Ingredients You’ll Need
You only need four simple ingredients for this vegan chocolate mousse. And I bet you have most of them in your pantry right now.
- Aquafaba (1 cup): That’s the liquid from one 15-ounce can of chickpeas. Don’t toss it! This is the magic ingredient that gives the mousse its fluffy texture. Make sure you use unsalted chickpeas, or at least ones without added preservatives, so the aquafaba whips up properly.
- Dark chocolate chips (7 ounces, 54% cacao): I like using 54% cacao for a good balance of sweetness and richness. If you want a more intense chocolate flavor, go up to 70%. Just make sure they’re vegan-friendly if that’s important to you.
- Fresh lemon juice (1 tablespoon): This isn’t for flavor it’s for science. The acid helps stabilize the aquafaba foam, so your peaks hold their shape. Meyer lemons are lovely here, but any fresh lemon works.
- Maple syrup (2 tablespoons): A little natural sweetness to round out the dark chocolate. You can swap in agave nectar if that’s what you have.
That’s it. No eggs, no dairy, no complicated stuff. This is truly a healthy dessert bowl that feels like a cheat meal.
Kitchen Tools Required
You don’t need a fancy setup for this clean dessert bowl. Here’s what I use:
- Stand mixer or hand mixer: A stand mixer with a whisk attachment is my go-to. It frees up my hands for other steps. But a hand mixer works too it just takes a few minutes longer. Honestly, I’ve even done it with a whisk and some serious arm strength, but I don’t recommend it unless you’re looking for a workout.
- Large mixing bowl: Make sure it’s clean and dry. Any grease will ruin your aquafaba foam.
- Rubber spatula: For gently folding in the melted chocolate. A gentle hand is key here.
- Double boiler or microwave-safe bowl: To melt the chocolate. I use the microwave in 20-second bursts, stirring between each. Easy and fast.
- Small bowls or glasses: For serving. Ramekins, juice glasses, or even small mason jars work great.
If you don’t have a fancy blender, a regular one works just blend a little longer. But for this recipe, you really just need a mixer and a bowl.
How to Make Chickpea Chocolate Dessert Bowl
Let’s get into the process. I’ll walk you through the four main stages. Remember, the detailed steps are in the recipe card above this is the “why” behind each stage.
Stage 1: Prep Your Aquafaba
Open your can of chickpeas and drain the liquid into a clean bowl. Set the chickpeas aside for another use hummus, curry, or roast them for a snack. Add the lemon juice and maple syrup to the aquafaba and whisk them together. The lemon juice is your stabilizer, so don’t skip it.
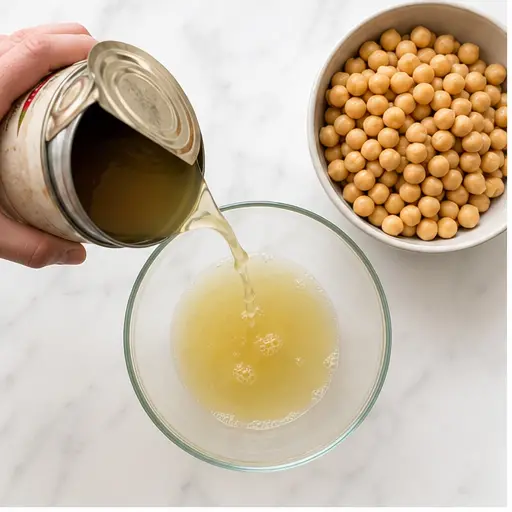
I like to use a glass or metal bowl for this. Plastic can sometimes hold onto grease, which is the enemy of foam.
Stage 2: Whip to Stiff Peaks
Transfer the aquafaba mixture to your stand mixer bowl. Beat on high speed with the whisk attachment. It takes about 10 minutes, but keep going until the foam is thick and glossy. You’ll know it’s ready when you can tilt the bowl and the foam doesn’t slide. Unlike egg whites, aquafaba can’t be over-whipped, so don’t be shy. Let it run until it’s very stiff.
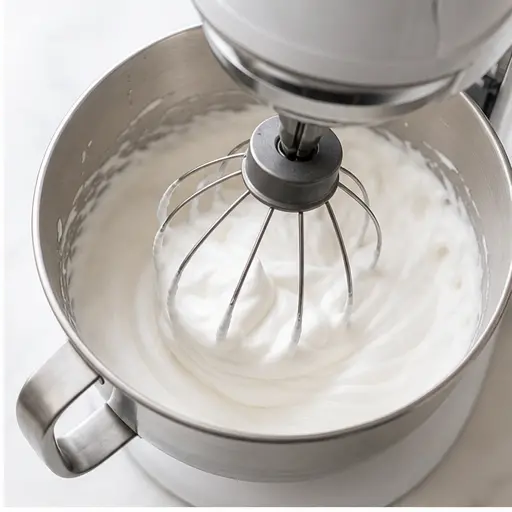
If you’re using a hand mixer, it might take 12-15 minutes. Put on a podcast or your favorite playlist. I promise the result is worth the wait.
Stage 3: Melt the Chocolate
While the aquafaba whips, melt your dark chocolate chips. I use a microwave-safe bowl and heat in 20-second bursts, stirring each time. It should be smooth and glossy. Let it cool slightly you don’t want it hot when you fold it in, or it will deflate the foam.
If you prefer a double boiler, that works too. Just make sure the bowl doesn’t touch the water, and stir until melted.
Stage 4: Fold and Chill
Here’s where you need a light touch. Gently fold the melted chocolate into the whipped aquafaba using your rubber spatula. The mixture will deflate a little that’s normal. Fold just until no streaks remain. Don’t overmix, or you’ll lose all that airy texture.
Divide the mousse among your serving bowls or glasses. Refrigerate for at least 3 hours, but overnight is even better. The texture sets beautifully, becoming silky and firm. Serve it chilled, and you’ve got a dairy free mousse that rivals any traditional one.
Tips for Perfect Aquafaba Mousse
I’ve made this healthy chocolate pudding more times than I can count. Here are my best tips to nail it every time.
- Use room temperature aquafaba: Cold liquid takes longer to whip. Let it sit out for 10 minutes before you start.
- Keep everything clean and grease-free: Any trace of oil will prevent the aquafaba from forming stiff peaks. Wash your bowls and beaters well.
- Don’t rush the whipping: Aquafaba takes longer than egg whites. Be patient. It will get there.
- Cool the chocolate slightly: If the melted chocolate is too hot, it will deflate your foam. Let it cool for 2-3 minutes before folding.
- Chill for at least 3 hours: The mousse needs time to set. Overnight is ideal for the best texture.
One more thing: if your mousse seems a little runny after folding, don’t panic. It will firm up in the fridge. Trust the process.
Flavor Variations
This aquafaba chocolate dessert is perfect as written, but it’s also a great base for creativity. Here are a few ways to switch it up.
- Berry bliss: Top with fresh raspberries, blueberries, or sliced strawberries. The tartness cuts through the rich chocolate beautifully.
- Nutty crunch: Add a dollop of peanut butter or almond butter before folding, then top with chopped nuts or a drizzle of nut butter.
- Sea salt finish: A sprinkle of flaky sea salt on top before serving enhances the chocolate flavor. It’s a classic for a reason.
- Minty fresh: Add a drop of peppermint extract to the aquafaba before whipping. It makes a refreshing spring dessert.
These are just starting points. Feel free to experiment with what you have in your pantry.
How to Store Leftovers
This clean dessert bowl stores beautifully, which makes it perfect for meal prep. Here’s how to keep it fresh.
Store the mousse covered in the refrigerator for up to 3 days. Use plastic wrap directly on the surface to prevent a skin from forming, or keep it in an airtight container. The texture stays silky and smooth.
I don’t recommend freezing this mousse. The texture changes when thawed, and it loses that light, airy quality. But honestly, it’s so good that leftovers rarely last more than a day in my house.
If you’re making this ahead for a party, prepare it the day before and let it chill overnight. It’s one of those desserts that actually improves with time. The flavors meld, and the texture becomes even more luscious.
Frequently Asked Questions
Try it, then text me your honest reaction! I promise, this Chickpea Chocolate Dessert Bowl will change the way you think about healthy desserts. It’s rich, creamy, and secretly nutritious. Honestly, it’s become my go-to for late-night cravings and dinner parties alike.
If you loved this recipe, share it with a friend who needs a healthier dessert option. And don’t forget to pin it on your favorite dessert board for later!
Source: Nutritional Information


