

Crispy Beef Taco Cups Baked for Parties
Ingredients
Method
- Preheat your oven to 375°F (190°C) and lightly grease a muffin tin with cooking spray.
- In a skillet over medium heat, cook the ground beef until browned. Drain any excess fat. Stir in the taco seasoning and water according to the packet instructions. Let simmer.
- Press one wonton wrapper into each cup of the muffin tin. Add a spoonful of the seasoned beef and top with a sprinkle of cheddar and Monterey Jack cheese. Add a second wonton wrapper on top and repeat the beef and cheese layers.
- Bake for 12-15 minutes, or until the edges are crispy and golden, and the cheese is melted.
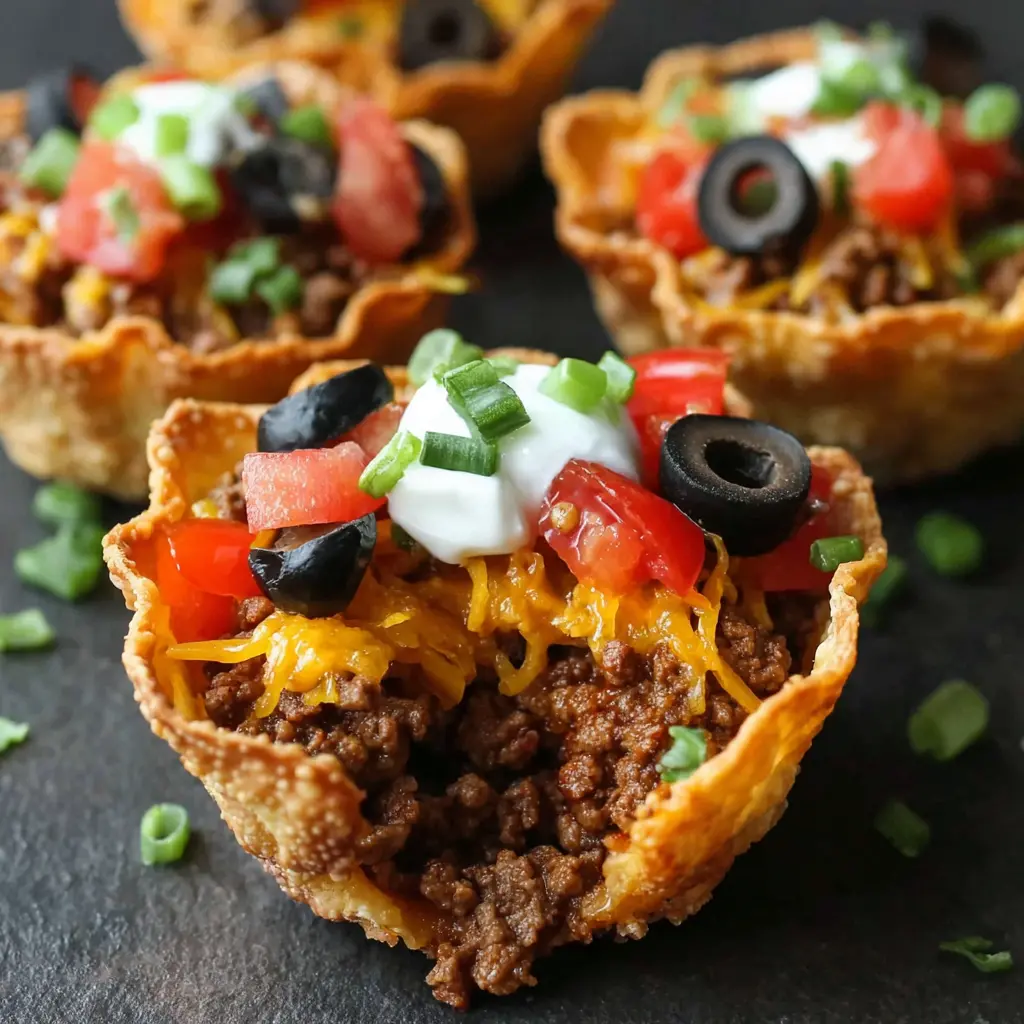
- Let the taco cupcakes cool for a few minutes before removing them from the muffin tin. Garnish with sour cream, salsa, and green onions. Add any optional toppings you like!
- Serve warm with your favorite sides like chips and salsa.
Nutrition
Notes
Tried this recipe?
Let us know how it was!You know that panic when you have zero time for fancy appetizers?
I’ve been there. It’s a Tuesday night, you’ve got people coming over in an hour, and suddenly you’re staring at your pantry like it’s a blank canvas. You need something that looks impressive, tastes amazing, and doesn’t make you sweat through your shirt. That’s where these Crispy Beef Taco Cups come in. Honestly, they’re the answer to every last-minute hosting prayer I’ve ever had.
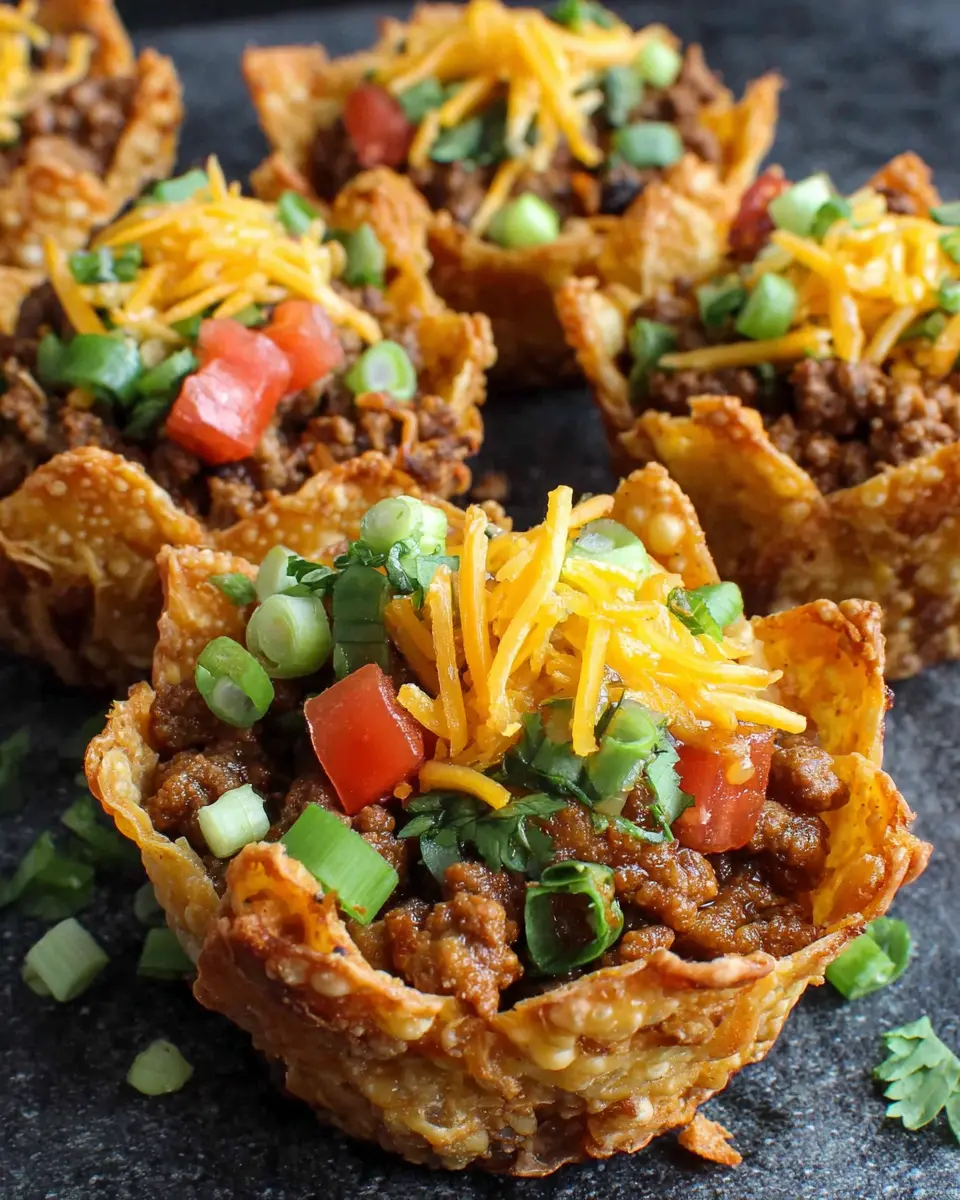
I mean, think about it. You take a simple wonton wrapper, press it into a muffin tin, and fill it with a perfectly seasoned ground beef taco filling. A little cheese on top, a quick bake, and suddenly you’ve got these gorgeous, golden, crunchy taco shells that hold their shape like a dream. No crumbling, no sogginess, just pure, satisfying crunch. These mini taco appetizers are the perfect party finger food. They’re the kind of thing that makes people ask, “Did you really make these?” and you get to smile and say, “Yeah, and it was way easier than you think.”
With spring here and Cinco de Mayo right around the corner, these loaded taco bites are about to become your new best friend. They’re great for everything from a casual Taco Tuesday to a full-on fiesta. So let’s get into it, shall we?
What Are Crispy Beef Taco Cups?
So, what exactly are we talking about here? Basically, they’re individual, handheld taco shells made from wonton wrappers or tortillas. You press them into a muffin tin to create a crispy tortilla basket. Then you fill that basket with a savory beef mixture, top it with cheese, and bake until everything is bubbly and golden. The result is a crunchy taco shell that’s sturdy enough to hold all your favorite toppings.
It’s not really a taco, and it’s not really a casserole. Well, it is, but in a way that’s way more fun and portable. They’re perfect for parties because guests can just grab one and go. No messy forks, no dripping salsa down your shirt. Just pure, delicious, one-bite goodness. These baked tortilla cups are seriously a game changer for entertaining.
Ingredients You’ll Need
Let’s talk about what goes into these little cups of joy. The beauty of this recipe is that the ingredient list is short and sweet. You probably already have most of this stuff in your fridge or pantry.
For the filling, you’ll need some good quality ground beef. I like to use 90% lean so there’s not too much grease to drain. Then you’ve got your taco seasoning, which you can totally use a packet of, or make your own if you’re feeling fancy. The cheese situation is important too. I use a mix of shredded cheddar cheese and Monterey Jack cheese. The cheddar gives you that sharp, familiar flavor, and the Monterey Jack melts like a dream, making these cheese taco cups extra gooey.
And for the shells, you’ve got options. Wonton wrappers are my go to because they get incredibly crispy and have a nice, neutral flavor. You can find them in the refrigerated section of most grocery stores, usually near the tofu or the salad dressings. I’ve also used flour tortillas and corn tortillas, and I’ll break down the differences a bit later.
How to Make Crispy Beef Taco Cups
Okay, let’s get down to business. The process is so simple, it almost feels like cheating. First, you brown your ground beef in a skillet until it’s perfectly tender. Drain off any excess fat, then stir in your taco seasoning and a little bit of water. Let that simmer for a few minutes until it thickens up. That’s your ground beef taco filling, done.
While the beef is cooking, you can prep your shells. If you’re using wonton wrappers, just lightly spray your muffin tin with nonstick spray. Then press one wrapper into each cup. For extra stability, you can use two wrappers per well, which is a tip I picked up from The Chunky Chef. It really helps. If you’re using tortillas, you’ll want to warm them up first so they don’t break. A quick 20 seconds in the microwave does the trick. Then cut them into circles using a round cookie cutter or even a mason jar lid.
Now, here’s the most important part. You need to pre-bake those shells before you add any filling. Trust me on this. If you skip this step, you’ll end up with soggy bottoms. No one wants that. Bake them at 375°F for about 5 minutes, just until they start to turn golden and hold their shape. Then pull them out, fill them with your beef mixture, top with the shredded cheese, and pop them back in the oven for another 8 to 10 minutes. The baking time for taco cups is usually pretty short, so keep an eye on them.
Tips for Perfectly Crispy Cups
I’ve made these Crispy Beef Taco Cups more times than I can count, and I’ve learned a few things along the way. Here are the tips that make all the difference.
Don’t skip the pre-bake. I know I said it already, but it’s worth repeating. That initial bake is what creates a barrier between the tortilla and the filling, keeping it crunchy. It’s the difference between a crispy tortilla basket and a sad, limp one.
Watch your moisture. The filling needs to be thick, not watery. After you cook the beef and add the seasoning, let it simmer until most of the liquid has evaporated. If you’re adding salsa, use a chunky one and drain off the excess liquid. Too much moisture is the enemy of a crunchy taco shell.
Work in batches. When you’re pressing the wonton wrappers or tortillas into the muffin tin, work with only a few at a time. If you’re using corn tortillas, they cool down fast and become brittle. A Dash of Megnut recommends working with just three at a time, and I’ve found that to be spot on.
Don’t overfill. It’s tempting to pile on the filling, but resist the urge. Overfilling leads to spillage and sogginess. A heaping tablespoon or two is plenty. You want the cups to be loaded, but not overflowing.
Use a good nonstick spray. Generously coat your muffin tin. These cups can stick, and there’s nothing worse than trying to pry a perfect cup out of the pan only to have it fall apart. I learned this the hard way.
Common Mistakes & Fixes
Mistake: The cups are soggy on the bottom.
Solution: You skipped the pre-bake or overfilled them with a watery filling. Next time, pre-bake the shells and make sure your beef mixture is thick.
Mistake: The tortillas break when pressing them into the tin.
Solution: You didn’t warm them up enough. Corn tortillas need a good 20 to 30 seconds in the microwave to become pliable. Work quickly while they’re still warm.
Mistake: The cheese leaks out and makes a mess.
Solution: You overfilled the cups or used a cheese that’s too oily. Stick to a mix of cheddar and Monterey Jack, and don’t go overboard with the amount.
Mistake: The cups are too soft after baking.
Solution: They might need a few more minutes in the oven. Let them bake until the edges are deep golden brown and the cheese is bubbly. Also, let them cool in the pan for a few minutes before removing them; they firm up as they cool.
Recipe Variations & Substitutions
One of the best things about this recipe is how versatile it is. You can change it up based on what you have in your fridge or who you’re feeding. The possibilities are endless.
Protein Swaps: If you’re not feeling beef, you can use ground turkey or shredded chicken instead. For a vegetarian option, black beans or refried beans work beautifully. You can even use plant based crumbles if that’s your thing.
Shell Type Comparison: I mentioned earlier that you have options for the shell. Wonton wrappers are my favorite because they get incredibly crispy and are perfectly portioned. Flour tortilla cups are a bit more substantial and have a chewier texture. Corn tortilla cups are great if you want a more authentic corn flavor, but they can be a little more delicate to work with. Each one gives you a slightly different result, so feel free to experiment.
Dietary Adaptations: To make these gluten free, use corn tortillas instead of wonton wrappers or flour tortillas. Also, use individual spices instead of a taco seasoning packet, as some packets contain gluten. For a lower carb option, you can skip the shell entirely and just bake the filling in the muffin tin with some cheese on top. It’s like a mini taco bowl.
Spice It Up: Add some sliced jalapeños to the filling or top the cups with a few pickled jalapeños before baking. You can also mix some chopped green onions into the beef for an extra layer of flavor.
What to Serve with Taco Cups
These loaded taco bites are pretty great on their own, but they become a full on feast when you pair them with the right sides and dips. Think of it as a taco bar in miniature form.
I love setting up a toppings bar so everyone can customize their own cups. Lay out bowls of sour cream, salsa, and guacamole. Add some diced tomatoes, chopped green onions, sliced black olives, and shredded lettuce. A dollop of cilantro lime crema on top is also a fantastic idea. It adds a cool, creamy finish that balances the spicy beef.
For side dishes, you can’t go wrong with Mexican Rice or a simple side of refried beans. A fresh taco salad with crunchy lettuce, corn, and a zesty dressing is another great option. And if you’re feeling extra, a side of queso dip for dipping is never a bad idea.
Storage and Reheating Instructions
So, you’ve made a batch of these Crispy Beef Taco Cups and you have leftovers. Or maybe you want to make them ahead for a party. Either way, I’ve got you covered. The key is to store them properly so they stay as crispy as possible.
To Store: Let the cups cool completely. Then place them in an airtight container and store them in the refrigerator. They’ll keep for about 3 to 4 days. If you’re stacking them, put a layer of paper towels between the layers to absorb any excess moisture.
To Freeze: You can absolutely freeze these. Cool them completely, then place them on a baking sheet in a single layer and pop them in the freezer for about an hour. Once they’re frozen solid, transfer them to a freezer safe bag or container. They’ll last for up to 2 months. This is a great make ahead appetizer strategy.
To Reheat: The best way to reheat these is in the oven or an air fryer. For the oven, preheat to 350°F, place the cups on a baking sheet, and heat for about 8 to 10 minutes, or until they’re warmed through and crispy again. If you’re reheating from frozen, add a few extra minutes. You can also use a toaster oven for smaller batches. Avoid the microwave, as it will make them soggy.
Make Ahead Strategy: For a party, you can prepare the beef filling up to two days in advance and store it in the fridge. You can also pre-bake the tortilla shells and store them in an airtight container at room temperature for a day. Then, when you’re ready to serve, just fill, top with cheese, and bake. It couldn’t be easier.
Frequently Asked Questions
The Science Behind the Perfect Crunch
I’m not a food scientist, but I’ve spent enough time in the kitchen to understand why certain things work. With these cups, it all comes down to moisture management. Wonton wrappers are essentially thin sheets of dough made from flour, water, and a little salt. When you bake them, the water evaporates and the starches crisp up, creating that satisfying crunch.
But if you add a wet filling to an unbaked wrapper, that moisture gets absorbed into the dough before it has a chance to crisp. The result is a soft, doughy texture. That’s why pre-baking is so crucial. It sets the structure of the wrapper and creates a barrier that resists moisture. It’s the same principle behind blind baking a pie crust. You’re essentially giving the shell a head start.
Another factor is the fat content of your meat. Using 90% lean ground beef means there’s less grease to deal with. If you use a fattier blend, you’ll need to drain it very well. Excess grease can pool at the bottom of the cup and make it soggy. So, a little bit of science and a little bit of technique go a long way toward achieving that perfect, crunchy result.
Why This Recipe Works for Parties
I’ve brought these Crispy Beef Taco Cups to more gatherings than I can count. Potlucks, game days, birthday parties, you name it. They’re always the first thing to disappear. There’s something about the individual serving size that people love. It feels special, like you put in way more effort than you actually did.
Plus, they’re incredibly versatile. You can make a big batch of the filling and let people choose their own toppings. It turns your appetizer into an interactive experience. And since they’re handheld, there’s no need for plates or forks. Just grab and go. For a Cinco de Mayo party, they’re an absolute must. They fit right in with all the other festive dishes and they look amazing on a platter.
And let’s be honest, they’re way more fun than a standard taco. The crunchy shell, the juicy filling, the melted cheese. It’s all packed into one perfect, poppable bite. You’ll get compliments and recipe requests, guaranteed.
When you serve these at your next get together, watch how fast they go. People will be hovering around the platter, grabbing a second, and a third. They’ll ask you how you made them, and you can just smile and say it was easy. Because honestly, it is. These cups have your back.
I’d love to hear about your topping combos. Drop a comment below and tell me what you put on yours. And if you’re looking for more party inspiration, check out my Pinterest boards for tons of ideas. Go ahead, be the host with the most.
Source: Nutritional Information


