
Easy Beef Creamy Garlic Butter Pasta
Ingredients
Method
- In a large pot or Dutch oven, melt butter over medium heat. Add ground beef and cook, breaking it apart with a spoon, until browned and fully cooked (about 5-7 minutes). Drain any excess fat.
- Add minced garlic and dried Italian seasoning to the beef. Sauté for 1-2 minutes until fragrant.
- Pour in beef broth and add uncooked pasta. Stir to combine and ensure the pasta is submerged. Bring to a boil, then reduce heat to a simmer. Cover and cook for about 10-12 minutes, or until the pasta is tender and most of the liquid has been absorbed. Stir occasionally.
- Once the pasta is cooked, stir in grated Parmesan cheese. For a creamier texture, add heavy cream or milk and stir until smooth.
- Taste and adjust seasoning with salt and pepper. Add red pepper flakes for a spicy kick, if desired.
- Serve the pasta hot, garnished with extra Parmesan and fresh herbs like parsley or basil. Enjoy!
Nutrition
Notes
Tried this recipe?
Let us know how it was!Why You’ll Love This Creamy Garlic Butter Pasta
Look, I’ll be honest with you. There are some nights where I stare into the fridge and just… nothing sounds good. You know that feeling? It’s like 6:30 PM, you’re tired, the kids are hungry, and you’re this close to just ordering pizza again. But then I remember this Creamy Garlic Butter Pasta and suddenly everything changes.
This isn’t some complicated restaurant dish that takes hours. I mean, it tastes like it does, but that’s the magic of it. You get that rich, silky sauce that coats every single noodle, and the garlic hits you in the best way possible. It’s comfort food that comes together in about 30 minutes. Honestly, what more could you want?
I’ve been making this for years, and it’s become my go-to for those weeknight dinner emergencies. The first time I tried it, I was skeptical. How could something so simple taste so good? But trust me on this one. The combination of butter, garlic, and cream is just… perfect. And the best part? You probably already have most of the ingredients in your kitchen.
Ingredients & Essential Tools
What You’ll Need
Before we get into the nitty-gritty, let’s talk about what goes into this dish. And I want to be really clear about something: the ingredients here are simple, but each one plays a specific role. There’s no random stuff just to fill space.
For the base, you’ll need butter. Good butter. I know it’s tempting to grab the cheap stuff, but honestly, this is where you want to splurge a little. The butter is the backbone of the sauce, so you want one that tastes great. I usually grab Kerrygold from Costco or the store brand at Ralphs. Both work fine.
Garlic is obviously non-negotiable here. Fresh cloves, not the pre-minced stuff in a jar. I know, I know, it’s convenient. But the flavor difference is huge. Fresh garlic gives you that sharp, aromatic kick that makes this dish so good. And we’re using a good amount of it, so you really want it to shine.
For the creamy part, you’ve got options. Heavy cream gives you the richest, most luxurious texture. But if you’re watching calories or just don’t have it on hand, whole milk works too. I’ve used both, and honestly, they’re both great. The cream is just a little more… indulgent. You know?
You’ll also need pasta. Any shape works, but I’m partial to fettuccine or linguine. They catch the sauce perfectly. And don’t forget the Parmesan cheese. Freshly grated is best, but the pre-shredded stuff from the store works in a pinch. Just avoid the powdery stuff in the green can. Please.
And here’s a little secret: pasta water. Don’t drain it all! That starchy water is liquid gold for thinning out your sauce and helping it cling to the pasta. I’ll explain more in a bit.
Kitchen Equipment
You don’t need a fancy kitchen for this. I promise. Here’s what you’ll need:
- A large pot for boiling pasta (duh)
- A skillet or large pan for the sauce
- A wooden spoon or spatula
- A sharp knife for mincing garlic
- A measuring cup for the pasta water
- A grater if you’re using block Parmesan
That’s it. No blender, no food processor, no special gadgets. Just basic stuff you probably already have. I mean, unless you’re a college student living on ramen and sheer willpower. In that case, you might need to borrow a pot from a friend.
One thing I will say: use a non-stick or well-seasoned pan for the sauce. It makes cleanup so much easier, and you won’t have to scrub burnt garlic off the bottom. Trust me, I’ve learned that lesson the hard way.
Step-by-Step Cooking Guide
Preparing Your Pasta
Start by bringing a large pot of salted water to a boil. And I mean generously salted. It should taste like the sea. This is your only chance to season the pasta itself, so don’t be shy. I usually add about a tablespoon of salt per gallon of water.
Add your pasta and cook it according to the package directions. But here’s the thing: cook it to al dente. Not mushy. You want it to have a little bite, a little resistance when you chew. Because it’s going to cook a bit more in the sauce later.
Before you drain the pasta, scoop out about a cup of that starchy water. Set it aside. I cannot stress this enough. That water is going to save your sauce if it gets too thick. It’s like a secret weapon.
Drain the pasta, but don’t rinse it. Rinsing removes the starch that helps the sauce stick. Just let it sit in the colander while you make the sauce.
Making the Garlic Butter Sauce
Now for the good part. In your skillet, melt the butter over medium heat. Let it foam up a little, but don’t let it brown. You want it golden and bubbly, not nutty and dark.
Add your minced garlic. And here’s where most people mess up: they burn the garlic. You don’t want that. Garlic turns bitter when it burns, and it ruins the whole dish. So keep the heat at medium and stir constantly. You want it fragrant and lightly golden, about 30 to 45 seconds. The second it starts to brown too much, you’ve gone too far.
If you’re using red pepper flakes, add them now. They’ll infuse the butter with a subtle heat that’s just lovely. I usually add about half a teaspoon, but adjust based on your spice tolerance.
Now, sprinkle in the flour. This is the thickening agent. Whisk it into the butter and garlic until it forms a paste. That’s called a roux, and it’s the foundation of your sauce. Cook it for about a minute, stirring constantly. It should smell a little nutty, but not burnt.
Combining for Creaminess
Slowly pour in the heavy cream or milk, whisking constantly. Don’t dump it all in at once, or you’ll get lumps. Add it in a steady stream while whisking, and watch the magic happen. The mixture will start to thicken almost immediately.
Once all the cream is in, let it simmer gently for a minute or two. It should coat the back of a spoon. If it’s too thick, add a splash of that reserved pasta water. If it’s too thin, let it simmer a little longer. You’re looking for a consistency that’s like… well, like a creamy sauce. Not soup, not paste.
Stir in the grated Parmesan cheese. It should melt right in, making the sauce even richer and silkier. Taste it and adjust the salt and pepper. Remember, the Parmesan is salty, so don’t overdo it.
Finally, add the drained pasta to the sauce. Toss everything together until every strand is coated. If the sauce seems too thick, add a little more pasta water. If it’s too thin, let it cook for another minute. You want it glossy and clinging to the pasta.
Expert Tips & Variations
Tips for Enhancing Flavor
Here’s something I learned from making this dish a hundred times: the quality of your butter matters. I know I said that already, but it’s worth repeating. Good butter makes a noticeable difference. Also, don’t skimp on the garlic. I usually use 4 to 5 cloves, but if you’re a garlic lover like me, go ahead and use 6. It’s not going to hurt anyone.
Another tip: let the sauce rest for a minute before serving. It gives the flavors a chance to meld together. And always, always taste before you serve. Adjust the salt, pepper, and cheese to your liking. You’re the one eating it, after all.
Oh, and one more thing. My pasta looks especially yellow in these pictures because the butter over here is all dyed super yellow! Very annoying. Yours will probably not be this yellow, fyi. Don’t worry about the color. Focus on the flavor.
Pasta Variations & Add-ons
This dish is incredibly versatile. I’ve made it with chicken, shrimp, even ground beef. Let me give you some ideas:
- Chicken: Season chicken breasts with salt, pepper, and Italian seasoning. Pan-sear them until golden and cooked through, then slice and serve on top of the pasta.
- Shrimp: Sauté shrimp in butter with a little garlic until pink. Toss them into the sauce at the end.
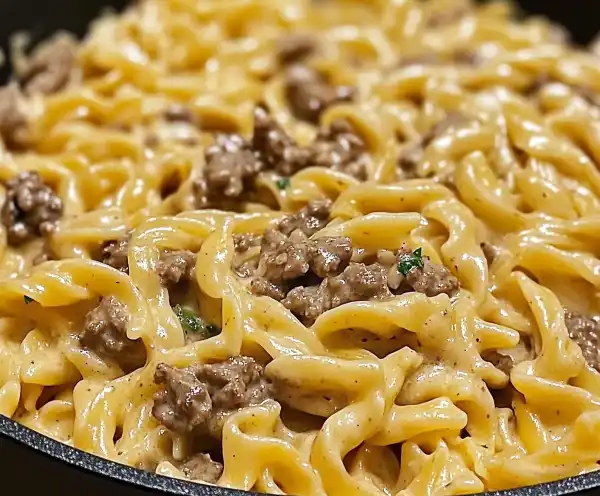
- Ground Beef: Brown the beef first, then proceed with the recipe. It adds a heartiness that’s perfect for colder nights.
- Spinach: Stir in a handful of fresh spinach at the end. It wilts in seconds and adds a pop of green.
- Mushrooms: Sauté sliced mushrooms with the garlic. They soak up all that buttery goodness.
You can also swap the pasta shape. I’ve used spaghetti, fettuccine, linguine, even penne. They all work. Just adjust the cooking time based on the package.
Common Mistakes & Fixes
Mistake: The sauce is too thick, almost like a paste.
Solution: You probably used too much flour or not enough liquid. Add a splash of pasta water or milk and whisk vigorously. It should loosen right up.
Mistake: The sauce is too thin and watery.
Solution: Let it simmer a few more minutes to reduce. Or mix a teaspoon of flour with a tablespoon of water to make a slurry, then whisk it in.
Mistake: The sauce curdled or separated.
Solution: This usually happens if the heat was too high or you used low-fat milk. Next time, use heavy cream or whole milk and keep the heat at medium. If it already happened, try whisking in a splash of cold cream to bring it back together.
Mistake: The garlic tastes bitter.
Solution: You burned the garlic. Keep the heat at medium and stir constantly. Garlic should be fragrant and lightly golden, not dark brown.
Mistake: The sauce doesn’t stick to the pasta.
Solution: You probably rinsed the pasta after draining. Don’t do that! The starch helps the sauce cling. Also, make sure you toss the pasta in the sauce while it’s still hot.
Serving, Storage & FAQ
Best Serving Suggestions
This Creamy Garlic Butter Pasta is amazing on its own, but it’s even better with some sides. A simple green salad with a lemon vinaigrette cuts through the richness perfectly. And garlic bread? Absolutely. You can’t go wrong with more garlic.
If you’re serving it as a main dish, I’d pair it with some crusty bread and maybe some roasted vegetables. Broccoli or asparagus work great. The slight bitterness of the greens balances the creamy sauce.
For a complete meal, top it with grilled chicken or shrimp. Or keep it vegetarian and add some sautéed mushrooms and spinach. Honestly, the possibilities are endless.
Storage & Reheating Tips
Leftovers? Lucky you. Store them in an airtight container in the fridge for up to 3 days. I prefer glass containers because they don’t absorb odors. Plastic works too, but glass is better.
Here’s the thing: the sauce will thicken as it cools. That’s normal. When you reheat it, add a splash of milk or pasta water to loosen it up. Reheat it gently on the stove over low heat, stirring frequently. Don’t microwave it on high, or the sauce might separate. Low and slow is the way to go.
Can you freeze it? I wouldn’t recommend it. Creamy sauces don’t freeze well. The texture gets grainy and weird. Just eat it within a few days and you’ll be fine.
Frequently Asked Questions
Final Thoughts
When you make this Creamy Garlic Butter Pasta, you’ll see what I mean. It’s one of those rare recipes that feels special but doesn’t require a ton of effort. The garlic butter sauce is rich and velvety, the pasta is perfectly tender, and the whole thing comes together in less time than it takes to order takeout.
I really hope you give this a try. Whether it’s a busy Tuesday night or a lazy Sunday dinner, this dish delivers. And if you add some chicken or shrimp on top? Forget about it. Your family will thank you, and you’ll feel like a rockstar in the kitchen.
If you make it, I’d love to hear how it goes. Leave a comment below or tag me in your photos. And for more inspiration, check out my Pinterest boards. I’m always pinning new ideas.
Happy cooking, friends!
Source: Nutritional Information


